
Properly executed pour-over coffee is one of the few brewing methods where the brewer – not the machine – controls every extraction variable in real time. That’s both its appeal and its reputation for being fussy. The Hario V60, the Chemex, the Kalita Wave: they all reward the same underlying skill set.
The good news is that skill set isn’t complicated. It’s just sequential. Get the variables right before water touches coffee, execute the bloom correctly, and the pour architecture and drawdown almost manage themselves. What follows is the complete sequence – with the “why” behind each step so you can adapt it, not just follow it.
While manual extraction demands your full attention, understanding batch brew coffee reveals how modern specialty cafés are scaling this exact same precision for larger crowds.
Key Takeaways on How to Make Pour Over Coffee
- A burr grinder and a 0.1g scale matter more than the specific dripper you choose – nail those two first.
- Set your ratio at 1:16 (20g coffee to 320g water) and treat it as a calibration baseline, not a fixed rule.
- The bloom prevents channeling by releasing CO2; adjust its duration based on roast date, not just a fixed 30-second count.
- Grind finer for sour, fast brews; grind coarser for bitter, stalled ones – always change one variable before tasting again.
- A flat spent coffee bed after drawdown is the clearest visual confirmation that extraction was even.
- Water chemistry is an active extraction variable: 100–150 ppm TDS with calcium and magnesium produces measurably better results than distilled or very hard water.
Prerequisites: The Minimal Kit and Baseline Expectations
Pour-over is controllable and genuinely accessible. You don’t need a $300 grinder or a smart kettle with a digital thermometer to pull a great cup. What you do need is a short list of tools that each serve a specific, non-negotiable function – and clarity on which ones you can substitute without hurting the result.
Essential Brewing Hardware Inventory
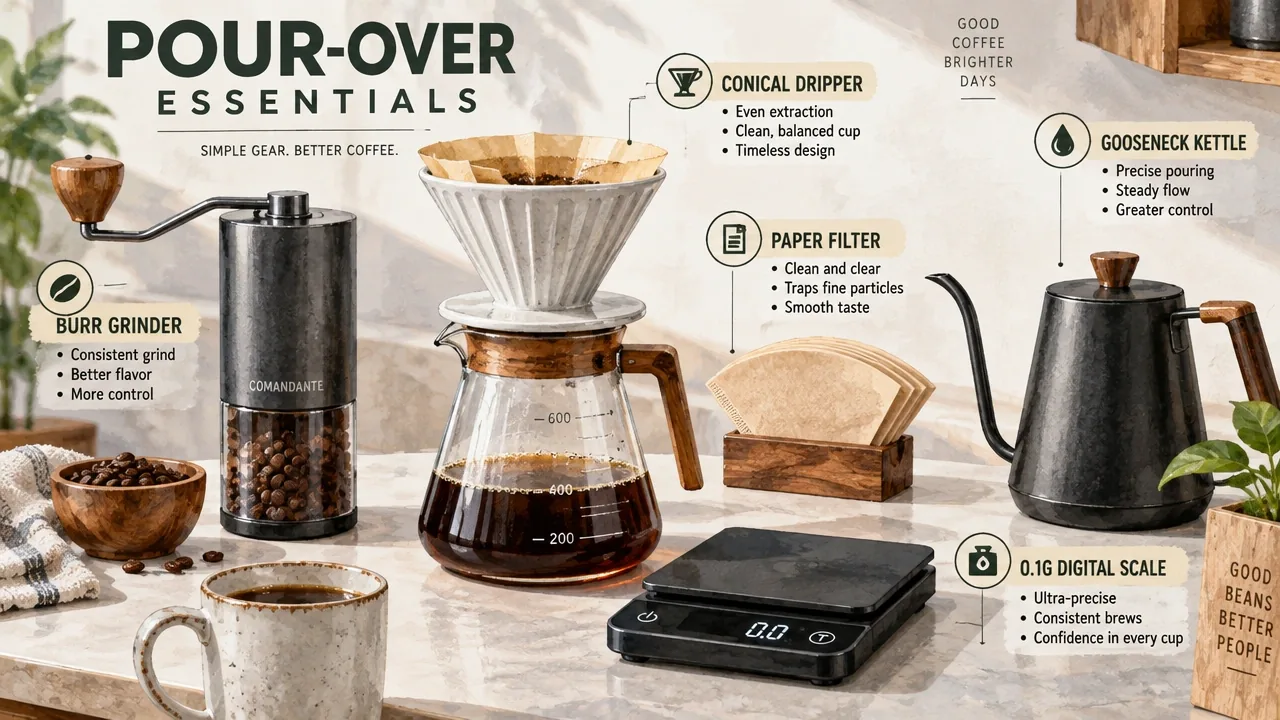
The core kit breaks down into six items: a conical or flat-bottomed dripper (Hario V60, Kalita Wave, Chemex, or similar), a paper or metal filter matched to your brewer, a burr grinder, a gooseneck kettle, a 0.1g digital scale, and a timer.
Before worrying about the dripper itself, mastering proper coffee bean grinding and securing a reliable scale matter more than the specific gear you choose.
Each one earns its place. The dripper shapes flow dynamics. The filter controls body and clarity. The burr grinder produces a consistent particle size – blade grinders chop randomly, and random particle sizes mean random extraction. The gooseneck kettle gives you pour-rate control that a standard kettle spout simply can’t match. The scale removes guesswork from your ratio. The timer tells you whether your grind is in the right ballpark before you taste a drop.
If the gooseneck kettle is a cost barrier right now, a regular short-spout kettle half-filled with water, or even a gooseneck pouring jug or milk-frothing pitcher, can stand in. You’ll sacrifice some precision on flow rate and pour placement, but cup quality can remain genuinely high. The workaround costs you attention, not results.
If the grinder is the barrier, pre-ground coffee from a local roaster beats freshly ground coffee from a poor blade grinder every time. Ask specifically for a pour-over grind, buy in small quantities to keep it fresh, and upgrade the grinder when the budget allows. A good burr grinder is the single best long-term upgrade for your cup quality – but it doesn’t have to happen on day one.
Here’s a look at what a complete pour-over hardware setup looks like in practice:
Beginner Accessibility and Filter Media Dynamics
Pour-over is not inherently difficult. The learning curve is about building a repeatable routine, not mastering a complex technique. Regular coffee works fine as long as it’s reasonably fresh and ground to a medium-fine consistency – the texture of table salt is the standard reference point. No machine is required. And while brewing directly through a filter held over a cup is technically possible, a proper dripper improves flow consistency enough that it’s worth using from the start.
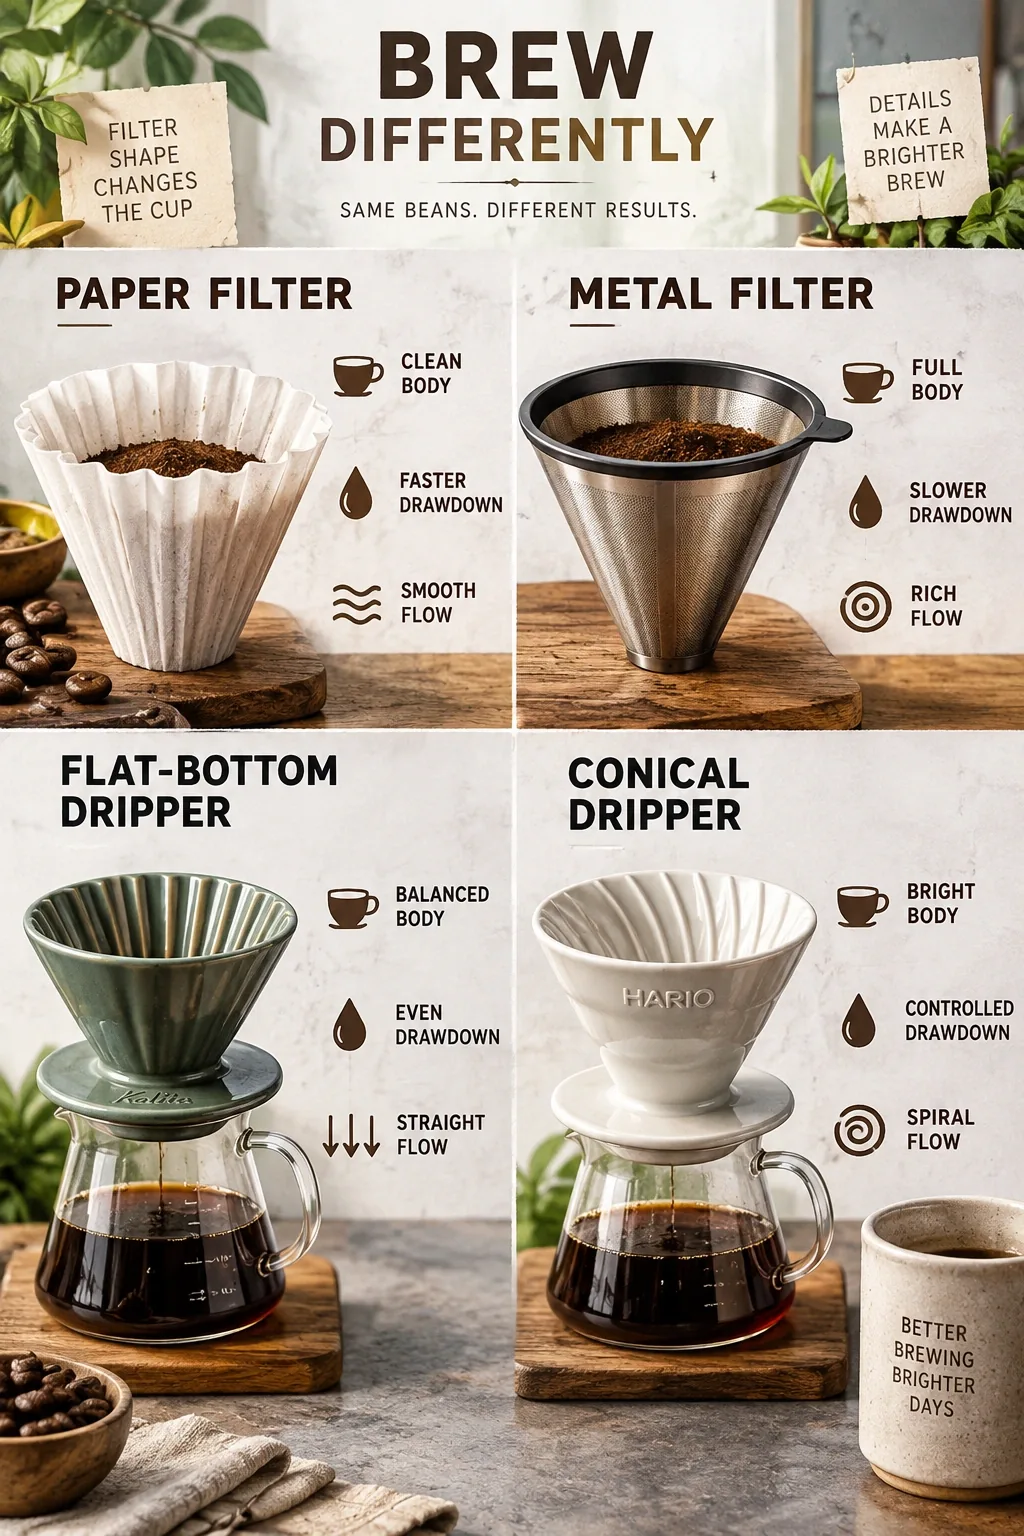
The choice between paper and metal filters changes the cup in two meaningful ways: body and drawdown speed. Paper filters trap oils and fine particles, producing a cleaner, brighter cup with faster drawdown. Metal filters let those oils and micro-fines pass through, giving you a fuller-bodied, slightly heavier cup – and a slower, more variable drawdown that requires closer monitoring.
Flat-bottomed drippers (like the Kalita Wave) create a more even water distribution across the coffee bed because the geometry keeps water in contact with grounds for a more uniform time. Conical drippers (like the V60) funnel water toward a single exit point, making flow rate more sensitive to grind size and pour technique – which gives you more control, but also more to get wrong.
This infographic maps out how filter type and dripper geometry interact with drawdown and body:
Step 1: Dial In the Core Variables Before Water Touches Coffee
Before a single gram of water meets your grounds, three numbers need to be set: your coffee-to-water ratio, your grind size, and your water temperature. Get these right and the rest of the brew is mostly execution. Get them wrong and no amount of careful pouring will save the cup.
Recipe Ratios and Grind Targets
The standard starting ratio for pour-over is 1:15 to 1:17, with 1:16 as a reliable baseline – meaning 20 grams of coffee to 320 grams of water. This range isn’t arbitrary; it sits in the extraction window where most coffees hit their sweetness and balance without tipping into sourness or bitterness.
Grind size should land at medium-fine: roughly the texture of table salt, coarser than espresso but finer than drip. From there, use your drawdown time and taste as calibration tools. If the brew finishes fast and tastes sour or thin, grind finer. If it stalls and tastes bitter or astringent, grind coarser. One adjustment at a time.
One thing that doesn’t scale linearly: your recipe. If you move from 20g to 30g of coffee, you can’t simply multiply everything and expect the same result. Larger doses require a slightly coarser grind because the deeper coffee bed creates more resistance and raises the water level above the grounds, changing how heat and flow behave. Scaling up without adjusting grind risks a stalled drawdown or over-extraction at the bottom of the bed while the top stays under-extracted. When you change dose, recalibrate grind before you recalibrate anything else.
From Scott Rao’s blog, the coffee author and consultant behind The Professional Barista’s Handbook, a minimum dose of 20–22 grams is recommended for V60 brews – smaller doses push you toward finer grinds, which produce more fines and more bitterness, while also lowering the average extraction temperature across the brew.
The minimum-dose guidance isn’t about being precious with coffee. It’s about physics: a shallow bed extracts unevenly, and finer grinds to compensate introduce bitterness before they fix the extraction deficit.
Temperature and Mineral Composition
Water temperature should sit between 195–205°F (90–96°C), with 93°C (about 200°F) as the most dependable baseline for a wide range of roast levels. Boiling water – 100°C – extracts too aggressively and can scorch lighter roasts; water below 90°C under-extracts reliably. If you don’t have a temperature-controlled kettle, bring water to a boil and let it rest off heat for 30–45 seconds.
Water chemistry matters more than most home brewers realize. The target is a total dissolved solids (TDS) of 100–150 ppm, with a mineral profile that includes both calcium and magnesium. These aren’t decorative – they actively participate in extraction chemistry.
A study published in the Journal of Agricultural and Food Chemistry used computational modeling to quantify how dissolved cations bind to coffee compounds. Magnesium ions showed the highest binding energy and extraction efficiency across key coffee acids, caffeine, and flavor compounds, while calcium bound less strongly and sodium barely registered. The same research confirmed that bicarbonate interacts with chlorogenic acids and neutralizes harsh acidity – which is why alkalinity functions as a buffer rather than a contaminant.
What this means practically: pure distilled water tastes flat in coffee because it lacks the minerals that pull soluble compounds into solution. Excessively hard water over-extracts certain compounds and can leave a chalky mouthfeel. Bottled water labeled “spring” or “mineral” with a TDS in the 100–150 ppm range is a straightforward solution if your tap water is at either extreme.
Step 2: Prep the Brewer, Rinse the Filter, and Load Coffee
Setup is quick, but skipping any part of it costs you cup quality in ways that are hard to trace back to the source.
Start by placing your paper filter in the dripper and rinsing it thoroughly with hot water. This serves two purposes: it removes the papery, slightly cardboard taste that unrinsed filters impart to the brew, and it preheats the dripper and server so your brew doesn’t lose temperature on contact with cold ceramic or glass. Discard the rinse water completely before you add coffee.
Add your ground coffee to the rinsed filter, then tare the scale to zero. Give the dripper a gentle shake or tap to level the coffee bed – an even, flat surface lets water distribute uniformly from the first pour. If grounds are piled higher on one side, water will favor that path and create uneven extraction before the bloom even begins.
Check that the filter is fully seated against the dripper walls with no lifted edges, and that no dry grounds are clinging to the upper walls of the filter above the coffee bed. Grounds stuck to dry paper don’t extract – they just sit there while the water below them over-extracts. Place the dripper on your server or cup, confirm everything is stable on the scale, and you’re ready for the bloom.
Step 3: Execute the Bloom with Roast-Date-Aware Timing
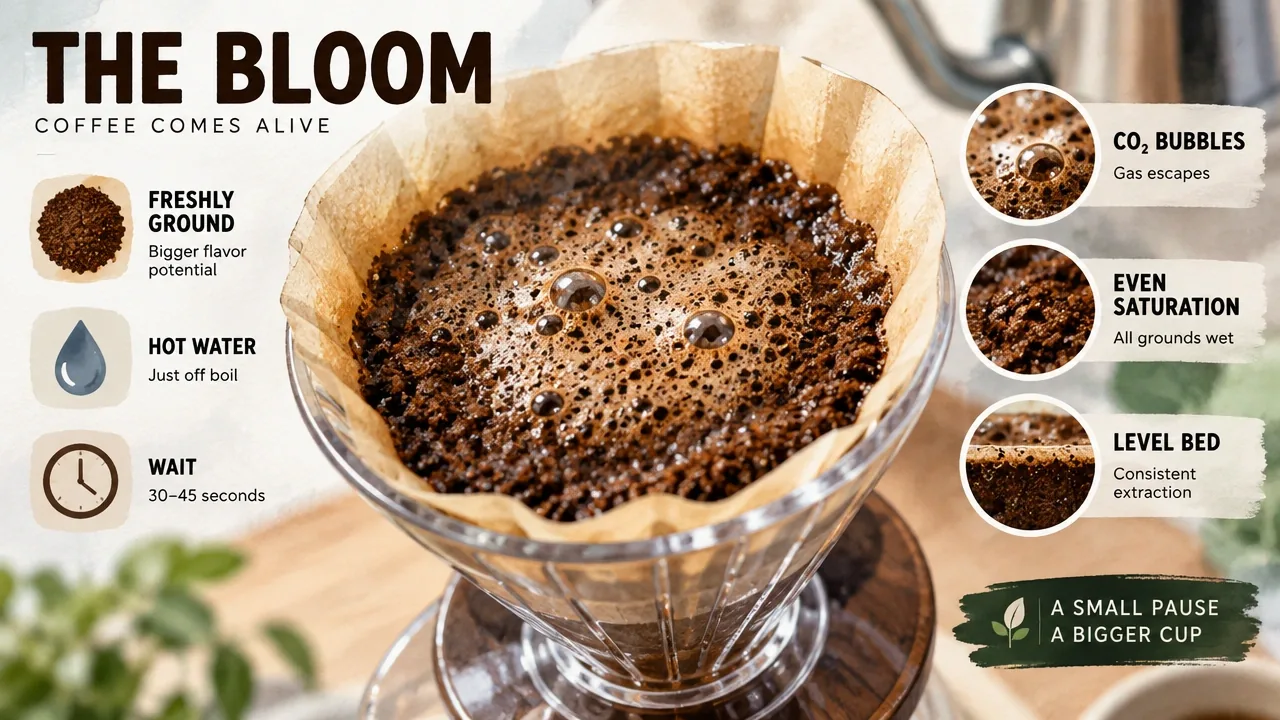
The bloom is the first pour, and it does something specific: it saturates the coffee grounds and allows CO2 trapped inside them to escape before the main extraction begins. This matters because CO2 is hydrophobic – it actively repels water. If you skip the bloom and pour straight through, CO2 escaping mid-brew creates uneven flow paths, dry pockets, and the kind of channeling that produces a sour, inconsistent cup.
Pour 2x to 3x the coffee weight in water – for 20g of coffee, that’s 40–60g of water – evenly over the grounds, starting from the center and spiraling outward. Then stop and wait.
The standard bloom window is 30–45 seconds, but roast date changes the calculus. Coffee roasted 3–14 days ago is in its prime degassing window and typically needs only 30 seconds. Coffee roasted fewer than 3 days ago is still releasing CO2 aggressively – extend the bloom to 40 seconds or watch for bubbles to subside before proceeding. Coffee roasted more than 2 weeks ago has already off-gassed significantly; the bloom is still worth doing for saturation, but the CO2 drama will be minimal.
From Scott Rao’s research on slurry dynamics, prewetting with a 3:1 ratio of water to grounds is the target for full saturation. Coffee grounds can absorb up to twice their weight in water, but some liquid escapes the bed during the bloom – which means a 2:1 ratio reliably under-saturates. The 3:1 ratio accounts for that loss and ensures the entire bed is moistened before percolation begins pulling solubles out.
During the bloom, watch the surface. Active bubbling confirms fresh coffee with CO2 to release. If you see dry pockets – areas where grounds didn’t fully wet – use a gentle swirl of the dripper or a quick stir with a spoon to push water into those gaps. A uniformly wet, slightly domed slurry surface is what you’re after before the main pour begins.
Step 4: Choose and Execute Pour Architecture
The bloom is done. Now the question is how to deliver the remaining water – and the answer shapes extraction yield, flavor balance, and how much control you have over the final cup.
Pattern Selection and Brew Schedules
The two broad categories are pulse pouring and continuous single-pour, and each creates a different extraction environment.
Pulse pouring – adding water in discrete intervals – maintains a higher water-to-coffee contact ratio throughout the brew, keeps the slurry agitated, and gives you checkpoints to observe drawdown behavior. The most structured version of this is the 4:6 method, developed by World Brewers Cup champion Tetsu Kasuya. It divides the total water into five pours: the first two pours (40% of total water) control sweetness and acidity by adjusting their relative sizes; the last three pours (60% of total water) control strength by varying the number of pours and rest intervals. It’s a system built for intentional flavor manipulation, not just consistency.
Osmotic flow is a gentler variation where water is added slowly and continuously at a rate that matches drawdown, keeping the water level nearly static above the bed. It minimizes turbulence and agitation, which reduces fines migration and produces a cleaner, more delicate cup – at the cost of some extraction efficiency.
For most home brewers starting out, a practical middle ground works well: two equal pours after the bloom for simplicity, or a pulse of roughly 50g every 20 seconds for a more structured 4:6-style approach. A single slow circular pour suits lighter roasts where you want gentler extraction; pouring a pencil-thin stream onto a flat bed gives you precise visual control over saturation.
Scott Rao cautions against breaking a V60 brew into more than two main pours after the bloom – each additional pour lowers average extraction temperature and can compromise extraction uniformity. More pours means more heat loss between additions, which is a real trade-off worth understanding before you commit to a highly segmented schedule.
Stream Control and Bed Saturation
Pour in concentric spirals starting from the center and moving outward to within about a centimeter of the filter paper edge – never directly onto the paper itself. Water hitting the bare filter bypasses the coffee bed entirely, drops straight through, and dilutes your brew without extracting anything.
The gooseneck kettle is the right tool here because it lets you control both flow rate and pour placement simultaneously. Maintain a steady, consistent stream – not a dribble, not a flood. The goal is to keep the water level reasonably stable above the coffee bed rather than letting it surge and crash. Surges create turbulence that drives fines downward; crashes lower slurry temperature and stall extraction momentum.
This video demonstrates pour technique and stream control in a way that’s worth watching before your first brew:
Step 5: Manage Agitation, Slurry Temperature, and Fines Migration
Once water is in the dripper, three things are happening simultaneously: the slurry is extracting, it’s cooling, and fine coffee particles are migrating downward toward the filter tip. Managing all three is what separates a consistent brew from a lucky one.
Agitation – swirling the dripper or stirring the slurry – serves a specific purpose: it redistributes water that has pooled unevenly and eliminates dry pockets where grounds haven’t been wetted. The Rao spin, a gentle swirl of the dripper after the bloom and again near the end of the brew, uses centrifugal force to flatten the coffee bed and push any dry grounds on the walls back into the slurry. The goal is a flat, uniform spent coffee bed at the end of the brew – which signals even extraction across the entire dose.
Slurry temperature is affected by pour height and flow velocity. Pouring from too high increases the distance water travels through air, which cools it and also increases turbulence on impact. Keeping the kettle spout close to the slurry surface – 5 to 10 centimeters – maintains temperature and minimizes the kinetic energy that drives fines downward.
Fines migration is the mechanism behind most stalled drawdowns. Fine coffee particles, produced by any grinder but more abundant with lower-quality ones, are small enough to travel through the slurry with water. They accumulate at the filter paper tip – the lowest point of a conical dripper – and progressively choke the exit. The result is a drawdown that starts normally and then slows dramatically in the final third of the brew.
Scott Rao’s investigation into slurry spinning quantified this directly: a seven-second spin produced a drawdown of 5:18, while a two-second spin produced a 4:28 drawdown – a 50-second difference from agitation alone. The longer spin drove more fines into the filter tip, choking flow. The two-second spin produced a brighter, more enjoyable cup once grind size was adjusted to compensate.
The practical takeaway: swirl briefly and deliberately, not enthusiastically. If your drawdown is consistently stalling, the first variable to check is agitation intensity before touching grind size. If reducing the spin doesn’t solve it, then grind slightly coarser to produce fewer fines in the first place.
Step 6: Read Drawdown and the Spent Coffee Bed
The brew is done when the water drains through the coffee bed and the dripper stops dripping. What you see in those final moments – and what the spent bed looks like afterward – tells you almost everything about whether the extraction went right.
Total brew time should land between 2:30 and 3:30 minutes for most pour-over recipes in the 15–25g dose range. Use this as a diagnostic window, not a strict target. A brew that finishes in 2:00 minutes drained too fast; one that’s still going at 4:30 stalled somewhere. Both are signals to adjust – but the fix depends on what the bed and the cup tell you together.
The spent coffee bed is the clearest visual indicator of extraction evenness. A flat, level bed with no craters, dry patches, or obvious channels means water distributed evenly and extracted uniformly. A cratered center suggests water tunneled through one path and bypassed surrounding grounds. A muddy, uneven surface with grounds piled against the filter walls points to insufficient agitation during the brew or a filter that wasn’t fully seated.
Channeling signs are worth learning to read in real time, not just after the fact. If you see water racing down one side of the filter while the other side barely moves, that’s a channel forming. If the bed surface shows a hole or a crack early in the brew, water is finding a shortcut and the extraction will be uneven. A gentle swirl or a careful stir can sometimes rescue a channeling brew mid-pour; if the channel is deep, the damage to extraction uniformity is already done.
Brewer-specific behavior is worth knowing: metal filter drawdowns can range from 90 seconds to 3 minutes depending on the filter’s porosity and the grind, so the time window alone is less useful without tasting. Kalita stainless filters can clog with finer grinds more aggressively than their flat-bottomed design suggests. Chemex is vulnerable to a specific set of problems – heat loss through its glass body, airlock between the folded filter and the glass neck, and uneven filter seating that redirects flow.
When the brew is on track, the indicators are simple: flat bed, drawdown completing within the expected window, and a cup that tastes balanced and complete without needing sugar or cream to cover a defect.
Troubleshooting: Diagnose and Rescue Sour, Bitter, Fast, and Stalled Brews
Every pour-over failure has a root cause, and most of them announce themselves clearly through a combination of timing, visual cues, and taste. The diagnostic logic is straightforward once you know what each symptom points to.
Under-Extraction Correction
A fast drawdown paired with a sour, weak, or thin cup is the signature of under-extraction. Water moved through the coffee bed too quickly to pull the compounds that create sweetness and body, leaving behind the sharp, acidic compounds that extract first.
The primary fix is to grind finer. A finer grind creates more surface area and more resistance, slowing drawdown and giving water more time to extract. Before adjusting grind, also check for channeling – a fast drawdown can be caused by water finding a shortcut through the bed rather than a genuinely coarse grind. If the spent bed shows obvious channels or dry patches, address those first with better saturation during the bloom and more deliberate pour placement. If the bed looks even but the draw is still fast, grind finer. Increasing water temperature slightly – moving from 90°C to 93°C – can also help with under-extraction on lighter roasts without changing grind.
William Ristenpart, a professor of chemical engineering at UC Davis who studies coffee brewing, makes a clarifying point worth keeping in mind: what ultimately matters is final brew strength and extraction yield, not the specific route taken to get there. Two brews with identical final metrics taste the same regardless of the temperature path used. This means temperature is a lever for reaching your extraction target, not the target itself.
Over-Extraction Correction
A stalled or very slow drawdown paired with a bitter, dry, or astringent cup points to over-extraction. Water spent too long in contact with the coffee bed and pulled harsh, late-extracting compounds – primarily certain phenolic compounds and degraded chlorogenic acids – that overwhelm the sweeter notes extracted earlier.
The primary fix is to grind coarser. A coarser grind reduces resistance, speeds drawdown, and leaves the late-extracting bitter compounds behind. Alongside grind adjustment, reduce agitation: less swirling and lower pour turbulence means fewer fines driven into the filter tip, which reduces slurry choking. If fines migration is the suspected culprit – particularly if the drawdown started at a normal pace and then stalled dramatically near the end – a coarser grind is the most direct solution.
Marco Wellinger, a researcher at ZHAW in Switzerland, points out a factor that compounds over-extraction risk depending on brew method: the beverage ratio varies by up to a factor of 10 across extraction methods – from ristretto at 1.5 to filter coffee at 15. For pour-over, which sits at the dilute end of that spectrum, alkalinity in the water plays a significant buffering role. If your bitter cup persists after grind adjustment, your water’s alkalinity may be amplifying harshness rather than neutralizing it.
Iterative Adjustment Protocol
The correction matrix for pour-over is built on two axes: grind size and channeling versus slurry choking. Too coarse with channeling produces under-extraction even if drawdown time looks acceptable. Too fine with slurry choking produces over-extraction even if you started with a correct recipe.
The rule is to change one variable at a time and taste again. Changing grind and temperature and pour pattern simultaneously makes it impossible to know which adjustment fixed the problem – or which one made it worse. Start with grind, because it has the largest and most direct impact on extraction. If grind adjustment doesn’t move the cup in the right direction, check channeling behavior next. If the cup is still off after those two corrections, then adjust temperature – up for under-extraction, slightly down for over-extraction.
If a standard recipe continues to fail despite logical adjustments, two resets worth trying: stop grinding finer and instead focus on eliminating channeling through better pour placement, and let the water cool for an extra 30 seconds before pouring to reduce extraction aggression. These two changes together can transform a frustrating brew into a clear diagnostic starting point for the next iteration.
Affiliate Disclosure
This post contains affiliate links, meaning I may earn a commission if you make a purchase through these links, at no additional cost to you. As an Amazon Associate, I earn from qualifying purchases. I only recommend products I genuinely believe will add value.

1Zpresso J-Ultra Manual Coffee Grinder Iron Gray, Conical Burr, Foldable Handle, Magnet Catch Cup Capacity 40g, Numerical Adjustable Finely Setting, Faster Grinding Efficiency Ideal for Espresso
- [ Precision Coated Burr for Sweeter, Finer Espresso ] - Specially crafted for espresso, this manual coffee gri…
- [ External Grind Adjustment ] - Each click shifts by only 8 microns, giving you exceptional control from fine …
- [ Fast Workflow with Magnetic Catch Cup ] - Enhance your brewing routine with a catch cup that snaps securely …
- [ Compact Foldable Handle ] - Just push, twist, and it tucks away in seconds to prevent tipping. Perfect for t…
- [ Easy to Clean for Better Flavor ] - Tool-free dismantling makes cleaning simple and fast, helping you mainta…

Hario V60 Drip Coffee Decanter, 700ml, Black
- Hario's V60 dripper assists circulation and allows for maximum coffee expansion during brewing
- The removable silicone band is cool to touch and easy to wash
- Made of the best heat resistant borosilicate glass from Hario
- Professional Experience
- Designed and manufactured in Japan

Fellow Corvo EKG Pro Small Electric Tea Kettle for Coffee, 0.9 Liter
- THE ULTIMATE ALL-PURPOSE KETTLE: Speed, precision, and versatility in one. To-the-degree temp control and a hi…
- TAILORED TO YOUR ROUTINE: The full-color display offers an intuitive interface for seamless control. Schedule …
- EFFORTLESS PRECISION: With to-the-degree temperature control and a quick heat time, Corvo EKG Pro heats water …
- POUR WITH EASE: A wide spout delivers a quick, controlled pour—perfect for tea, coffee, or anything that calls…
- BREW WITH CONFIDENCE: Guide Mode lets you select a preset temperature for different coffee styles and tea, so …

Hario V60 Paper Coffee Filter, Size 01, White, 100ct Box
- Hario V60 cone shaped disposable paper filters for pour-over brewers
- Each filter is for single time use
- Contains 100 disposable white unstabbed size 01 paper filters
- Capacity of Size 01 is 1-2 cups
- Designed in Japan to fit the cone shaped Size 01 dripper

Greater Goods Coffee Scale with Timer, 0.1g Precision for Espresso & Matcha
- Barista-Level Precision: A 0.1g high-precision sensor with a rapid refresh rate responds instantly to changes …
- Integrated Brew Timer: A built-in count-up and count-down timer tracks bloom, extraction, and espresso shots. …
- Durable Waterproof Silicone Cover: The heat-resistant, dishwasher-safe silicone cover helps protect the coffee…
- Versatile Measurement Options: Quick-tare and 6 unit options make it easy to weigh coffee beans, espresso shot…
- Intuitive Design: A bright dual-color LCD display clearly separates weight and timer readings, while simple co…
Frequently Asked Questions About How to Make Pour Over Coffee
Can I use regular coffee for pour over?
Yes, as long as it’s reasonably fresh and ground to medium-fine. Pre-ground from a local roaster works well if you ask for a pour-over grind and use it within a week or two of opening.
Is pour-over coffee difficult to make?
It’s not difficult, but it’s sequential – each step sets up the next. Once the routine is repeatable, it takes less active attention than it sounds.
How long should I brew pour-over coffee?
Target 2:30 to 3:30 minutes total for most recipes. Faster than 2:00 means under-extraction; slower than 4:00 usually means the grind is too fine or fines have choked the filter.
Can I do a pour over with just a coffee filter?
Technically yes, but a dripper holds the filter in a stable position and maintains consistent flow geometry. Without one, the filter collapses unevenly and extraction suffers.
Why does my pour-over taste sour even when I follow the recipe exactly?
Sourness almost always means under-extraction – grind finer first. If the bed showed dry patches or channels during the brew, fix saturation before touching grind size.
How do I know if my water is ruining my coffee?
If your cup tastes flat or chalky despite a correct recipe and grind, water chemistry is likely the culprit. Try a bottled spring water with a TDS around 100–150 ppm and compare directly.
Does the pour pattern actually change the flavor, or is it just barista theater?
It changes the flavor through real mechanisms: agitation level, slurry temperature stability, and fines migration. A continuous slow pour extracts more gently than aggressive pulse pouring on the same grind setting.
What’s the single most common mistake beginners make?
Skipping the bloom or cutting it short. Uneven CO2 release during the main pour creates channeling that no amount of careful pouring afterward can correct.
References
- Some Observations on Hand Pours | scottrao.com
- Just Published: Brewing Temperature and the Sensory Profile of Brewed Coffee | sca.coffee
- Water and Coffee Acidity: How to Adapt Your Water for Different Extraction Methods | sca.coffee
- V60 Video | scottrao.com
- Why Spin the Slurry | scottrao.com
- The Role of Dissolved Cations in Coffee Extraction | doi.org