

What a Brown Sugar Oatmilk Cortado Actually Is
Preparing a brown sugar oatmilk cortado starts with understanding what you’re actually building – because this drink sits at an interesting crossroads between Spanish tradition and third-wave specialty coffee. A traditional cortado is a Spanish and Latin American drink built on espresso “cut” with a small amount of steamed milk, typically in a 1:1 ratio, served in a 4–5 oz glass. The name itself comes from the Spanish verb cortar – to cut. The milk isn’t there to dominate; it’s there to soften the espresso’s edge.
The brown sugar oatmilk version is a deliberate modern adaptation, not a strict interpretation. Brown sugar syrup replaces the milk’s natural sweetness, barista-blend oat milk takes the place of dairy, and the serving size expands – the Starbucks-inspired version runs about 8 oz, while a ratio-purist build stays closer to 5 oz. The character shifts from austere and coffee-forward to warm, lightly sweet, and creamy.
The core structure is straightforward: sweetened espresso built on brown sugar syrup, topped with steamed oat milk, and finished with a dusting of ground cinnamon. The whole thing takes under 10 minutes once your syrup is made.
Before you pull a shot, there’s one piece of context worth knowing. The 1:1 cortado ratio you’ve probably heard cited as gospel is actually a third-wave American convention, not a Spanish rule. In Spain, the espresso-to-milk ratio varies by region – anywhere from 2:1 to 3:1 coffee-to-milk is common. The stricter ratio was popularized in U.S. specialty shops as a menu differentiator. This recipe works within that broader spectrum of variation. The slightly higher milk ratio here accounts for the fact that oat milk and brown sugar syrup need a bit more volume to achieve the same textural balance that dairy delivers in a classic cortado. You’re adjusting a parameter, not breaking a tradition.
Equipment You’ll Need
Here’s the full inventory before you start:
- Espresso machine: A semi-automatic or manual machine capable of pulling consistent shots. A moka pot or AeroPress (1:5 coffee-to-water ratio by weight, targeting a 2 oz yield) works as an approximation if you don’t have a machine – you won’t get crema, but the coffee intensity will hold up against the syrup and milk.
- Steam wand: Built into your espresso machine. For manual frothing, a French press or handheld frother works with some technique adjustments covered in Step 3.
- Serving glass: A 4–6 oz glass for a purist build; an 8 oz glass for the Starbucks-style version.
- Small saucepan or microwave-safe vessel: For syrup preparation.
- Whisk or spoon: For stirring the syrup.
- Thermometer: Strongly recommended – oat milk scorches within a narrow temperature window.
- Fine-mesh sieve: For cinnamon garnish. More on why this matters in Step 4.
One safety note worth taking seriously: always pre-warm your glass with hot water for 30 seconds before pouring in espresso. Pouring near-boiling liquid into a cold glass creates thermal shock that can crack the glass and will cool your drink faster than you’d like.
Ingredients and Specifications
- Espresso beans: Freshly roasted, medium-dark roast preferred for its balance of sweetness and body.
- Brown sugar: Light brown sugar for a milder caramel note; dark brown sugar for deeper molasses intensity.
- Filtered water: For both the syrup and your machine.
- Barista-blend oat milk: The “barista” designation matters here. Peter, a Plant Milk Sourcing Expert and Barista Consultant, explains that barista-series oat milks contain stabilizers like dipotassium phosphate that prevent the milk from splitting and curdling when it contacts the acids in coffee. A standard grocery-shelf oat milk lacks these stabilizers and will produce inferior foam that breaks down within seconds.
- Ground cinnamon: Optional garnish.
Oat Milk vs. Whole Dairy Milk: What You’re Working With
The nutritional profile of barista oat milk versus whole dairy milk affects both flavor perception and how the milk behaves under steam – and the differences are significant enough to change your technique.
Here’s a head-to-head comparison:
| Nutrient | Barista Oat Milk (150 ml / 5 oz) | Whole Dairy Milk (150 ml / 5 oz) |
|---|---|---|
| Calories | ~80–100 kcal | ~150 kcal |
| Fat | ~4–6 g | ~8 g |
| Protein | ~1–2 g | ~8 g |
| Sugars | ~6–8 g | ~12 g |
The lower protein content in oat milk is the key variable. Dairy foam gets its structure and heat stability from casein micelles – a protein network that forms a resilient, elastic foam matrix. Oat milk’s foam relies instead on soluble beta-glucan fiber, which builds a weaker, less heat-tolerant structure. That’s why oat milk foam collapses faster and scorches at a lower temperature. The technique in Step 3 is built entirely around managing those physical limits.
How to Make the Brown Sugar Syrup
Well-made brown sugar syrup is the single biggest differentiator between a professional-tasting cortado and one with a gritty, undissolved layer at the bottom of the cup. The root problem is a simple solubility issue: 1.5–2 oz of espresso doesn’t contain enough hot liquid volume to fully dissolve a tablespoon of crystalline brown sugar before the drink cools. Pre-dissolving the sugar into a syrup eliminates that problem entirely.
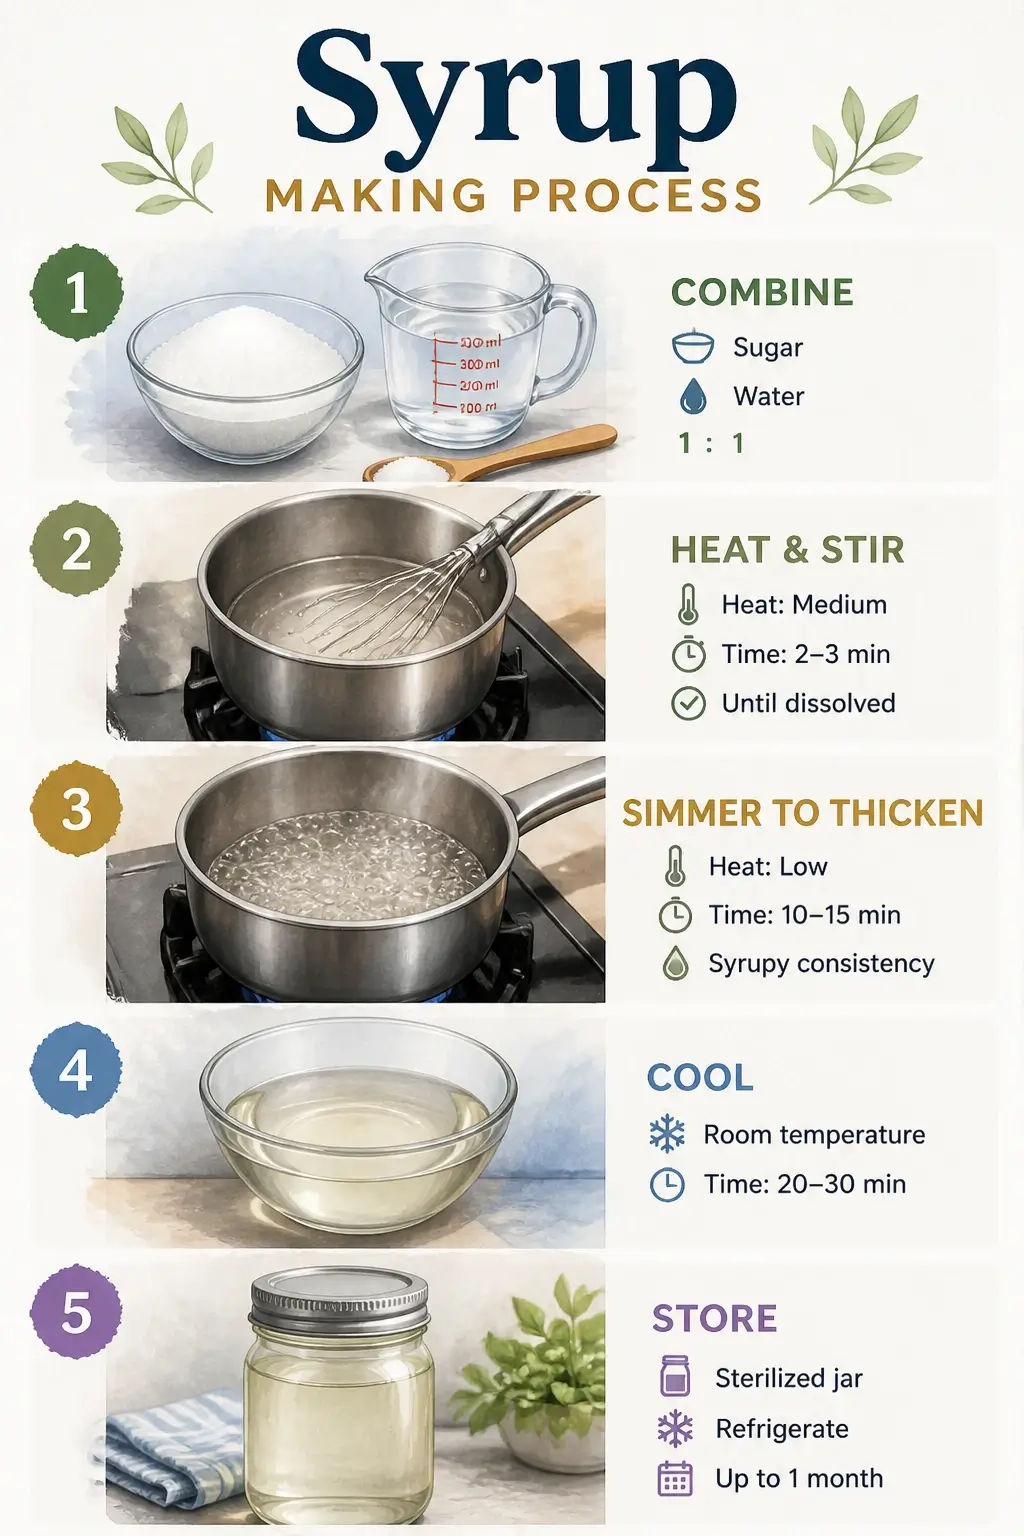
The process is straightforward. Combine equal parts brown sugar and water by volume or weight – 2 tablespoons of each for a single serving, or 1 cup of each for a batch. Add them to a small saucepan over medium heat and stir continuously until the sugar is completely dissolved. Once dissolved, let the mixture simmer for 2–3 minutes to thicken slightly to a classic simple syrup consistency, then remove from heat.
Eric Squires, a Coffee Consultant and Mixologist, recommends applying the same precision to syrup preparation that you’d bring to coffee brewing itself – measuring sugar and water by weight rather than volume for a consistent 1:1 ratio every time. A kitchen scale removes the variability that comes from packed versus loosely measured tablespoons, and it matters more than most home recipes acknowledge.
One technique detail that most recipes skip: pour the syrup into the cup before the espresso, not after. The thermal energy from the freshly pulled shot hitting the syrup accelerates blending and eliminates any residual resistance to dissolution. It’s a small order-of-operations change that produces a noticeably smoother result.
Allow the syrup to cool completely before use. Hot syrup poured into the cup before espresso is fine – that’s the intended sequence. But never add hot syrup to already-steamed oat milk; it will disrupt the foam. For batch preparation, pour the cooled syrup into a clean glass jar, seal it, and refrigerate. A properly stored 1:1 syrup keeps for up to one month refrigerated. Signs it’s time to discard: surface mold, an off-smell, or crystallization. This syrup is not shelf-stable at room temperature – the approximately 30% sugar concentration isn’t high enough to prevent fermentation or mold beyond a week at room temperature.
Here’s a visual overview of the full syrup-making process:
Pulling the Ristretto Shot for Your Cortado
The ristretto shot is the espresso foundation that keeps this drink from tasting like sweet, milky water. Ivan Laranjeira Petrich, an Espresso Extraction Specialist, notes that a low-yield, high-dose extraction like a ristretto produces a more concentrated, full-bodied result – one that stands up against sweetness and milk without retreating into the background. The trade-off is a slight increase in acidity and body over a standard shot, which is exactly what this recipe needs.
A ristretto uses the same dose of ground coffee as a standard espresso shot – 18–20 g – but only half the water volume, yielding about 0.5–0.75 oz (15–22 ml) per shot. The result is more syrupy, more concentrated, and less bitter than a normale.
For the Starbucks-style 8 oz version, pull 3 ristretto shots, giving you roughly 1.5 oz of total espresso. For a smaller, ratio-purist cortado, a standard double shot at 2 oz works as the base.
Your extraction benchmarks:
- Dose: 18–20 g of finely ground coffee
- Yield: 15–22 ml per shot (ristretto)
- Extraction time: 25–30 seconds. If the shot flows in under 20 seconds, your grind is too coarse. Tighten it.
- Visual cue: The shot should drip like warm honey – slow, viscous, consistent.
Taste is your most reliable diagnostic tool. A sour, sharp shot signals under-extraction – grind finer, check your distribution and tamp firmness, and target that 25–30 second window. A bitter, ashy finish means over-extraction – grind slightly coarser or reduce your yield. Dial in the grind before you build the drink; there’s no recovery once the syrup and milk are in the cup.
Two more mechanical details that matter: preheat your brew group and portafilter with a flush of hot water before locking in, and pull the shot with a scale under the cup. Espresso left standing for more than 30 seconds loses crema and begins oxidizing – pour it directly over the syrup, without delay.
If your machine can’t produce a true ristretto, a standard double espresso at 2 oz is a workable substitute. Compensate for the slightly reduced intensity by using a marginally darker roast.
Steaming Oat Milk to Stable Microfoam
Properly steamed barista-blend oat milk produces a silky, glossy microfoam that integrates with the espresso instead of sitting on top of it – but it requires a fundamentally different approach than dairy. The gap between a silky, glossy microfoam and a collapsed, scorched mess is roughly 5°C and about 7 seconds of aeration. That’s not a skill issue; it’s a material science issue.
Dairy foam gets its structure from casein micelles that form a resilient, elastic protein network. Oat milk foam relies on beta-glucans – soluble fiber molecules that build a weaker, less elastic matrix. That matrix collapses 2–3 times faster than dairy foam and breaks down irreversibly above 60°C, producing a scorched “cooked oatmeal” flavor that no amount of syrup will mask. The 55–60°C steaming window isn’t a suggestion; it’s a physical limit.
Here’s the exact protocol:
Step 1 – Prepare your pitcher: Pour cold barista-blend oat milk into a clean, chilled steaming pitcher, filling it no more than one-third full. Cold milk gives you a longer working window before you hit the temperature ceiling.
Step 2 – Purge the wand: Expel any condensed water from the steam wand before submerging it. Water in the steam line dilutes the milk and disrupts foam formation.
Step 3 – Aerate briefly: Submerge the wand tip just below the milk surface and open the steam valve. Aerate for only 3–5 seconds – far shorter than the 8–12 seconds you’d use for whole milk. Listen for a gentle, papery tearing sound. That’s microfoam forming. Stop as soon as you hear it.
Step 4 – Heat to temperature: Submerge the wand deeper and angle it to create a rolling whirlpool. Heat the milk to 55–60°C (131–140°F), monitoring with a thermometer. The moment you hit 60°C, cut the steam.
Step 5 – Tap and swirl: Immediately tap the pitcher firmly on the counter twice to burst any large surface bubbles, then swirl continuously for 10–15 seconds. This incorporates the foam into the milk to create a uniform, paint-like texture. If it looks glossy and moves like wet paint, you’ve nailed it.
Nefeli, a Specialty Barista Trainer and Quality Specialist, confirms that oat milk performs best around 60°C, while soy and almond require an even lower ceiling of around 55°C to prevent curdling and splitting. The temperature target isn’t arbitrary – it’s calibrated to the specific protein and fiber chemistry of each milk type.
If you’re working without a steam wand, heat the oat milk on the stovetop to 55°C, then use a French press plunger pumped 8–10 times to aerate. Tap and swirl immediately after.
One more thing: do not let the steamed milk sit. The beta-glucan network begins breaking down within about 20 seconds of steaming. Pour immediately.
Watch this breakdown of milk steaming fundamentals to see the technique in action before you try it yourself:
For persistent foam collapse even with a barista blend, check your steam wand pressure. A lower-pressure, slightly wetter steam often aerates oat milk more gently, producing finer bubbles than a high-power commercial wand set to full. Try opening the steam valve slightly less than full for a softer rolling action.
Assembling the Cortado: Order, Pour, and Finish
Cortado assembly is where preparation either pays off or falls apart. The sequence matters more than most recipes acknowledge – each component needs to arrive in the cup at the right moment, in the right condition, or the drink loses both flavor integration and visual appeal.
Follow this order precisely:
1. Syrup first. Pour 1 oz (about 1 tablespoon) of your pre-made brown sugar syrup into the pre-warmed glass. The warm glass keeps the syrup fluid and ready to blend.
2. Espresso directly over the syrup. Pour your freshly pulled ristretto (1.5 oz for the 8 oz version; 2 oz standard double for a smaller build) directly over the syrup. The thermal energy from the hot espresso hitting the syrup finishes the integration instantly. Stir once or twice.
3. The oat milk pour. Pour the steamed oat milk gently over the center of the espresso. Tilt the cup slightly and pour from a low height – this promotes soft integration without disrupting the crema layer or splashing the foam. For a traditional cortado texture, pour everything including the foam to create a single unified liquid. For a latte-style presentation, hold back the foam with a spoon and add it as a thin cap at the end.
4. Garnish with cinnamon. This is where most home recipes produce a cosmetically rough result. Sprinkling cinnamon directly from a jar almost always creates clumps that float on the surface, break apart on the first sip, and look unintentional. Luigi Di Ruocco, Vice President of Mr. Espresso, demonstrates in his approach to specialty espresso builds that every element of a finished drink – including the garnish – should integrate cleanly, not sit on top as an afterthought.
Use a fine-mesh tea strainer or spice sieve to dust the cinnamon. The sieve breaks up clumped particles into a uniform, microscopic layer that dissolves on contact with the foam and releases aroma immediately. For a zero-grit alternative, stir the finished drink with a cinnamon stick – it releases volatile oils without any particulate. Or mix a small amount of cinnamon into the hot syrup before adding espresso, infusing the flavor at the base rather than the surface.
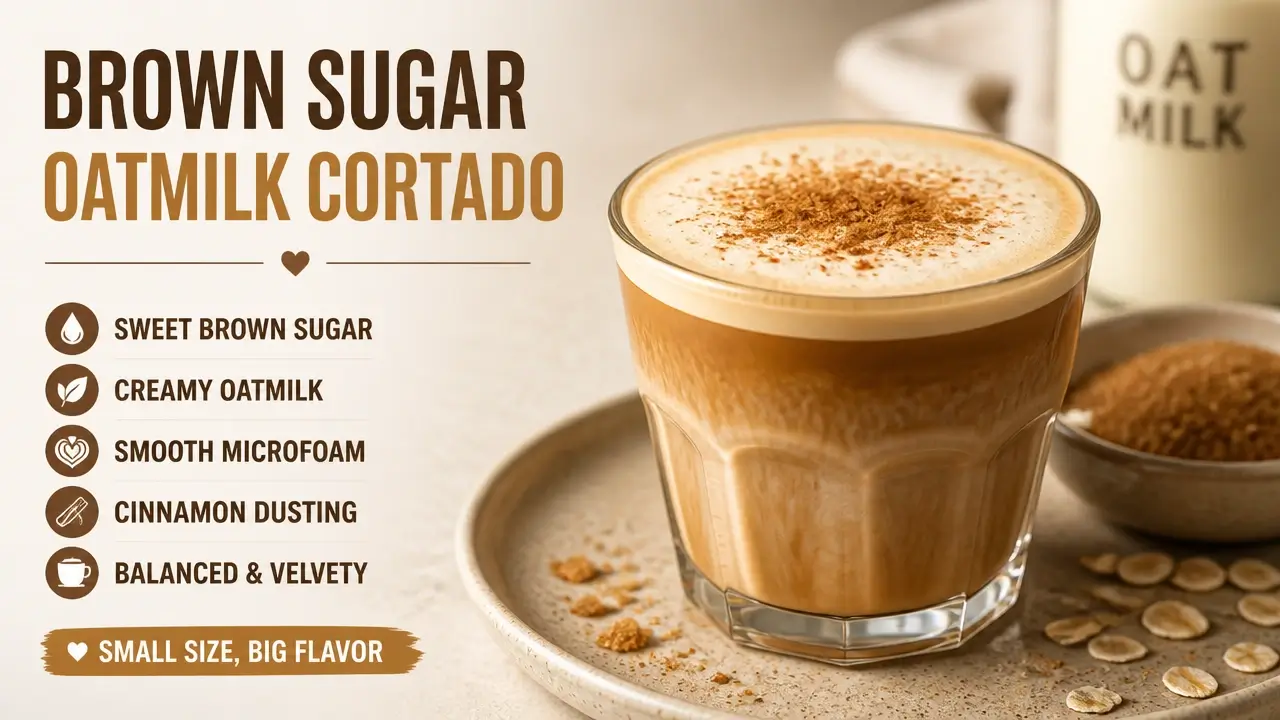
The finished drink should look like this: light caramel-brown from the syrup-espresso blend, a thin and even microfoam layer with no visible large bubbles, and a faint, even cinnamon dusting. The cup should be filled to about 1 cm below the rim.
To achieve this visually appealing result, it’s crucial to use the right cup size, as outlined in our guide to finding the Perfect Cortado Cup, which ensures the ideal balance of flavors and textures.
Serve immediately. The small volume of a cortado means it cools fast, and oat milk foam begins breaking down after about 90 seconds.
Diagnosing What Went Wrong
Cortado troubleshooting is a process of isolating which of the three components failed – espresso, milk, or syrup – and tracing it back to a single root cause. Most problems have one fix, and most fixes are permanent once you know the mechanism.
Before diving into the specific failure categories, one note on cinnamon chemistry: research published by food science researchers on cinnamon polysaccharide behavior found that Cinnamomum burmannii – the most common grocery-store cinnamon variety – produces significantly higher-viscosity solutions than Ceylon cinnamon when dissolved in liquid, due to its higher content of branched arabinoxylans. In practical terms, this means grocery-store cinnamon clumps more aggressively and integrates less cleanly into beverages than Ceylon. If you’re experiencing persistent cinnamon grit issues even with a sieve, switching cinnamon variety is a legitimate fix.
Espresso Extraction Failures in the Cortado
Under-extracted espresso – the kind that tastes sour and thin – is almost always a grind problem. If the shot flows in under 20 seconds, your grind is too coarse. The water is moving through the coffee bed too quickly, picking up the bright, acidic compounds that extract first while leaving the sweetness and body behind. Fix: grind finer, redistribute and tamp evenly, and target a 25–30 second extraction.
Over-extracted espresso – harsh, ashy, bitter – means the opposite: the grind is too fine, the shot is choking, or the water temperature is running too hot. Fix: grind slightly coarser and target the same 25–30 second window. If bitterness persists after grind adjustment, reduce your yield slightly.
If your espresso is consistently sour despite grind changes, suspect thermal instability rather than extraction parameters. A machine that hasn’t reached full operating temperature will brew with water that’s too cool, producing sour shots regardless of grind setting. Flush the group head with a full shot’s worth of hot water before locking in the portafilter, and allow the machine to heat for at least 15–20 minutes after switching on.
Milk and Foam Problems in the Cortado
Oat milk foam stability failures fall into two categories, and they’re easy to distinguish by taste and timing.
A burnt, “cooked oatmeal” aftertaste means the milk was steamed above 60°C. The scorched flavor is caused by heat-degraded beta-glucans and Maillard-adjacent reactions in the oat solids – and it cannot be corrected once it’s happened. Discard the milk, clean the pitcher, and start with fresh cold oat milk. This time, monitor temperature with a thermometer and pull the steam at 55°C, not 60°C. The extra 5°C of buffer gives you margin for the milk’s thermal momentum after the steam cuts off.
Foam that disappears within a minute – leaving a flat, watery surface – points to either generic oat milk without stabilizers, or over-aeration. If you’re using a non-barista oat milk, switch brands before adjusting technique. If you’re already using a barista blend, trim your aeration time to 3 seconds maximum and ensure you’re tapping and swirling immediately after steaming. The beta-glucan network is fragile; it needs to be incorporated into the milk body while it’s still intact, not after it’s begun to collapse.
Syrup and Garnish Failures in the Cortado
Syrup dissolution problems share a common root cause: the sugar was either added dry or the pre-made syrup wasn’t fully dissolved before use. If you encounter a gritty texture mid-drink and the milk hasn’t been added yet, strain the espresso through a fine sieve into a new cup and re-add fresh syrup. If the milk is already in, the texture is difficult to correct – adopt the pre-made syrup method from Step 1 going forward and treat it as a non-negotiable.
The systematic fix for undissolved sugar is to treat the syrup as a prepared ingredient, not a last-minute addition. Pre-warming the glass (as covered in the setup section) also helps; it keeps the espresso hot enough to maintain syrup solubility through the stir.
For floating cinnamon clumps, the immediate fix is to remove the surface clumps with a spoon or carefully pour the drink through a fine sieve into a new cup. The permanent fix is using a sieve for every garnish application. Alternatively, the cinnamon stick stir method – stirring the finished drink with a whole cinnamon stick – releases volatile oils into the cup without producing any particulate at all, and it’s a natural solution when a sieve isn’t within reach.
Finally, a note on syrup storage: any syrup left at room temperature beyond a week is at risk of fermentation or mold growth. If your stored syrup shows surface fuzz, smells off, or has crystallized, discard it and make a fresh batch. Always refrigerate.
Key Takeaways on Preparing Brown Sugar Oatmilk Cortado
- A traditional cortado means “cut” espresso – the 1:1 ratio rule is a third-wave American convention, not a Spanish law.
- Pre-made brown sugar syrup is non-negotiable; dry sugar won’t fully dissolve in 2 oz of espresso before the drink cools.
- Barista-blend oat milk contains stabilizers that prevent splitting on contact with acidic espresso – generic oat milk won’t perform the same way.
- Oat milk scorches irreversibly above 60°C; steam to 55–60°C with only 3–5 seconds of aeration, then pour within 20 seconds.
- Ristretto shots – same dose, half the water – produce the concentrated, syrupy extraction that holds up against sweet syrup and creamy oat milk.
- A fine-mesh sieve for cinnamon garnish is the difference between a polished, café-quality finish and floating clumps on the first sip.
Frequently Asked Questions About Preparing Brown Sugar Oatmilk Cortado
What’s actually in a Starbucks brown sugar oatmilk cortado?
The Starbucks version uses three ristretto shots, brown sugar syrup, and barista-blend oat milk, served over ice in an 8 oz cup with a cinnamon topping. The homemade hot version follows the same three-component logic but skips the ice and scales the milk volume to suit a smaller, warmer serving.
Can you make a cortado with regular oat milk instead of barista blend?
You can, but the foam will collapse within seconds and the milk may curdle on contact with the espresso’s acidity. The stabilizers in barista blends – particularly dipotassium phosphate – are what make the difference; they’re not marketing language.
Why does my brown sugar oatmilk cortado taste sour even though I used good beans?
Sourness almost always points to under-extraction – the shot ran too fast because the grind was too coarse, or the machine hadn’t reached full operating temperature. Grind finer, flush the group head before brewing, and target a 25–30 second extraction time.
How long does homemade brown sugar syrup last, and how do I store it?
A properly sealed 1:1 brown sugar syrup keeps in the refrigerator for up to one month. It is not shelf-stable at room temperature beyond about a week – the sugar concentration isn’t high enough to prevent fermentation. Discard it if you see surface mold, smell anything off, or notice crystallization.
Can I make this drink without an espresso machine?
Yes. A moka pot or AeroPress with a 1:5 coffee-to-water ratio by weight, targeting a 2 oz yield, gets you close to espresso intensity. You won’t get crema, but the coffee concentration will hold its own against the syrup and milk. Use a finely ground, medium-dark roast.
Why does my oat milk foam taste burnt even when I’m careful with temperature?
If the burnt flavor appears even at what feels like a moderate temperature, the most likely culprit is steam wand lag – the milk continues heating for a second or two after you cut the steam. Pull the steam at 55°C rather than 60°C to account for that carry-over heat.
Does the type of cinnamon I use actually matter for this recipe?
It does, more than most people realize. The common grocery-store variety – Cinnamomum burmannii – contains polysaccharides that clump and resist dissolving in liquid far more aggressively than Ceylon cinnamon. If you’re consistently getting grit even with a sieve, switching to Ceylon cinnamon is a legitimate fix, not just a flavor preference.
Is this drink actually a cortado, or is it just a small latte with syrup?
It’s a fair question. The Starbucks-style 8 oz version is closer to a small flavored latte in volume than a strict cortado. If you want to stay within the cortado’s spirit – espresso cut with just enough milk to soften it – pull a double shot at 2 oz and keep the steamed milk to 2–3 oz. The syrup stays the same; the ratio is what defines the character.
References
- Plant Milks for Baristas: Steaming & Stabilizers – baristahustle.com
- Making Coffee Cocktails: Syrups & Infusions – perfectdailygrind.com
- Espresso Extraction Parameters – ncausa.org
- Steaming Plant Milks: Temperature by Milk Type – baristahustle.com
- Mr. Espresso: Specialty Espresso Builds – mrespresso.com
- Cinnamon Polysaccharide Behavior and Viscosity Research – sciencedirect.com