
Moka pot coffee brewing sits in a category most people misread: it looks like a miniature espresso machine, brews like a pressure percolator, and tastes like neither. The gap between those three things is where most bad cups are born.
Once you understand what 1.5–2 bar of steam pressure actually does to a coffee bed, the grind size, dose, water level, and heat timing stop being arbitrary rules. They become logical outputs of a physical system you can read and control. That’s what this guide builds.
Key Takeaways on Moka Pot Coffee Brewing
- The moka pot runs on 1.5–2 bar of steam pressure, not 9 bars; that gap explains every flavor and texture difference from espresso.
- Bitter coffee almost always traces to one of three causes: grind too fine, heat too high, or extraction run past the stop point.
- No universal ratio works across all setups; basket size, roast level, and desired strength all shift the correct dose and water volume.
- Medium-fine grind at table-salt texture gives the bed enough resistance for proper extraction without choking the 1.5–2 bar pressure.
- Pull the pot at the first sign of pale flow or sputtering; stopping early produces a better cup than chasing a full extraction.
- Record every variable per brew, then adjust one at a time; that single habit separates consistent brewers from everyone else.
Prerequisites: What the Moka Pot Actually Is
Moka pot coffee brewing starts with a pressure reality that most guides skip: this brewer operates at 1.5–2 bar of steam pressure, not the 9 bars that define an espresso machine. That single number explains almost everything about what the moka pot can and cannot produce.
The brewer itself is a three-chamber stovetop device. Water sits in the bottom. Ground coffee fills a metal filter basket in the middle. The upper chamber collects the finished brew. Heat does the work. No pump, no electricity, no moving parts beyond the steam itself.
Its origin is an industrial-design story as much as a culinary one. Alfonso Bialetti, an aluminum craftsman, introduced the Moka Express in the early 1930s in Italy. The choice of aluminum was not accidental. At the time, aluminum was a modern industrial material, associated with efficiency and progress, and Bialetti’s background in the aluminum industry gave him both the material access and the manufacturing logic to build an affordable, pressure-tolerant brewer for the home market. The octagonal body was functional: it maximized surface area contact with the flame while distributing heat evenly up the sides.
That aluminum construction is also why the moka pot carries its benefits and its limits in the same object. It is affordable, compact, and produces a strong, concentrated cup without any powered equipment. What it does not produce is true espresso. The pressure gap is too large. You get a bold, full-bodied coffee that sits somewhere between filter and espresso in strength and character, but the extraction physics are genuinely different.
Is a moka pot the best way to make coffee? That depends entirely on what you want. If you want strong, concentrated coffee from an affordable, low-maintenance brewer, it is hard to beat at its price point. If you want true espresso crema, a precisely dialed shot, or a light, nuanced filter cup, it is the wrong tool. The moka pot is not a compromise. It is its own category.
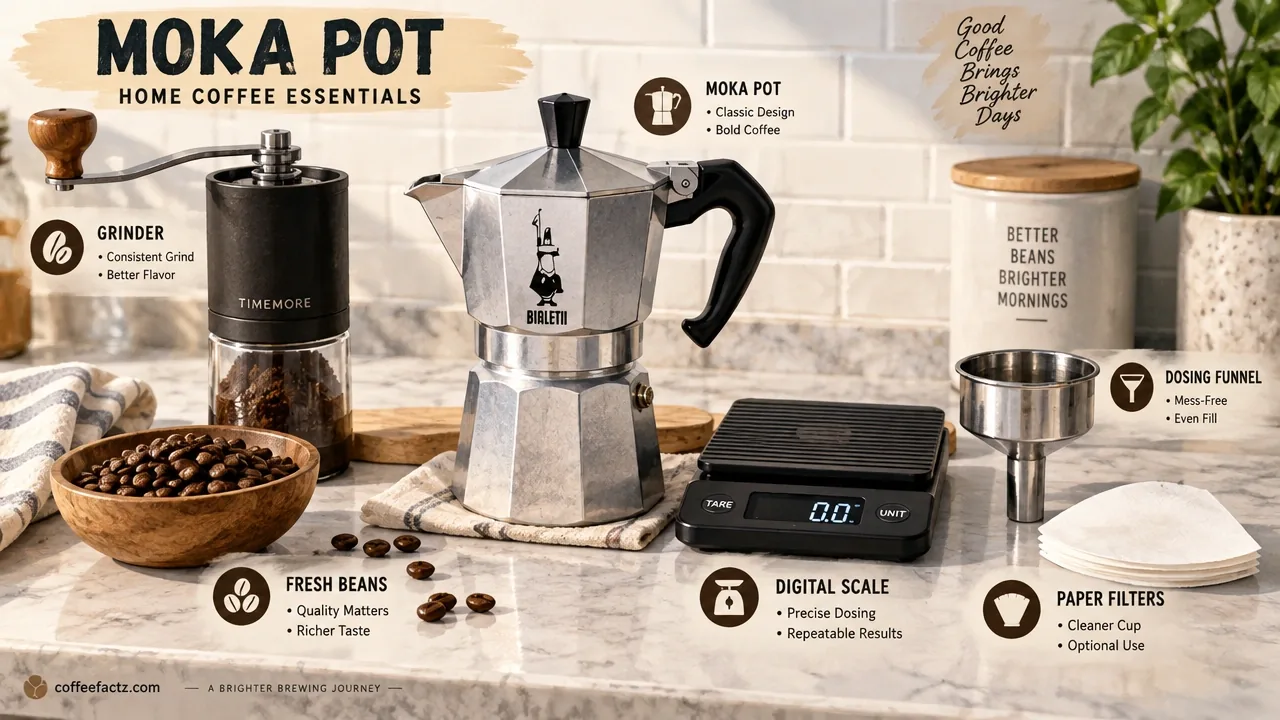
Before you brew, you need five things: the moka pot itself, a burr grinder, a kitchen scale, a heat source, and fresh coffee beans roasted within the past two to four weeks. Optional but genuinely useful: a dosing funnel to level your grounds without compacting them, and an AeroPress-style paper filter cut to fit the upper chamber. Stale beans cannot be rescued by technique. That is the one non-negotiable on the list.
Step 1: Decode the Mechanism Before You Touch the Heat
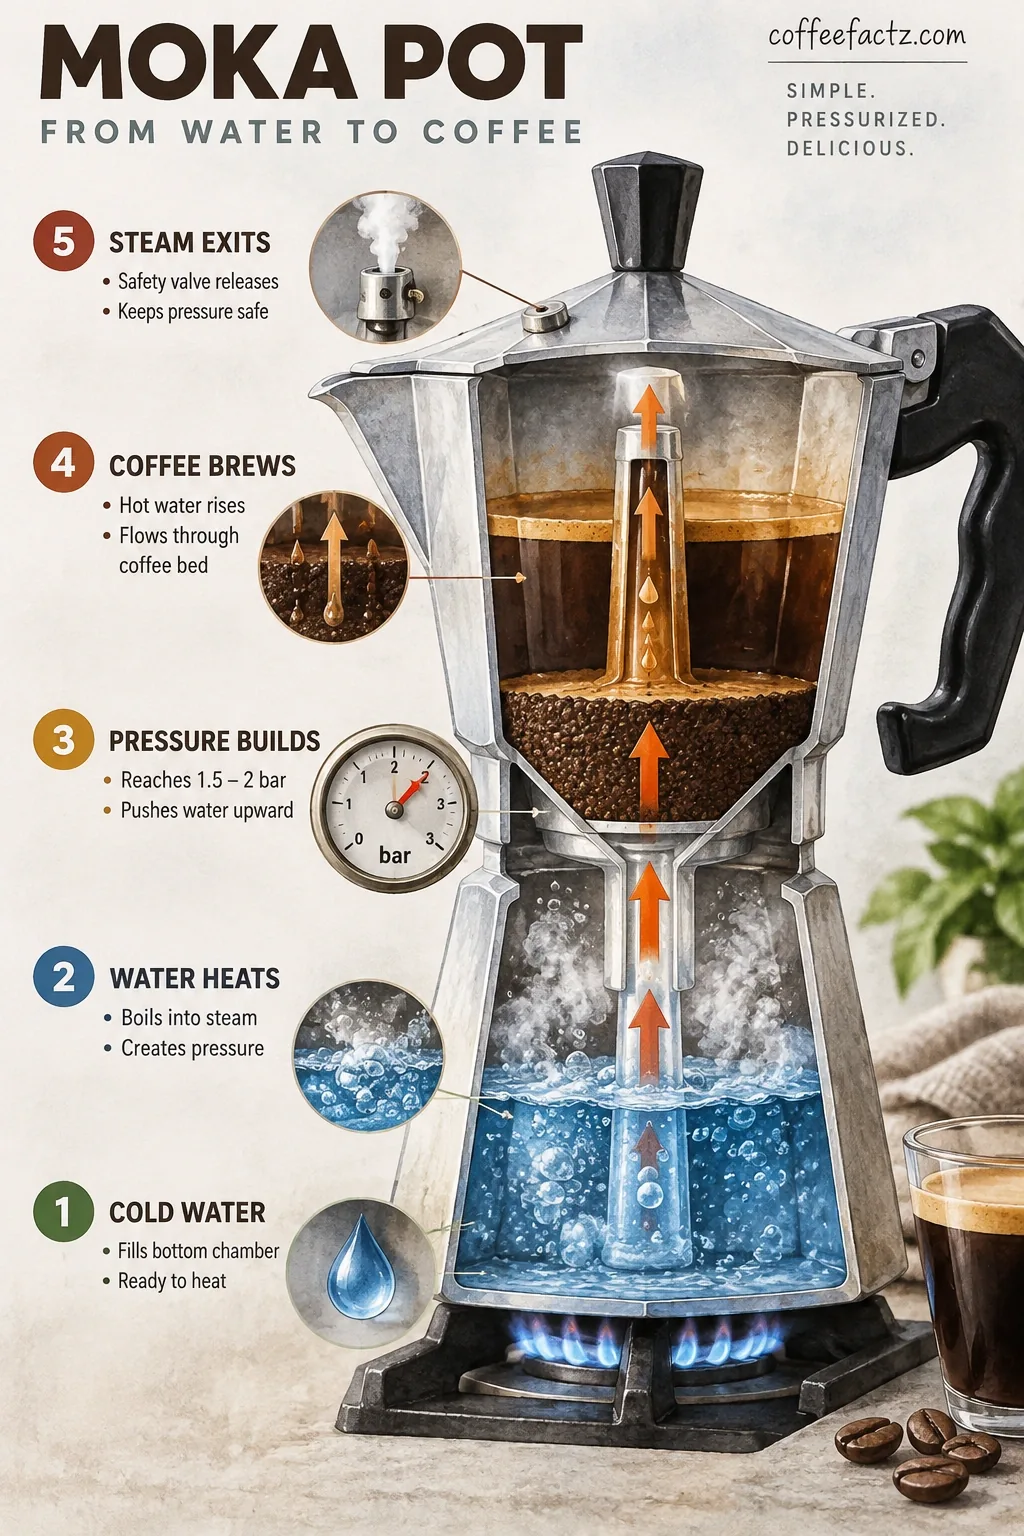
The moka pot’s mechanism is pressure-driven percolation, and understanding it changes every variable you’ll adjust later. Here is the physical chain of events.
Water in the bottom chamber heats toward boiling. As temperature rises, steam builds inside the sealed chamber. When pressure reaches roughly 1.5–2 bar, it overcomes the resistance of the coffee bed above it and pushes the hot water upward through the ground coffee, through the filter, and into the upper collection chamber.
That is the entire engine. No pump. No piston. Steam pressure alone drives the water through the bed.
This is where the contrast with espresso matters mechanically, not just as a marketing distinction. A commercial espresso machine uses 9 bars of pressure to force water through a tightly tamped, finely ground puck in roughly 25–30 seconds. That high pressure extracts emulsified oils and produces the crema layer you see on a pulled shot. The moka pot’s 1.5–2 bar cannot replicate that process. The water moves more slowly through a less compressed bed, and the extraction chemistry shifts accordingly. You get concentrated coffee with a heavy body, but not the same compound profile, and no true crema.
The safety valve on the bottom chamber is a pressure-relief mechanism, not a brewing aid. If the valve is blocked, pressure builds without limit. That is a safety hazard. Keep it clear and inspect it regularly.
What the mechanism tells you about your variables: grind size controls how much resistance the water meets on its way through the bed. Water temperature at the start affects how quickly pressure builds and how aggressively the water extracts as it moves. Heat level on the stove controls extraction speed. All three interact. None of them can be ignored.
The crema misconception deserves a clean answer: moka pots do not produce true espresso crema. Some dark roasts produce a thin, brownish foam from CO2 off-gassing, but it is not the same compound, not the same texture, and it does not behave like espresso crema. Chasing it by grinding finer or using darker roasts usually produces bitterness before it produces crema.
Step 2: Choose Coffee, Grind, and Ratio
Coffee selection for a moka pot is less about brand and more about three properties: freshness, roast level, and grind consistency. Get those right, and almost any quality bean will work.
Bean Freshness and Roast Selection
Fresh beans are the floor, not the ceiling. Coffee degasses CO2 for days after roasting, and that gas plays a role in extraction dynamics. Beans older than four weeks have lost most of their volatile aromatics. No grind adjustment recovers what has already off-gassed.

Roast level matters because it changes bean density. Lighter roasts are denser and more resistant to extraction, so they need finer grinding or longer contact time to yield their flavor compounds. Darker roasts are more porous and extract faster, which is why over-extraction and bitterness happen quickly with dark beans on high heat. Medium to medium-dark roasts are the most forgiving starting point for most home setups, but this is preference territory, not a rule.
What’s the best coffee to put in a moka pot? Fresh beans, ground just before brewing, at a roast level you enjoy. Arabica-dominant blends are common because they tend toward lower acidity and more sweetness at medium roast, but single-origin Arabica, blended Robusta, and everything in between can work. Freshness and grind consistency outrank origin every time.
Particle Size and Basket Dose
Grind size for a moka pot is medium-fine: coarser than espresso, roughly the texture of table salt. This is not an aesthetic choice. It is a flow-rate decision.
A research study on espresso extraction hydrodynamics published in the Journal of Food Engineering found that bed porosity, the space between coffee particles that water must navigate, is controlled not just by particle size but by size uniformity and compression together. Even at a larger mean particle size, a less uniform distribution can produce lower bed porosity and higher flow resistance. For a moka pot, this means grinding too fine, or grinding inconsistently with a blade grinder, can choke the bed and produce the same over-extraction and bitterness you’d get from tamping.
Never tamp the moka pot basket. The brewer is not designed for a compressed puck. Tamping increases bed resistance beyond what 1.5–2 bar can push through cleanly, which stalls flow and scorches the coffee sitting on the heat.
Fill the filter basket level with grounds. Use a dosing funnel to guide the coffee in without packing it, then sweep the top flat. Weigh your dose. Eyeballing a basket is imprecise enough to shift your extraction meaningfully from brew to brew.
On ratios: no universal number exists. Across the source landscape, you’ll find 1:10 coffee-to-water, 1:2, two tablespoons, three to four tablespoons, and dose ranges from 15 g to 25 g of coffee with water volumes from 150 ml to 355 ml. These numbers differ because basket sizes differ, roasts differ, and desired strength differs. A practical starting point for a 3-cup moka pot is roughly 15 g of coffee to 150 g of water, then adjust from there based on taste. The basket size sets your ceiling. Work within it.
Step 3: Water, Loading, and Assembly
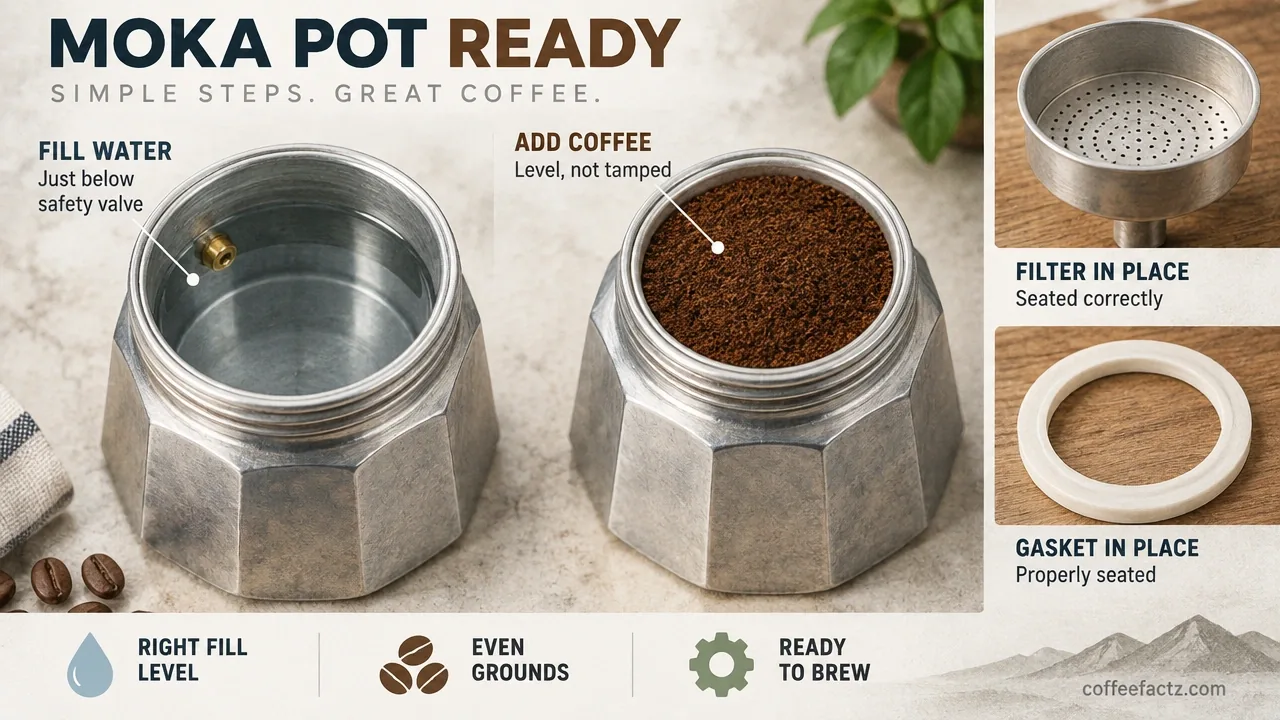
Water filling in a moka pot has one firm rule and one contested variable. The firm rule: fill the bottom chamber to just below the safety valve. Never cover the valve. If water blocks it, you remove the pressure relief, and the bottom chamber becomes a sealed vessel under heat with no exit. That is dangerous.
The contested variable is starting water temperature. Many guides say to use hot or pre-boiled water. Others brew from cold. The reasoning behind pre-boiling: cold water sitting in the bottom chamber on a lit stove spends more time at sub-extraction temperatures, which can increase bitterness as the coffee bed is exposed to heat before pressure builds enough to push water through. Starting with pre-heated water around 80–90°C reduces that dwell time.
The counterargument from some practitioners: cold water gives you more control over the pressure build rate, and the bitterness difference is smaller than expected when heat is managed carefully. Neither camp is wrong across all setups. Treat starting water temperature as a variable you test, not a rule you follow.
One practical workaround worth knowing: heat the bottom chamber alone until the water is just short of boiling, remove from heat, add your grounds and filter basket, assemble the pot, then return it to medium-low heat. This avoids the scald risk of handling a boiling-water-filled chamber while assembling, and it reduces the time the grounds spend sitting on heat before extraction begins. It requires care. Never assemble with boiling water in the chamber; the steam and heat at that point make burns likely.
Assembly itself: seat the filter basket, add level grounds, check that the rubber gasket sits flat in its groove, and thread the upper chamber down firmly. A loose seal leaks. A missing gasket leaks and can cause pressure to escape around the joint rather than through the coffee bed. These are the most common assembly failures.
Common mistakes at this stage: overfilling the water chamber past the safety valve, tamping the grounds, skipping the gasket inspection, and assembling the pot with boiling water already inside. Each one has a predictable consequence: over-pressure, choked flow, leaking, or burns. None of them are subtle.
Step 4: Heat Management and the Stop Point
Heat level on a moka pot is the variable most people set too high. Medium-low heat is the target. High heat does three things, none of them good: it drives the water through the coffee bed too fast, cutting contact time; it superheats the steam before it reaches the grounds, which scorches the bed; and it causes aggressive sputtering in the upper chamber, which means steam, not water, is doing the final push.
“High temperature extraction fluids (vapour, water and their mixture) transit in the coffee bed is noxious for the quality of the extract because, under these conditions, such fluids are more efficient in solubilizing less soluble compounds, generally conferring bitterness and astringency, and/or in stripping least volatile aroma compounds which are organoleptically unpleasant and described as clove-like, smoky, burnt, medicinal/chemical.” – From the study “Experimental investigation of steam pressure coffee extraction in a stove-top coffee maker” by L. Navarini et al.
This is the mechanical reason medium-low heat matters. When the stove is too high, the fluid pushing through the coffee bed transitions from pressurized hot water to steam or a steam-water mixture. That hotter, lower-density fluid is chemically more aggressive. It pulls bitter, astringent compounds and strips volatile aromatics that register as clove-like, burnt, or medicinal in the cup. Lowering the heat keeps the extraction fluid closer to pressurized water and away from steam dominance.
Watch the flow coming into the upper chamber. A steady, dark stream is extraction in progress. When that stream turns pale or honey-colored, the soluble compounds are mostly extracted and you are pulling diluted water through spent grounds. When you hear the first signs of sputtering or gurgling, steam has started to dominate the push. Remove the pot from heat immediately at that point, or just before it.
Do not wait for a full sputter. Do not let the pot run dry. Remove before the aggressive gurgle. Stopping early preserves the concentrated, balanced character of the brew. Stopping late pulls the bitter, steam-driven tail into your cup.
After pulling from heat, stir the contents of the upper chamber before serving. The first coffee to arrive is more concentrated than the last. Stirring equalizes the brew.
The video below demonstrates heat control and the stop point in real time, showing exactly what the flow looks like at each stage and when to pull the pot:
Step 5: Finish, Serve, and Build a Repeatable Cup
A successful moka pot brew is smooth, concentrated, and balanced. It sits in body and strength somewhere between a filter coffee and a straight espresso shot. No bitterness. No silt in the cup. A heavy, almost syrupy texture when the grind, dose, and heat were right.
Serve immediately after stirring. Transfer to your cup rather than letting the coffee sit in the upper chamber, where residual heat continues extracting flavor from any grounds that made it through the filter. If the brew is too strong, dilute with hot water. If you’re making an Americano-style drink, that dilution is the recipe.

One hardware adjustment that changes the character of the cup: place an AeroPress-style paper filter cut to fit inside the upper chamber, sitting above the coffee spout. It catches fine coffee particles and oils that pass through the metal filter. The result is a cleaner, less gritty cup with noticeably lower perceived bitterness. The paper absorbs some oils, which also means you lose a degree of body. Whether that trade is worth it depends on your preference. If you try it, lower your heat slightly and pull the pot before sputtering, because the paper adds a small amount of flow resistance.
Repeatability comes from records. Write down: bean origin and roast date, roast level, grind setting, dose in grams, water volume in grams, starting water temperature, heat level, and stop point. When the cup is off, you have one variable to change, not six to guess at. Adjust one thing at a time. Grind coarser if bitter. Grind finer if sour or weak. Lower the heat if the stop point felt rushed. Change water temperature if the extraction time seems right but the flavor is still flat.
Cleaning: rinse with water only after each use. No soap. The aluminum and the seasoning layer that builds on the inside of the pot over time are part of what makes the flavor profile stable and smooth. Soap strips that layer. Dry the pot fully before reassembling to prevent corrosion inside the threads.
Troubleshooting: Bitter, Sour, Weak, Leaky, and Sputtering Brews
Moka pot troubleshooting works best as a root-cause system, not a symptom checklist. Every flavor problem traces back to one or more controllable variables. Identify which variable moved, and you know what to change.
Extraction Fault Diagnosis
Bitter coffee is the most common complaint, and it almost always means over-extraction. The three most frequent causes: grind too fine, heat too high, or pot left on heat past the stop point. Any one of them can produce bitterness on its own. All three together produce a cup that tastes burnt and medicinal.
Fix bitter coffee by working backward through those three causes. Coarsen the grind first. If that doesn’t resolve it, lower the heat. If the heat is already medium-low, check your stop point: are you pulling before the sputter, or letting it run through the full gurgle? One adjustment at a time. If you change grind and heat simultaneously, you won’t know which one fixed it.
Sour or sharp coffee points toward under-extraction. The water moved through the bed too quickly, or the temperature was too low, and it didn’t pull enough soluble compounds. Grind slightly finer to increase bed resistance and contact time. If the grind is already medium-fine, check your starting water temperature and heat level.
Weak coffee usually means the dose is too low, the grind is too coarse, or both. Weigh your dose and compare it to your basket size. A 3-cup moka pot typically holds around 15–17 g of coffee. If you’re under that, add more. If the dose is right and the brew is still thin, coarsen the grind slightly and check that your water level is correct.
The highest-value correction for beginners: stop treating any single recipe as universal. Bean density, roast level, grind consistency, water temperature, heat source, and altitude all shift the extraction. Practitioners who brew consistently well keep a log and adjust one variable per session. That discipline, not a magic ratio, is what produces a repeatable cup.
Hardware Failures and Safety Limits
Leaking from the joint between the upper and lower chambers means one of two things: the gasket is missing, or it is worn and no longer seals. Pull the pot apart, inspect the rubber ring, and replace it if it is cracked, hardened, or deformed. Gaskets are inexpensive and degrade over time from heat cycling. A leak is not a technique problem. It is a hardware problem.
Crema on a moka pot brew is not espresso crema. A thin foam layer sometimes appears, particularly with fresh, dark-roasted beans releasing CO2. It is not the same compound structure as espresso crema, does not have the same texture, and does not indicate a well-pulled shot. Do not adjust your process to chase it.
Safety: never assemble the moka pot with boiling water already inside the bottom chamber. The combination of high heat, live steam, and a pot you need to handle and thread together creates a real burn risk. If you are using the preheat method, remove the bottom chamber from heat before adding the filter basket and upper chamber. Once assembled, return to heat. This is the sequence that keeps the process safe.
Frequently Asked Questions About Moka Pot Coffee Brewing
Why does my moka pot coffee taste burnt even on low heat?
Burnt flavor usually means the water in the bottom chamber ran out before you pulled the pot, or the heat was still too high for your grind. Try coarsening the grind one step and pulling the pot the moment the flow turns pale, before any sputtering begins.
Can I use a moka pot on an induction stove?
Only if the bottom chamber is made from stainless steel or has a ferromagnetic base. Standard aluminum moka pots don’t work on induction. Bialetti and other manufacturers make induction-compatible versions, and a separate induction disc adapter also works in a pinch.
How do I know when to replace the gasket?
Replace it when you see coffee or steam escaping from the joint during brewing, or when the rubber feels hard, cracked, or no longer springs back when pressed. Most gaskets last six months to a year with daily use. They’re sold by size, so bring your old one to match it.
Does the size of the moka pot change the brewing technique?
Yes, meaningfully. Smaller pots, like a 1-cup or 2-cup, build pressure faster and are more sensitive to heat. They need lower heat and a quicker stop point than a 6-cup or 9-cup pot. Dial in the heat separately for each size you own.
Why is there no crema on my moka pot coffee?
Because 1.5–2 bar of pressure isn’t enough to emulsify the oils that form espresso crema. The thin foam you sometimes see is CO2 off-gassing from fresh beans, not crema. It’s not a sign of anything wrong, and you shouldn’t change your process to produce more of it.
Is it safe to leave a moka pot on the stove unattended?
No. Once the water chamber runs dry, the pot sits on heat with no liquid to absorb it. The rubber gasket degrades, the aluminum can warp, and in worst cases the safety valve can fail. Stay nearby and pull the pot at the stop point every time.
Does water quality affect the moka pot brew?
Yes. Hard water with high mineral content leaves scale inside the bottom chamber over time, which reduces heat transfer efficiency and can affect flavor. Filtered or moderately soft water brews more consistently and keeps the pot cleaner longer.
Can I brew lighter roasts in a moka pot?
You can, but light roasts are denser and more resistant to extraction, so they require a finer grind and potentially a slightly higher starting water temperature to extract fully. Expect more acidity and brightness in the cup, and watch the stop point carefully since under-extraction is more common with light roasts in this brewer.
References
- Influence of particle size distribution on espresso extraction via packed bed compression | dx.doi.org
- Experimental investigation of steam pressure coffee extraction in a stove-top coffee maker | prokofe.ru