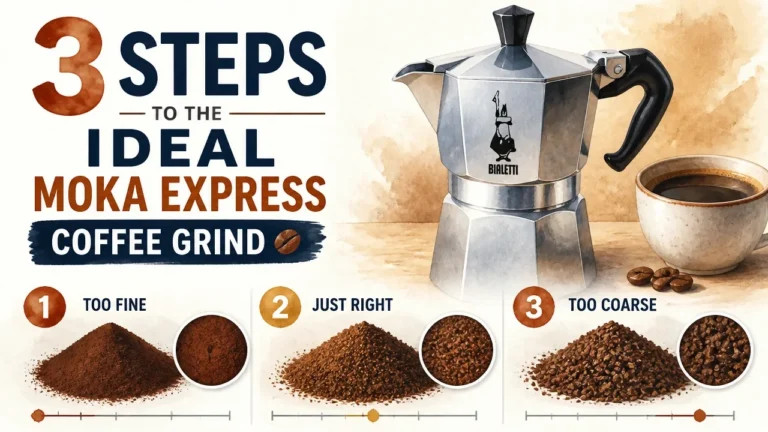

The best grind for moka pot is more precisely defined than most guides admit – and getting it wrong in either direction causes real problems, from bitter, over-extracted sludge to a choked filter plate and a rattling safety valve. It’s not just “somewhere between espresso and drip.”
Once you understand why the moka pot runs at 1–2 bars instead of espresso’s 9, the grind target stops being a vague recommendation and starts being a mechanical specification. This guide builds that specification from the ground up, step by step.
Key Takeaways on Best Grind for Moka Pot
- Medium-fine – roughly 360–660 microns, similar to fine table salt – is the only grind window that works with moka pot pressure.
- Espresso grind is not just a taste mistake; it builds dangerous pressure that the safety valve has to relieve.
- Particle consistency matters as much as particle size – fines from a low-quality grinder clog the filter even when the average grind looks correct.
- Dark roasts need one or two notches coarser; light and medium roasts benefit from one or two notches finer than your baseline.
- Never tamp a moka basket – at 1–2 bars, a compressed bed stalls flow and chokes the brew.
- Log your grinder setting, dose, first-coffee time, and yield; repeatability requires recorded variables, not guesswork.
Mastering grind distribution is only the first step toward total stove-top proficiency, which you can explore further in The Ultimate Guide to Moka.
Prerequisites: Gear, Dose, and Safety Before You Touch the Grinder
Before a single grind adjustment means anything, the rest of your setup has to be consistent. Changing grind size while your dose varies, your gasket leaks, or your safety valve is clogged is like tuning a guitar with a broken string – the feedback is noise.
Here’s what belongs on the counter before you start dialing in.
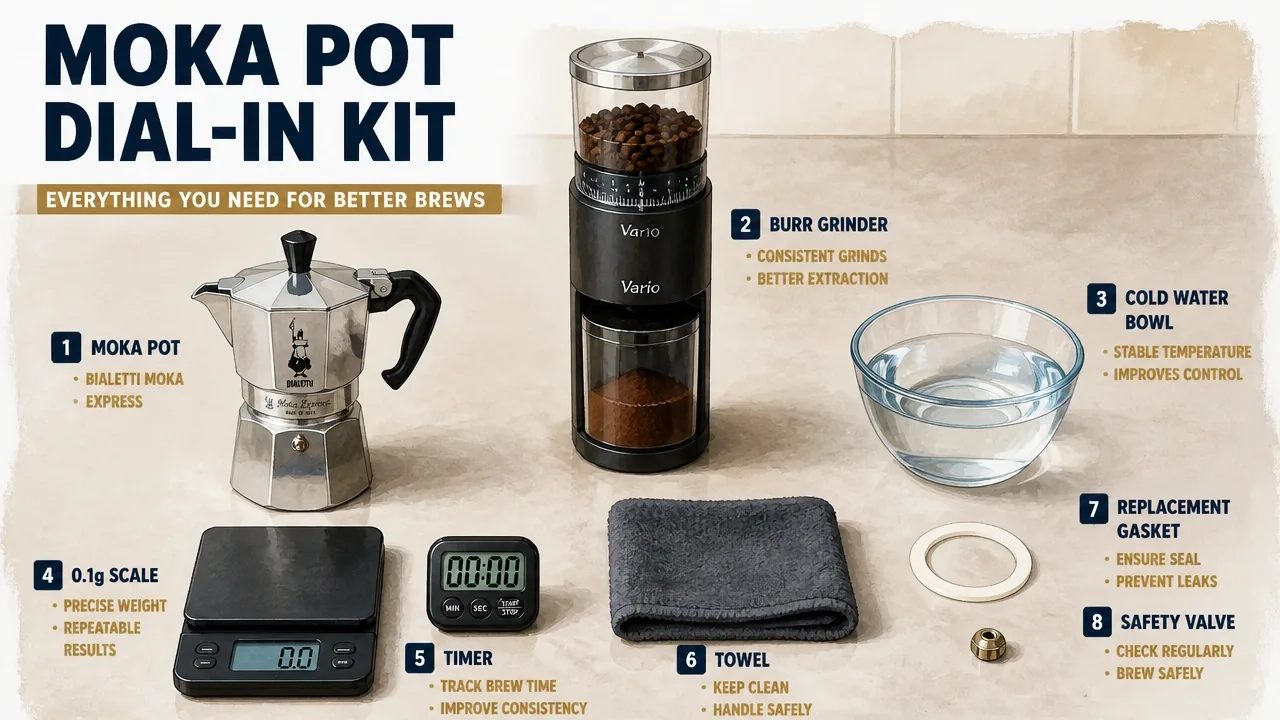
The kit: a stovetop moka pot (the Bialetti Moka Express is the reference point here), a burr grinder (more on why in Step 1), a 0.1g scale, a timer, a kitchen towel, a bowl of cold water for quenching, a replacement gasket if the current one feels hard or shriveled, and a clean safety valve. That last item gets ignored more than any other – a clogged valve is a pressure hazard, not a minor inconvenience.
Dose and ratio: the working ratio for moka is roughly 1:10 by weight – about 90–100g of coffee per liter of water. In practical terms: a 3-cup Bialetti takes around 15–17g of coffee; a 6-cup takes around 22–25g. These aren’t rigid rules, but they’re your starting anchor. Dose drift is one of the most common reasons a grind setting that worked yesterday tastes off today.
Water fill: fill the boiler to just below the safety valve – never above it. Overfilling raises internal pressure beyond what the pot is designed to handle, and it removes the air gap that helps regulate flow. Keep the gasket seated properly and tighten the pot hand-firm, not wrench-tight.
Grinder zero-point: if your grinder uses a numbered dial or click system, find its true zero before trusting any setting recommendation in this guide or anywhere else. Zero-point varies between individual units of the same model because of burr seating tolerances. A “10 clicks from zero” recommendation on a Timemore C2 from one person’s grinder may land at a completely different particle size on yours. Calibrate first, then use click numbers as relative references, not absolute ones.
Starting with pre-ground: if you’re not grinding fresh yet, choose a Moka-specific medium-fine pre-ground – not espresso pre-ground. Espresso pre-ground is too fine for the moka filter plate and will stall your brew or build dangerous pressure. Moka-specific pre-ground coffee is workable; it’s just not the most controllable option.
Here’s a look at a properly staged dial-in kit – everything within arm’s reach before the first shot of water hits the boiler.
Ensuring your equipment is in peak condition provides the structural foundation required to implement more moka pot tips for dialing in extraction yield.
Step 1: Establish the Baseline Medium-Fine Grind and Grinder Setting
The medium-fine grind is where every moka dial-in begins. Everything else – roast adjustments, basket fill, heat management – is a refinement on top of getting this particle size right first.
Particle Size Targets
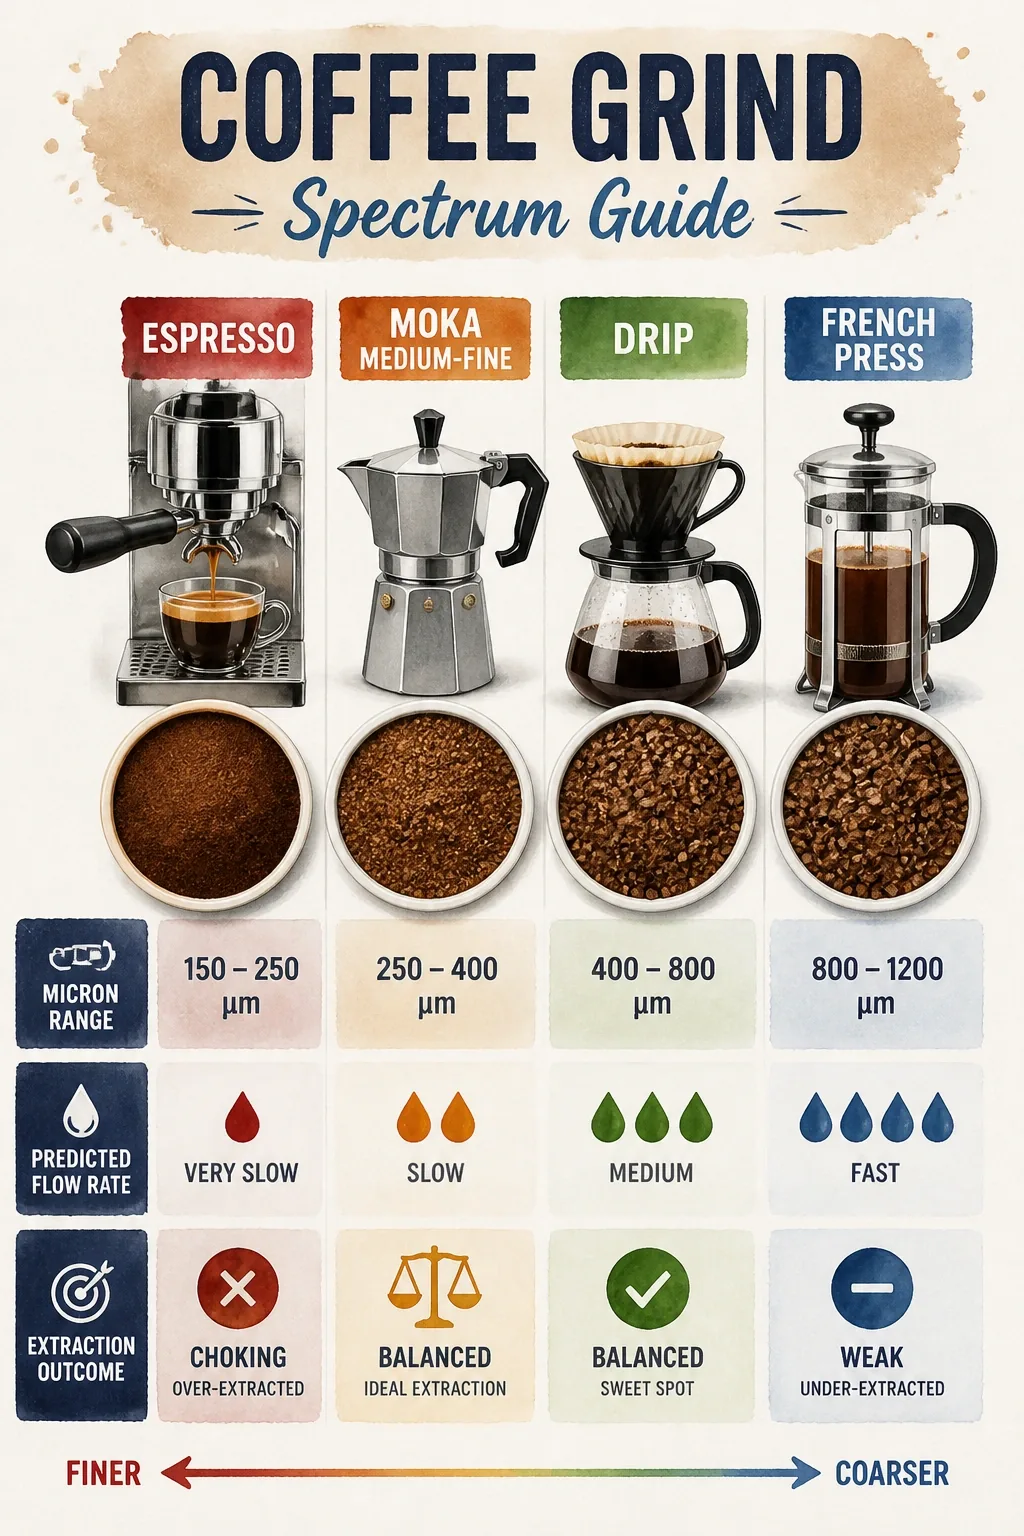
Medium-fine means finer than pour-over or drip, and coarser than espresso. The tactile benchmark most people find useful: fine table salt or granulated sugar. In micron terms, you’re targeting roughly 360–660 microns. That’s the window where water can move through the coffee bed at the pressure the moka pot actually generates – around 1–2 bars.
Why does espresso grind fail so reliably in a moka pot? Because espresso is calibrated for 9 bars of pump pressure. At 1–2 bars, an espresso-fine grind creates more resistance than the moka’s steam pressure can overcome. The filter plate clogs, flow stalls, pressure builds beyond the safety valve’s rating, and the coffee that does extract is bitter and over-done. This isn’t a minor taste issue – it’s a safety issue.
The other extreme fails just as predictably. A French press coarse grind gives water almost no resistance at all. The short moka brew cycle – typically 30–45 seconds of active flow – can’t extract enough solubles from large particles. Under-extraction gives you weak, sour, watery coffee that tastes like it was brewed in a hurry, because effectively it was.
The hidden variable that separates a good medium-fine grind from a frustrating one isn’t just average particle size – it’s consistency. A grinder that produces a wide range of particle sizes around that 360–660 micron target will also produce a significant quantity of fines: ultra-small particles that migrate to the bottom of the coffee bed and plug the filter plate even when the overall grind looks correct. This is why a grinder with poor particle uniformity causes channeling and choking at settings that should theoretically work.
Burr Calibration Parameters
The physics difference between a burr grinder and a blade grinder is the difference between slicing and smashing. Burr grinders shear beans between two abrasive surfaces at a controlled gap, producing particles clustered around a target size. Blade grinders spin a metal blade at high speed and pulverize beans into a random distribution of dust, powder, and chunks – exactly the fines profile that clogs a moka filter plate and produces bitter over-extraction.
For moka pot use, a blade grinder is a last resort, not a tool. If it’s what you have right now, use Moka-specific pre-ground instead and plan the burr grinder upgrade as a near-term investment.
For burr grinder owners, the table below provides verified starting ranges and calibration notes for the most common models in this price range. These are starting points, not guaranteed settings – your zero-point calibration from the prerequisites section determines how these translate on your specific unit.
| Grinder Model | Burr Type | Starting Range (from zero) | Adjustment Increment | Zero-Point Note |
|---|---|---|---|---|
| Baratza Encore | 40mm conical | 10–14 | 1 number = ~75 microns | True zero varies; calibrate before use |
| Fellow Opus | 40mm conical | 20–25 | Fine per step | Alignment-sensitive; check burr seating |
| Timemore C2/C3 | 38mm conical | 12–16 clicks | 1 click ≈ 25–30 microns | Count from tactile zero, not dial print |
| 1Zpresso (JX/JX-Pro) | 38mm conical | 2.0–2.5 rotations | 1 click ≈ 8–12 microns | Very fine adjustment; small moves matter |
| Comandante C40 | 38mm conical | 20–26 clicks | 1 click ≈ 30–40 microns | Red Clix changes step size; note which burr set |
The baseline adjustment rule is simple: if the coffee tastes bitter, move 1–2 notches coarser. If it tastes sour or weak, move 1–2 notches finer. Change one variable at a time, brew again, and taste before adjusting further.
“Unlike the ground coffee used with professional coffee machines, ground coffee for Moka must have a medium grain, coarser than the blend for espresso, otherwise the water would have trouble passing through the powder. This could lead to a burnt, bad-tasting coffee.” – Bialetti, official manufacturer of the Moka Express
Bialetti’s reasoning here is mechanical, not aesthetic. The moka pot’s internal pressure ceiling is what sets the grind floor. Go finer than that ceiling allows, and you’re not making stronger coffee – you’re making dangerous coffee.
If you’re still using pre-ground as a temporary workaround, choose Moka-specific medium-fine or a coffee labeled slightly coarser than espresso. It won’t give you the repeatability of fresh grinding, but it keeps you safely inside the pressure window while you set up a burr grinder.
Step 2: Adjust for Roast Level, Freshness, and Basket Fill Without Tamping
With the medium-fine baseline established, two variables can still push the result off-target: roast level and how you prepare the coffee bed. Both are adjustments on top of your grind setting, not substitutes for it.
Bean Age Profile Calibration
Dark roasts are more porous and brittle than light roasts – the extended roast process drives out moisture and CO₂, making the bean structure looser. At the same grind setting, dark roast grounds release solubles faster, which means they over-extract more easily. The fix is to go slightly coarser – one or two notches – to slow extraction and tame the harsh, ashy bitterness that dark roast can produce at a standard medium-fine setting.
Light and medium roasts are denser and harder. They need more contact time and a finer grind to hit the same extraction yield. If a light roast tastes thin or sour at your baseline setting, move slightly finer before adjusting anything else.
Freshness matters more than most people expect. Coffee off-gasses CO₂ for days to weeks after roasting. Grinding immediately before brewing captures more of that volatile aromatic content. It also introduces a practical problem: static. Freshly ground coffee, especially from a conical burr grinder, carries an electrostatic charge that causes grounds to clump, scatter, and stick to the funnel walls.
The Ross Droplet Technique (RDT) solves this with one drop of water – literally one drop – added to the beans in the hopper before grinding. The moisture is enough to discharge the static without meaningfully affecting grind behavior. The deeper value of RDT isn’t just tidiness: clumps that form from static cling create uneven density in the coffee bed, which creates channels where water takes the path of least resistance instead of flowing evenly through the grounds. Channeling in a moka pot looks like sputtering and tastes like bitterness in one part of the cup and sourness in another.
Pre-ground dark-roast coffee carries its own caution: if it’s ground fine and your heat is running high, the combination accelerates extraction past the point of balance. Ashy, burnt notes at the end of the cup usually trace back to this combination.
Coffee Bed Preparation Protocol
Never tamp a moka pot basket. This point deserves its own sentence because it contradicts the muscle memory of anyone who’s made espresso. Tamping in a moka compresses the coffee bed beyond what 1–2 bars can push through. The filter plate clogs, pressure builds, and the safety valve does its job – loudly.
Fill the funnel basket loosely to the rim. Level the bed by gently shaking or stirring the basket with a finger or small spoon. The goal is an even, flat surface with no mound in the center and no compressed spots at the edges. Water should be able to move through the entire bed at roughly equal resistance.

If you’re experimenting with a slightly finer-than-standard grind – say, pushing toward the lower end of the medium-fine window – one workaround is to fill the basket only 2/3 to 3/4 full and distribute loosely. Less coffee depth means less total resistance. This is not a universal fix; it works only with a consistent burr grinder and a specific dose, and it narrows your margin for error considerably. Think of it as a precision tool, not a safety net.
Step 3: Read Brew Flow, Pair Boiler Water Temperature, and Lock Repeatable Settings
At this point, your grind is set, your bed is level, and the pot is assembled. Now the brew itself tells you whether everything is working – if you know what to watch and listen for.
Thermal Extraction Signals
Flow pattern is your primary diagnostic. A properly dialed moka pot produces a steady, honey-like flow from the central spout – not a violent sputter from the start, not a slow creep that takes two minutes to produce a trickle.
- Sputtering immediately: the grind is too coarse, or the heat is too high. Pressure is building faster than the coffee bed can regulate it.
- Stalled or creeping flow: the grind is too fine, the basket is overfilled, or both. Water can’t move through the bed at moka pressure.
- Steady flow, then a sputter at the end: this is normal and expected as the boiler empties. Remove from heat at the first sign of sputtering.
Boiler water temperature is the other lever. Starting with pre-heated water – around 90–100°C (190–205°F) – shortens the time the pot sits on a hot burner before brewing begins, which reduces the risk of scorching the coffee bed from below. The practical method: boil water in a kettle, pour it into the boiler, add the basket, assemble, and place on the stove.
This approach does conflict with Bialetti’s official instruction to start with room-temperature water. Their reasoning centers on safety and simplicity – handling a boiler full of near-boiling water introduces burn risk, especially when tightening the two halves together. If you use pre-heated water, use a towel to grip the pot and tighten only hand-firm. Never over-tighten a hot pot.
Heat level: medium to low, not high. High heat races the pressure build-up, overwhelms the coffee bed before it can regulate flow, and scorches the bottom of the brew. Slow, controlled heat produces a slower, more even extraction.
The video below breaks down moka pot mechanics and heat management in detail – worth watching before you adjust your stove settings.
Recipe Endpoint Documentation
Once you hit a brew that flows well and tastes balanced, write it down immediately. The variables that matter:
- Grinder model and setting (clicks or dial position from your calibrated zero)
- Dose in grams
- Water temperature (pre-heated or room temp)
- Time from first coffee drop to first sputter
- Yield in grams or mL
- Taste notes (balanced, slightly bitter, slightly sour, etc.)
Target benchmarks to give you a reference frame: a 16g dose in a 3-cup moka should yield roughly 35mL with the first coffee appearing around 25–35 seconds after the pot goes on heat. A 2-cup pot with 11–12g typically runs a few seconds longer before first drop, depending on heat and grind.
Remove the pot from heat 5–10 seconds after the first coffee appears, before the main sputter. Some brewers quench the base in a bowl of cold water immediately after – this stops extraction sharply and prevents the last few drops from over-extracting. The risk: thermal shock can cause splashing and, over many cycles, may stress aluminum seams. Use a towel, keep the pot level, and don’t submerge it.
The “no scale or timer needed” advice you’ll see on casual moka guides is a beginner trap. It’s true that Italians have been making moka without scales for generations – but they’ve also been using the same bean, the same pot, and the same stove for years. Repeatability without logged variables is just habit, not control. Until you have that accumulated muscle memory, log the numbers.
Troubleshooting: Fix Choking, Sputtering, Bitterness, Sourness, and Pressure Safety
Even a well-dialed moka pot throws curveballs. Here’s how to trace every common symptom back to its actual cause.
Symptom-to-fix reference:
| Symptom | Most Likely Cause | Fix |
|---|---|---|
| Bitter, harsh taste | Grind too fine, heat too high, or brew ran too long | Go 1–2 notches coarser; lower heat; remove at first sputter |
| Sour or weak | Grind too coarse or dose too low | Go 1–2 notches finer; check dose against 1:10 ratio |
| Stalled / no flow | Grind too fine, basket overfilled, or fines clogging filter | Go coarser; reduce fill; distribute loosely; clean filter plate |
| Violent sputtering throughout | Grind too coarse or heat too high | Go 1–2 notches finer; reduce heat to medium-low |
| Safety valve blowing | Grind too fine or filter plate blocked | Stop immediately; cool; coarsen grind; clean valve before retrying |
| Powder/sludge in cup | Excessive fines from inconsistent grinder or too-fine grind | Upgrade to quality burr grinder; go 1–2 notches coarser |
Pressure safety is the non-negotiable on this list. An espresso-fine grind in a moka pot is not just a taste problem – it can build pressure beyond what the safety valve is rated to release cleanly. If the valve blows, stop, cool the pot completely, clear the valve, coarsen the grind, and inspect the gasket before the next brew.
Maintenance variables that mimic grind faults deserve their own callout. A worn rubber gasket – hard, cracked, or visibly shrunken – causes inconsistent sealing, which changes the pressure dynamics inside the pot. If you’ve been chasing a grind problem for weeks and nothing works, check the gasket first. Replace it for a few dollars before spending another hour adjusting clicks.
Clean the filter plate regularly – grounds and oils accumulate in the small holes and reduce flow even when the grind is correct. Descale the boiler periodically if you’re in a hard-water area; mineral buildup reduces boiler capacity and changes heat transfer. And never put an aluminum moka pot in the dishwasher – the alkaline detergent strips the oxidized surface layer that protects the aluminum and contributes to the pot’s characteristic flavor profile.
Reading the cup: no abundant powder residue on the rim or inside the cup after a gentle swirl means the grind isn’t producing excessive fines. Heavy sludge or a gritty ring suggests fines are escaping the filter plate – either the grind is too fine, the grinder’s particle consistency is poor, or both.
The final verdict on grind: medium-fine, 360–660 microns, adjusted one or two notches coarser for dark roasts and slightly finer for light or medium roasts. Never tamped. Validated by steady honey-like flow, a balanced taste with no bitterness or sourness dominating, and a safety valve that never gets involved.
If you’re buying pre-ground, choose Moka-specific medium-fine – it’s safer than espresso pre-ground and will land you inside the pressure window. But freshly ground coffee from a quality burr grinder remains the only approach that gives you full, repeatable control over every variable in this process.
Frequently Asked Questions About Best Grind for Moka Pot
What grind size should I use for my moka pot?
Medium-fine – about 360–660 microns, or the texture of fine table salt – is the target. It’s finer than drip coffee but noticeably coarser than espresso.
Which ground coffee is best for a moka pot?
Freshly ground coffee from a burr grinder gives you the most control. If you’re buying pre-ground, look for coffee specifically labeled for moka or stovetop use – not espresso grind.
What grind setting for Bialetti?
It depends on your grinder model and its calibrated zero-point, but on a Baratza Encore, settings 10–14 are a reliable starting range. On a Timemore C2 or C3, 12–16 clicks from true zero works for most medium-fine targets.
What coffee do Italians use for a moka pot?
Traditional Italian moka coffee is a medium-to-dark roast, ground medium-fine – brands like Lavazza Qualità Rossa or Illy Classico are common. The grind is specifically formulated for stovetop pressure, not espresso machines.
Why does my moka pot taste bitter even with the right grind?
Bitterness usually means over-extraction – the grind is too fine, the heat is too high, or the brew ran past the first sputter. Try going one notch coarser and removing from heat the moment steady flow turns to a splutter.
Can I use a blade grinder for moka pot coffee?
You can, but it’s the weakest option. Blade grinders produce uneven particle sizes including lots of fine dust, which clogs the filter plate and causes bitter, inconsistent results. A burr grinder is a meaningful upgrade even at the budget end.
Why does my moka pot sputter from the start?
Early violent sputtering usually points to a grind that’s too coarse or heat that’s too high – pressure builds faster than the coffee bed can regulate flow. Lower the heat to medium-low and try one or two notches finer.
How do I know when to stop the moka pot brew?
Remove from heat 5–10 seconds after the first coffee appears at the spout, before the main sputter begins. The sputtering phase means the boiler is mostly empty and steam is driving the last extraction – that’s the bitter part you want to cut off.
References
- Ground Coffee for Moka Should Never Be Pressed | bialetti.com