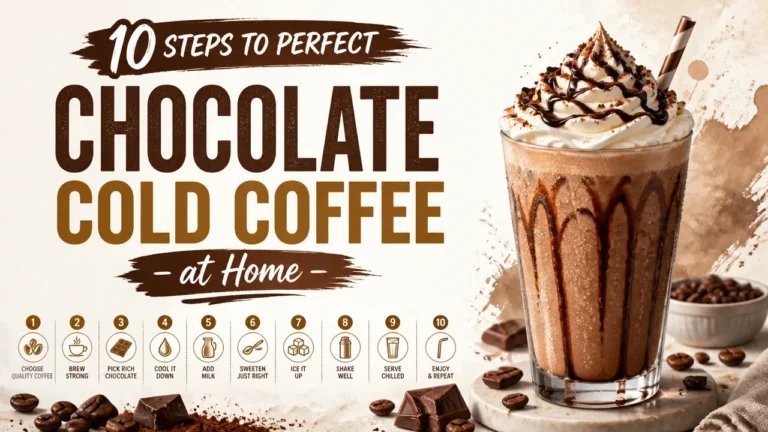

Perfectly made chocolate cold coffee is less a recipe and more a sequence of small decisions, each one protecting the next. Skip one – like adding cocoa powder directly to cold milk, or pouring into a warm glass – and the whole drink pays for it in graininess, bitterness, or a watery finish no amount of syrup can rescue.
What separates a café-quality result from a mediocre one at home isn’t equipment. It’s knowing why each step exists, so you can fix it when something goes sideways – and it will, the first time, for everyone.
Whether you are experimenting with homemade chocolate drinks or wondering about the espresso in your drink, understanding the foundational components is essential.
Key Takeaways on Chocolate Cold Coffee at Home
- Chill your glass, milk, and tools before starting – warm components accelerate ice melt and ruin texture before the first sip.
- Cocoa powder is hydrophobic and must be dissolved in a warm paste before cold milk is added, or the drink will be gritty.
- Taste the coffee base before adding chocolate or dairy; bitter coffee combined with cold dairy gets worse, not better.
- Ice cream isn’t just flavor – its emulsifiers hold cocoa particles in suspension and prevent the drink from separating.
- Blend for froth, not slush; over-processing ice turns a creamy cold coffee into a grainy, watery mess within seconds.
- When a batch goes wrong, change one variable at a time – otherwise you’ll fix the symptom without learning the cause.
Before You Start: The Setup That Prevents Most Failures
Most chocolate cold coffee recipes fail before the blender even turns on. The ingredients are usually fine. The problem is that nobody tells you what to have ready – chilled, prepped, and within arm’s reach – so you’re not stopping mid-recipe to run the milk under cold water or hunt for a clean jar.
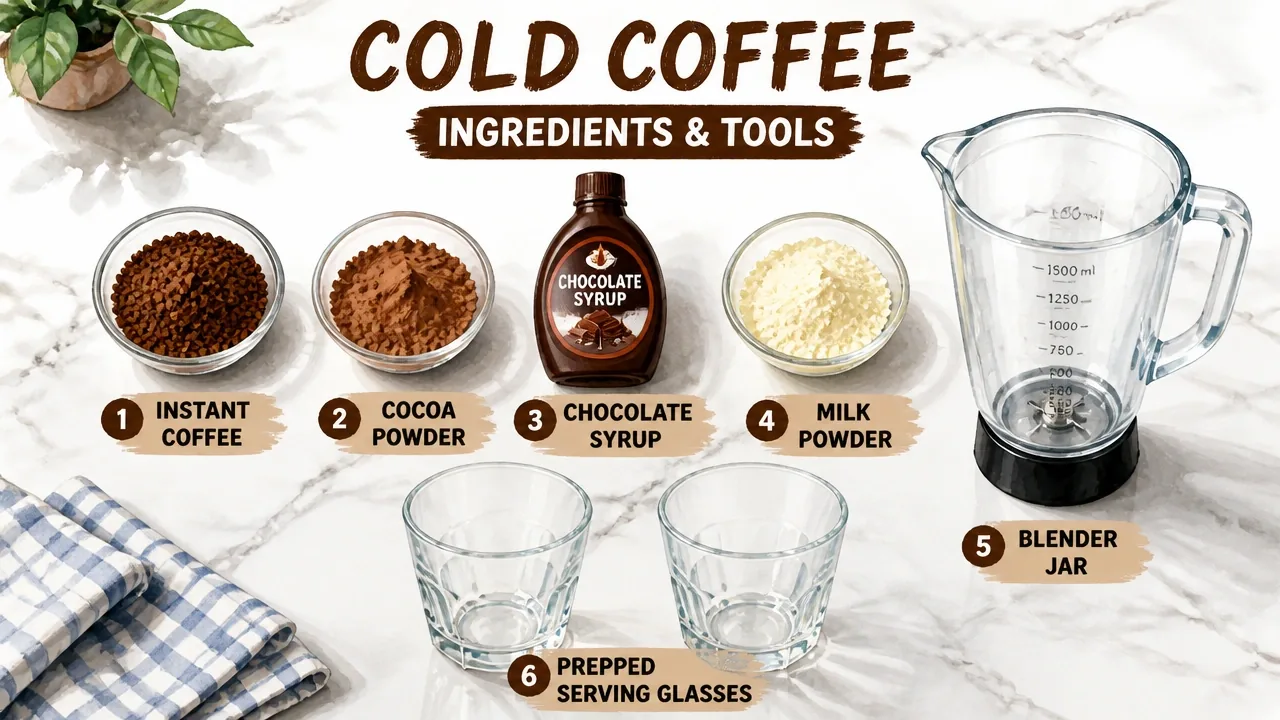
Here’s the full list of what you need:
Ingredients:
- 2 teaspoons instant coffee (or ½ to ¾ cup cold brew concentrate)
- 2 teaspoons granulated sugar
- 2 teaspoons warm water
- 2 cups chilled whole milk
- 1 tablespoon unsweetened cocoa powder
- 2 tablespoons chocolate syrup
- 1 tablespoon milk powder
- 2 scoops chocolate ice cream
- Ice cubes
Tools:
- One blender with a clean jar
- One serving glass (tall, wide-mouth)
- A small whisk or fork
- A parchment sheet (optional, for rimming the glass)
Before you touch anything, put the milk in the coldest part of your fridge if it isn’t already there. Chill the serving glass in the freezer. Have one clean blender jar ready to go – not two, not three – because a one-jar cleanup plan is the difference between making this drink twice a week and making it once.
J. Kenji López-Alt, chef and author of The Food Lab, points out that starting with a smaller amount of liquid first – equal volumes of powder to liquid – makes mechanical stirring far more effective. Smaller amounts get viscous faster, which helps break up dry pockets before the remaining liquid goes in.
That principle applies directly here. The warm coffee paste you’ll build in Step 3 is not a shortcut – it’s what makes your cocoa and coffee dissolve cleanly instead of floating in clumps.
Step 1: Choose a Chocolate Syrup That Won’t Disappear in Cold Milk
Chocolate syrup is doing more work here than most people realize. It isn’t just sweetness – it’s viscosity, color, and the first flavor signal your palate picks up before the coffee even registers.
Use a thick, sweetened chocolate syrup or a dessert-style chocolate sauce. Not a thin, sugar-free version. Thin syrups disperse too quickly in cold liquid and leave almost no chocolate body behind. Two tablespoons go into the blender; that quantity needs to hold its own against a full cup of cold milk and a shot of coffee.
Before you add it, taste it straight off the spoon. If it tastes flat, chalky, or faintly metallic, switch brands or add a small pinch of salt when you hit Step 8. A syrup that tastes good on its own will taste great in the final drink. One that tastes mediocre will taste worse once diluted.
If you want genuine cocoa depth on top of the syrup’s sweetness, the unsweetened cocoa powder in Step 4 is where that comes from. The two work together – syrup for sweetness and sheen, powder for bitterness and body. Don’t try to replace one with double the other.
Step 2: Prep and Chill Your Serving Glass
The serving glass is not a passive container. It’s an active part of the recipe, and prepping it now – before you start blending – means it’s ready exactly when you need it.
Drizzle chocolate syrup inside the glass and swirl it slowly to coat the sides. If you want a chocolate-rimmed edge, run a thin line of syrup around the rim and press on chocolate shavings. Then place the glass in the freezer for at least 10 minutes.
The cold does two things at once: it sets the chocolate coating so it doesn’t slide off when you pour, and it pre-chills the glass so your first ice cube doesn’t immediately start sweating. A warm glass accelerates ice melt from the outside in. That’s dilution you didn’t plan for.
The hidden benefit – and the one most café tutorials skip – is mess containment. Place a small parchment sheet under the glass before you start rimming. Chocolate shavings scatter and syrup drips, and cleaning both off a counter mid-recipe is exactly the kind of friction that makes people decide not to make this again. Catch it before it happens.
Leave the glass in the freezer until the moment you’re ready to pour.
Step 3: Build a Strong Coffee Base That Isn’t Bitter
The coffee base is the flavor anchor of the entire drink. Everything else – chocolate, milk, ice cream – is built on top of it. If the base is harsh, the drink is harsh. No amount of syrup fixes bitter coffee once it’s blended into cold dairy.
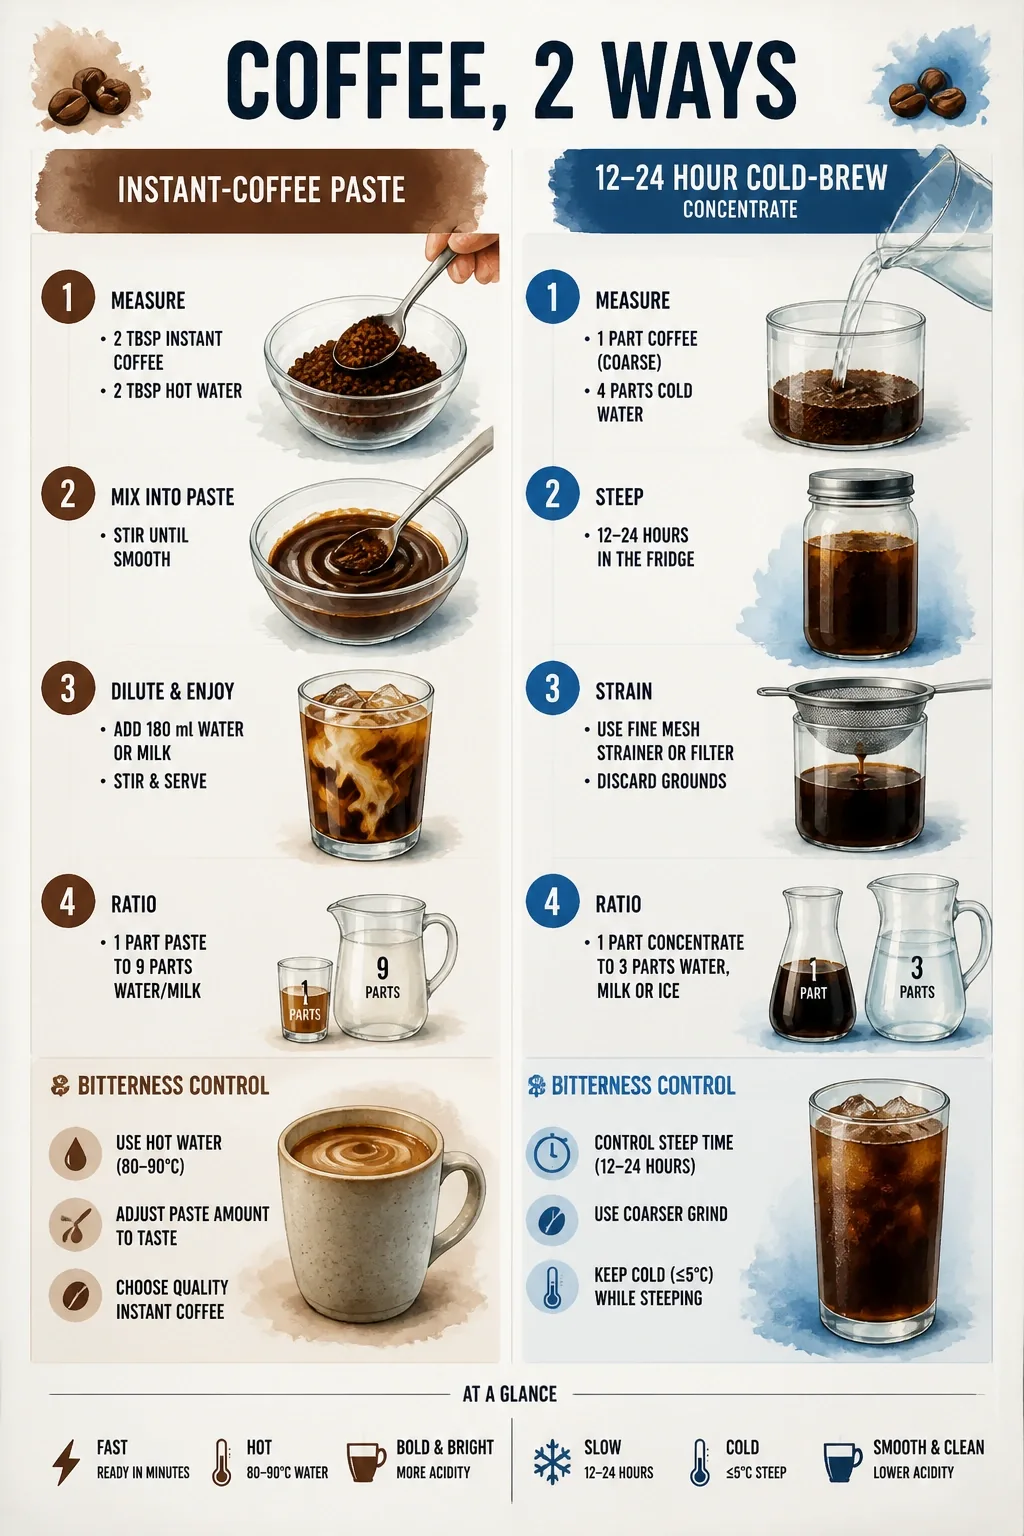
For the instant coffee method: Combine 2 teaspoons instant coffee, 2 teaspoons sugar, and 2 teaspoons warm water in a small bowl. Whisk until the mixture becomes a smooth, slightly glossy paste. It should look uniform – no dry granules, no gritty patches.
For cold brew: Steep coarse-ground coffee in cold water for 12 to 24 hours at a ratio of roughly 1:4 coffee to water. Use ½ to ¾ cup of the resulting concentrate in place of the instant paste. Cold brew naturally produces lower acidity, which is why it blends more smoothly with chocolate than a hot-brewed shot.
Before adding anything else, taste the base on its own. It should be strong – noticeably stronger than you’d drink it black – but not harsh or ashy. If it bites back, add a small pinch of salt or pull back the concentrate by a teaspoon or two. Bitter coffee combined with chocolate and cold dairy doesn’t mellow out – it amplifies. Correct it here, not at Step 8.
Step 4: Dissolve the Sugar and Cocoa Before Anything Cold Touches Them
Graininess in chocolate cold coffee almost always traces back to this step – specifically, to someone adding cocoa powder directly to cold milk. The powder hits the surface, forms a raft, and no amount of stirring fully breaks it down.
Add 1 tablespoon unsweetened cocoa powder directly into the warm coffee paste from Step 3. Whisk until there are zero dry specks. If the mixture seizes up and becomes too thick to stir, add one extra teaspoon of warm water and keep working it until it’s a smooth, uniform slurry.
Only after the sugar and cocoa are fully dissolved should cold milk or ice cream enter the picture.
The reason this matters goes deeper than just “cold water dissolves things slowly.” Research published in the Journal of Food Science and Technology on cocoa drink stability found that cocoa powder is inherently hydrophobic – the cocoa butter coating each particle actively repels water, which is why the powder clumps on contact with cold liquid instead of dispersing. Warming the mixture and concentrating it first helps overcome that surface resistance, allowing water to actually penetrate the particles before the drink is diluted.
That warm paste step isn’t a shortcut. It’s the only reliable way to get cocoa to behave.
Prof. William Ristenpart, co-director of the UC Davis Coffee Center, notes that brew temperature strongly shapes the extraction path, but what ultimately defines the drink is the final balance of strength and extraction yield – not the method used to get there.
That logic applies to cocoa just as cleanly as it does to coffee. The warm slurry method is your controlled extraction. The cold milk that follows is where you calibrate the final balance.
Step 5: Select Your Milk for Body and Sweetness Balance
Whole milk is the right starting point for most people. Its fat content carries chocolate flavor, buffers the coffee’s edge, and gives the drink a body that feels intentional rather than thin. Use 2 cups, fully chilled – not cold from a warm pantry, but cold from the back of the fridge.
If you’re going dairy-free, the milk you choose matters more than most recipes admit. Standard almond milk is mostly water with a small percentage of almonds and a stabilizer. It will produce a thinner drink with noticeably less body. Barista-style oat milk or a high-protein almond milk is the better call – the added fat and protein content behave more like whole milk under blending and hold up better against ice dilution.
Whatever milk you use, it must be cold before it goes into the blender. Warm or room-temperature milk accelerates ice melt the moment blending stops, and you’ll be pouring a drink that’s already thinning itself before it reaches the glass.
Step 6: Add Milk Powder and Ice Cream for Café-Style Texture
This is where the drink stops tasting homemade and starts tasting like something you’d pay eight dollars for.
Add 1 tablespoon of milk powder to the blender alongside the coffee-cocoa paste and chilled milk. Milk powder concentrates protein and fat without adding volume, which thickens the final drink without making it heavy. Then add 2 scoops of chocolate ice cream.
Most people think ice cream is there for flavor. It is – but it’s also doing structural work. Ice cream contains emulsifiers that hold fat and water together in suspension. When it’s blended into the cocoa-milk mixture, those emulsifiers help keep cocoa particles distributed evenly throughout the drink instead of settling to the bottom within the first two minutes.
Gordon J. Bellaver, owner of Penny Pound Ice and former barista at Intelligentsia Chicago, makes the point that ice – and by extension, the temperature management of cold drinks – rarely gets the same deliberate treatment as other ingredients, because most people assume it only serves one purpose: to chill. The texture consequences of that assumption show up in watery results and separated drinks that nobody talks about fixing.
Ice cream is the ingredient that closes that gap. It adds sweetness, fat, thickness, and emulsification in one scoop. If you don’t have milk powder, substitute an extra tablespoon of sweetened condensed milk or a small scoop of vanilla ice cream. Either will get you closer to the right texture than skipping it entirely.
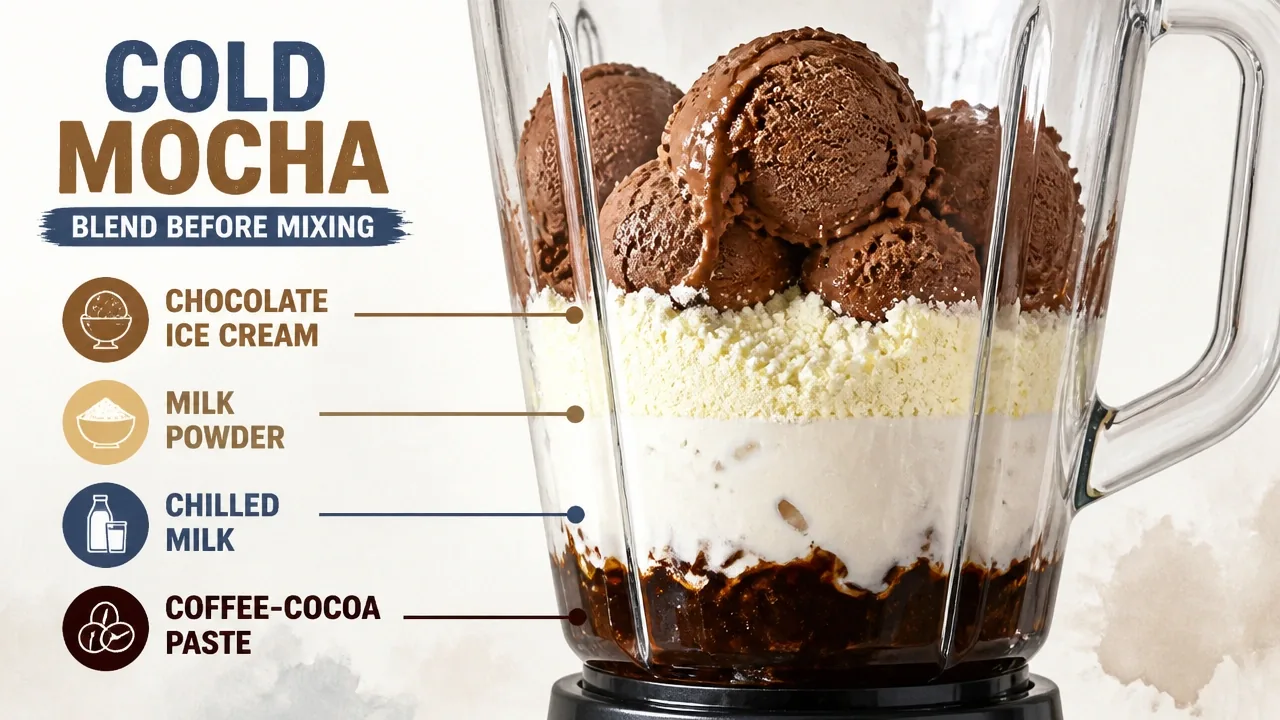
Step 7: Blend for Froth, Not Slush
Blend the full mixture – coffee-cocoa paste, chilled milk, milk powder, and ice cream – for about one minute on medium-high. You’re looking for froth: a uniform, slightly aerated texture with no visible chunks of ice cream. Stop the moment it gets there.
If you want to add ice directly to the blender, use only a few cubes and pulse two or three times. Never run the blender on ice for a full minute. Ice that gets over-processed turns the drink from a creamy cold coffee into a grainy slush that separates within seconds of hitting the glass. If your blender struggles with ice, skip it in the blender entirely. Pour the blended drink over fresh ice in the glass after the fact – that’s the better method anyway.
No blender? Use a wide-mouth jar with a tight-fitting lid. Add everything, seal it, and shake hard for 30 to 45 seconds. The result won’t be as uniformly frothy, but it will be well-mixed and cold. Finish with a spoon stir to break up any remaining ice cream pockets.
Step 8: Taste and Adjust Before the Final Pour
Don’t skip this step. The blended mixture in the jar is not the final drink – it’s the concentrated version of it. Ice will dilute it. The glass will cool it further. What tastes slightly too sweet or slightly too strong right now will taste balanced in 60 seconds.
Take a small spoon and taste the mixture directly from the blender jar. Ask yourself three questions:
- Is the chocolate present enough, or does it taste mostly like coffee?
- Is the sweetness there but not cloying?
- Is the coffee a background note or the only thing you taste?
If the chocolate is missing, add 1 teaspoon of cocoa powder or syrup and pulse for 5 seconds. If it’s too sweet, add a splash of milk and re-blend briefly. If it tastes sharp or bitter, a small pinch of salt – not more sugar – is the correction. Salt suppresses bitterness without pushing the drink into dessert territory.
Lugo, a Mexico City barista and collaborator with the Academia Mexicana del Cacao, describes the goal of cacao-forward drinks as generating specific sensory expressions – floral, fruity, acidic – that go well beyond industrial chocolate flavor. The benchmark isn’t sweetness. It’s a profile that delivers something distinct.
That’s a useful calibration frame even for a home recipe. You’re not chasing maximum sweetness. You’re chasing balance: chocolate-forward, coffee-present, cold, and smooth. If all three are in the right proportion, you’re ready to pour.
Step 9: Assemble Over Fresh Ice Without Losing the Froth
Pull the chilled glass from the freezer. Add fresh ice cubes – not the ones that have been sitting in the freezer for a week and picked up freezer odors – just before pouring. This sequence matters: ice in a warm glass starts melting the moment it lands; ice in a frozen glass stays solid long enough for the drink to settle.
Pour the blended mixture slowly over the ice, leaving about an inch of space at the top. That space is for toppings, but it also prevents overflow when the froth rises on contact with the cold.
Add toppings after the pour, not before. A drizzle of chocolate syrup, a few chocolate shavings, or an extra small scoop of ice cream – all of these go on last. If you add them before pouring, the incoming liquid pushes them sideways and they melt into the drink before the first sip.
If you tend to drink slowly or get interrupted, use coffee ice cubes instead of plain water ice. Freeze cold brew concentrate in an ice tray the night before. As they melt, they reinforce the coffee flavor instead of diluting it. It’s a small swap with a disproportionate payoff.
Step 10: Finish and Serve Immediately with a Success Check
Serve the drink within two minutes of assembly. The froth on top is a living thing – it collapses as the temperature equalizes and the bubbles thin out. If you’re making this for someone else, hand it to them before you clean up, not after.
The first sip tells you everything. It should be cold enough to feel sharp, smooth enough that no grit registers on the back of your tongue, chocolate-forward on the first hit, and coffee-present on the finish. There should be no watery aftertaste, no powdery residue, and no single flavor dominating the others.
If something is off, don’t drink through it hoping it’ll improve. Note which element is wrong – grit, bitterness, thinness, flatness – and before you start over, check the troubleshooting section below. Every symptom maps back to a specific step. Starting over without knowing which step failed is how you make the same mistake twice.
Troubleshooting: Which Step to Revisit When the Batch Is Off
Even a well-executed recipe goes sideways sometimes. The difference between someone who makes great chocolate cold coffee consistently and someone who makes it great once is the ability to diagnose the batch and correct one thing – not everything.
Symptom-to-Cause Mapping
Here’s the fast-reference map:
| Symptom | Root Cause | Return to |
|---|---|---|
| Bitter or harsh | Coffee base too strong or too concentrated | Step 3 |
| Grainy or gritty | Cocoa added to cold liquid without dissolving first | Step 4 |
| Thin or watery | Not enough milk powder or ice cream; too much ice melt | Step 6 or Step 9 |
| Separated in the glass | Insufficient emulsification; over-blended ice | Step 6 or Step 7 |
| Too sweet | Syrup or ice cream quantity too high | Step 8 |
| Flat chocolate flavor | Syrup too thin or cocoa under-dissolved | Step 1 or Step 4 |
The social recipe world is full of aesthetic praise – beautiful photos, five-star comments – but almost none of it addresses what to do when the drink doesn’t look or taste like the photo. These failure points are real, they’re common, and they all have specific causes.
Single-Variable Correction Protocol
The most important rule when correcting a batch: change one thing at a time.
If the drink is too sweet, add a teaspoon of unsweetened cocoa powder or a small pour of black coffee and taste again before touching anything else. If it’s too bitter, add a splash of milk or a half-scoop of ice cream – not both. If it’s thin and watery, blend in an extra half-tablespoon of milk powder or another scoop of ice cream. If it has separated in the glass, pour it back into the blender and pulse for 10 seconds; don’t add more ingredients until it’s re-emulsified.
The reason for the one-variable rule is simple: if you add milk and cocoa and ice cream at the same time and the drink improves, you don’t know which one fixed it. You’ll be guessing again next time. Change one variable, taste, decide. That loop – applied consistently – is what turns a recipe into a repeatable skill.
Frequently Asked Questions About Chocolate Cold Coffee at Home
Can I use hot brewed coffee instead of instant or cold brew?
You can, but let it cool completely to room temperature first, then refrigerate it for at least 30 minutes before blending. Hot coffee melts ice cream on contact and warms the milk, which collapses the froth before you even pour.
Why does my chocolate cold coffee taste watery even though I followed the recipe?
The most common culprit is warm milk or a warm glass. Both accelerate ice melt from the moment the drink is assembled. Make sure your milk is fridge-cold and your glass is freezer-chilled before you start.
What’s the best ratio of coffee to chocolate for a balanced drink?
The 2 teaspoons of instant coffee to 2 tablespoons of chocolate syrup ratio in this recipe is intentionally coffee-leaning. If you want it more mocha-forward, increase the syrup by half a tablespoon or add an extra teaspoon of cocoa powder – not both at once.
How do I make this without a blender?
Use a wide-mouth jar with a tight lid and shake for 30 to 45 seconds. Dissolve the coffee, sugar, and cocoa in warm water first – that step is non-negotiable – then add the cold milk and ice cream before shaking.
Can I make this ahead of time and store it?
You can store the blended base (without ice) in a sealed jar in the fridge for up to 24 hours. Re-blend or shake vigorously before serving, then pour over fresh ice. Don’t store it with ice already added.
Why is my cocoa powder still clumping even after I whisk it?
The paste is likely too dry or not warm enough. Add an extra teaspoon of warm water and keep whisking. The slurry needs to be fully fluid – not stiff – before cold milk goes in.
Does the type of chocolate ice cream brand matter?
It matters more than people expect. Ice creams with a higher fat content and real cocoa (not artificial chocolate flavoring) produce a richer, more stable emulsion. Cheap brands with a lot of air whipped in tend to dissolve too quickly and leave the drink thin.
How do coffee ice cubes actually help, and are they worth making?
They prevent dilution. As they melt, they add coffee flavor instead of water. If you drink slowly or tend to get distracted, they’re worth the 30 seconds it takes to freeze cold brew in an ice tray the night before.
References
- Ask the Food Lab: On Hot Chocolate and Whole Wheat | seriouseats.com
- Just Published: Brewing Temperature and the Sensory Profile of Brewed Coffee | sca.coffee
- Y’all Are Not Adding Enough Ice to My Cold Drinks | sprudge.com
- Fine Chocolate Meets Specialty Coffee: A New Kind of Hot Cocoa | perfectdailygrind.com
- Investigating the effect of different types of cocoa powder and stabilizers on suspension stability of cinnamon-cocoa drink | pmc.ncbi.nlm.nih.gov