

Properly made cold brew coffee is one of the most forgiving things you can brew at home-once you understand what’s actually happening inside the jar. No heat means no thermal extraction, which means the water has to pull flavor compounds out of the grounds through slow diffusion alone. That changes everything about how you set up the process.
This guide walks through each step in order: what gear you need, how to choose and grind your coffee, how to set the right ratio, and how to steep, filter, and store a batch that tastes smooth and clean every time. Stumptown, Big Shoulders, and UC Davis research all point to the same levers. We’ll cover all of them.
Key Takeaways on Cold Brew Coffee
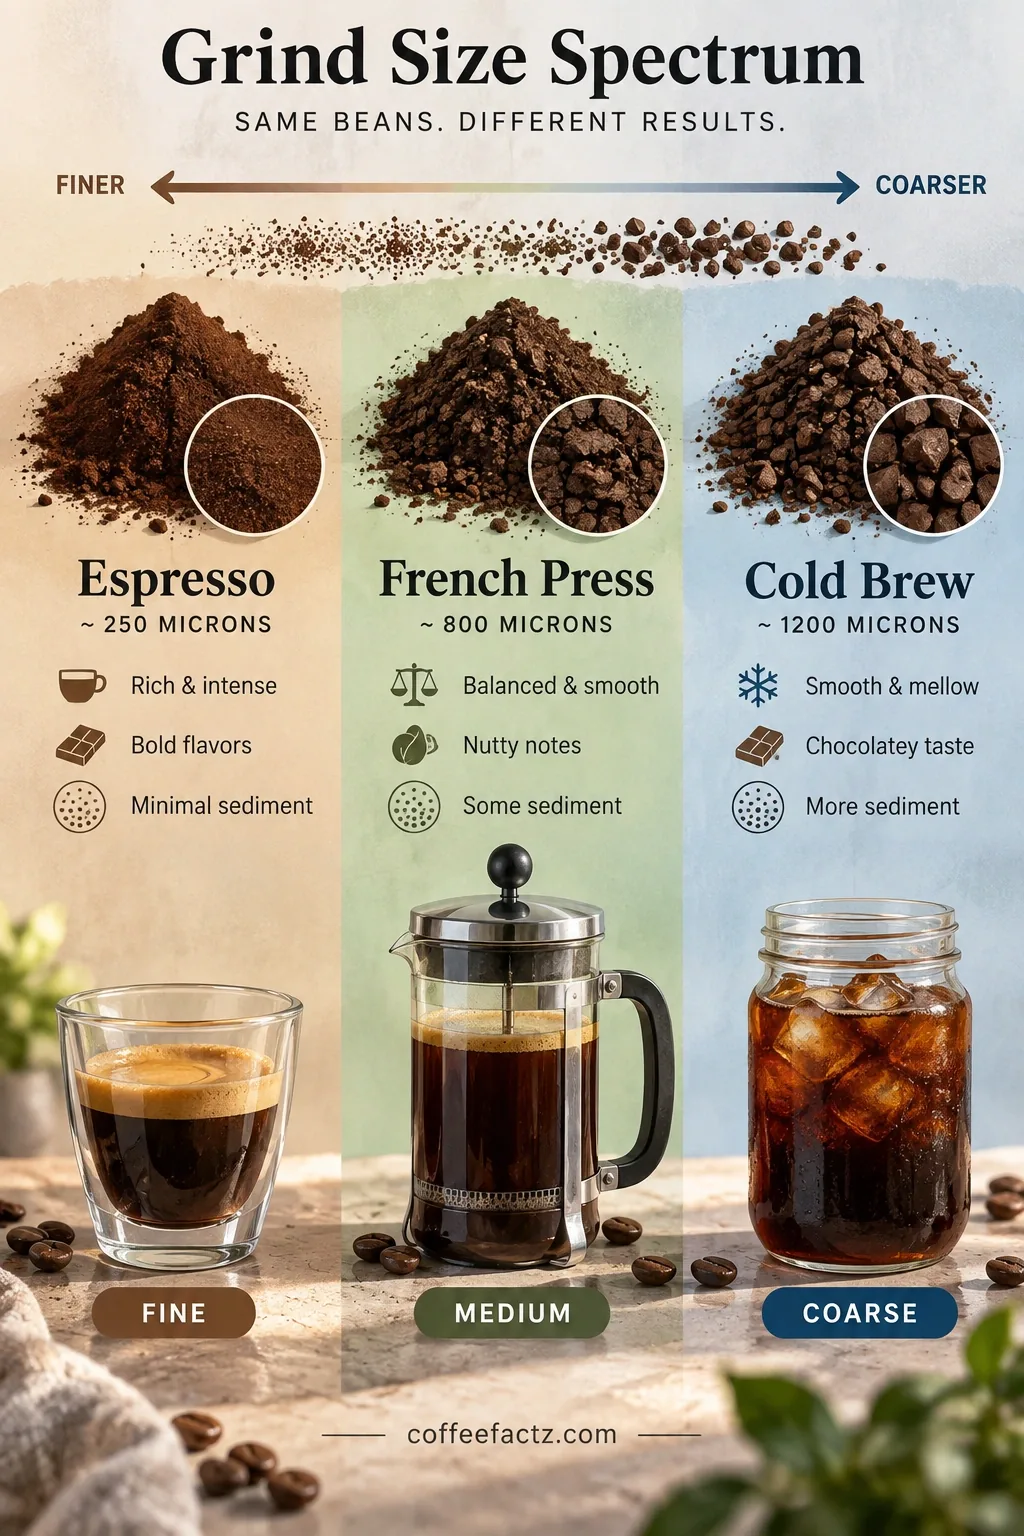
- Grind size is your primary control lever: target 1200 microns (coarse, like raw sugar) and adjust grind before adjusting steep time.
- Brew ratio drives strength more than temperature does; use weight, not scoops, for any result you can repeat.
- Cold brew extracts fewer harsh acids than hot brew because diffusion is slower and more selective than thermal extraction-that’s the mechanical source of its smoother taste.
- Steep 12–18 hours at 4°C refrigerator temperature; never exceed 24 hours or woody, funky off-notes develop.
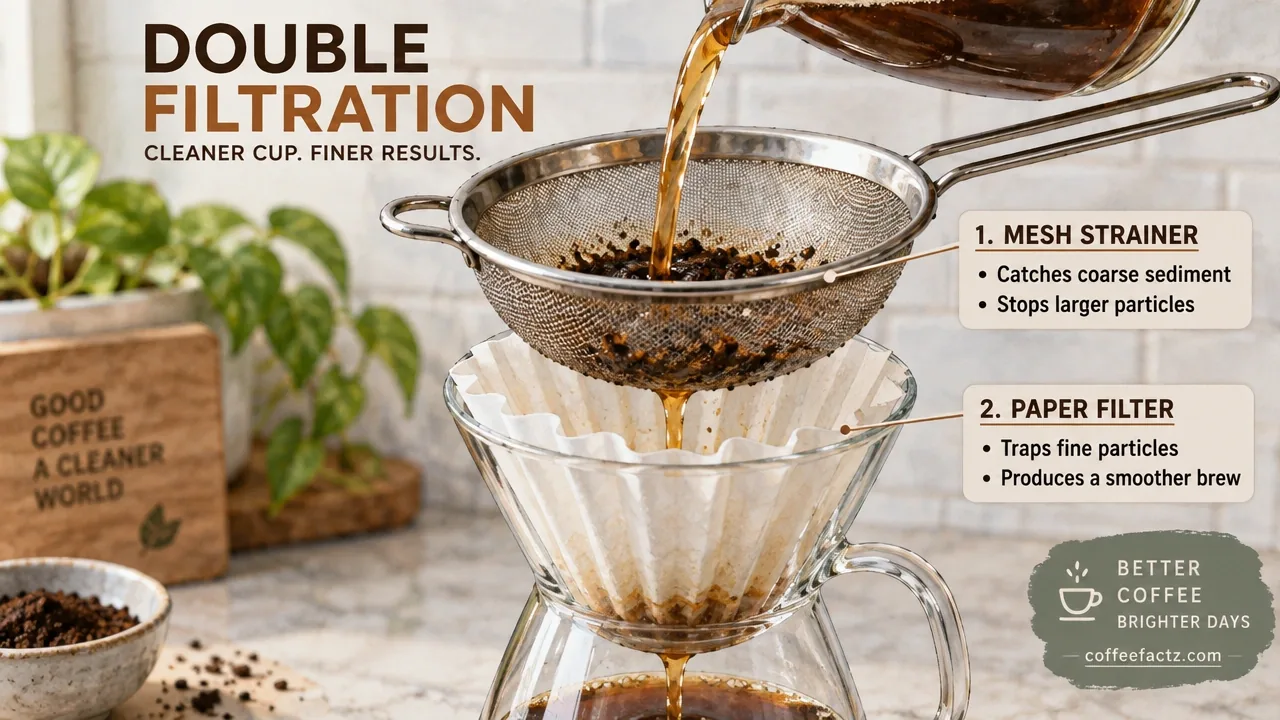
- Double filtration-metal mesh first, paper filter second-removes fine sediment and diterpenes that a single mesh pass leaves behind.
- Shelf life runs 7 days reliably, up to 10 days if sealed airtight and refrigerated immediately; trust your nose over any date.
Prerequisites: What You Actually Need (and What You Don’t)
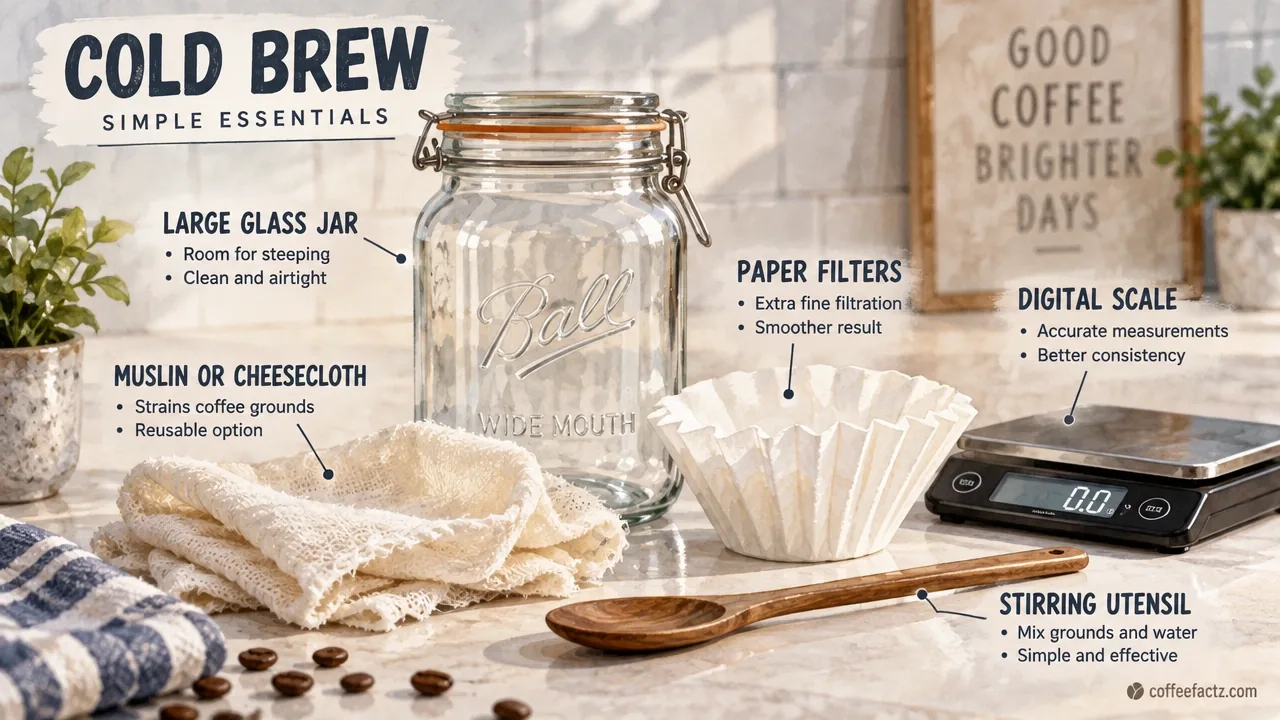
Cold brew coffee demands almost nothing in terms of gear. A large jar or container, a stirring utensil, a filter, a digital scale, and a refrigerator—that’s all the cold brew equipment you need. No special machine, no dedicated cold brew tower, no subscription kit required.
Before anything else, two common confusions are worth clearing up. Iced coffee is hot-brewed coffee poured over ice; it’s fast, but it picks up the acidity and bitterness that come with thermal extraction. Instant coffee dissolves in water rather than extracting through it-there’s no diffusion happening at all. Cold brew uses regular ground coffee and relies entirely on slow diffusion through cold water over many hours. Those are three completely different processes producing three completely different cups.
Set your expectations accordingly. Cold brew is not a quick chill. Plan for a 12 to 24-hour window from the moment you combine grounds and water to the moment you pour your first glass. Most of that time is unattended; the process just needs time.
On the gear side, the highest-value investment is in your coffee and your filtration material-not in specialized equipment. A large jar plus muslin, cheesecloth, or a paper filter gets you everything a $60 cold brew pitcher does. Equipment doesn’t make a better cup. Your understanding of the process does.
Step 1: Choose Coffee and Grind Size
Grind size is the single most important variable you control in cold brew, and it’s also the most common place batches go wrong. Start there before you worry about which bag to buy.
Use a coarse grind-around 1200 microns, which is roughly the texture of raw sugar or a standard French press grind. If you’ve used a French press before, that’s your target. Avoid anything approaching espresso grind; fine particles dramatically increase the surface area exposed to water, which accelerates extraction and pulls bitter, astringent compounds that cold water would otherwise leave behind. The result is a muddy, sharp brew with a layer of silt at the bottom. Go too coarse in the other direction and the water barely touches the interior of each particle-you get a weak, watery cup with almost no sweetness or body.
Grind size is your primary troubleshooting lever. If a batch tastes too sharp or bitter, coarsen the grind before you shorten the steep time. If it tastes hollow and flat, grind slightly finer before you extend the steep. Adjusting time is the blunt instrument; adjusting grind is the scalpel.
On coffee selection: a medium to medium-dark roast tends to produce a balanced cold brew with chocolate and caramel notes that hold up well without heat. Lighter roasts can work beautifully but may taste thin if the grind or ratio isn’t dialed in. Prioritize freshness and transparent sourcing over marketing language on the bag. Stale coffee, regardless of roast level, produces a flat, papery brew that no amount of steeping time will fix.
Step 2: Set Your Coffee-to-Water Ratio
Cold brew ratio is where most home brewers leave precision on the table. Scoops and “a handful” don’t repeat. Weight does. A digital scale is the cheapest meaningful upgrade you can make to your process-a basic kitchen scale costs less than a bag of decent coffee and eliminates the single biggest source of batch-to-batch inconsistency.
The ratio you choose determines whether you’re making a concentrate or a ready-to-drink cold brew, and those are two different products with different uses.
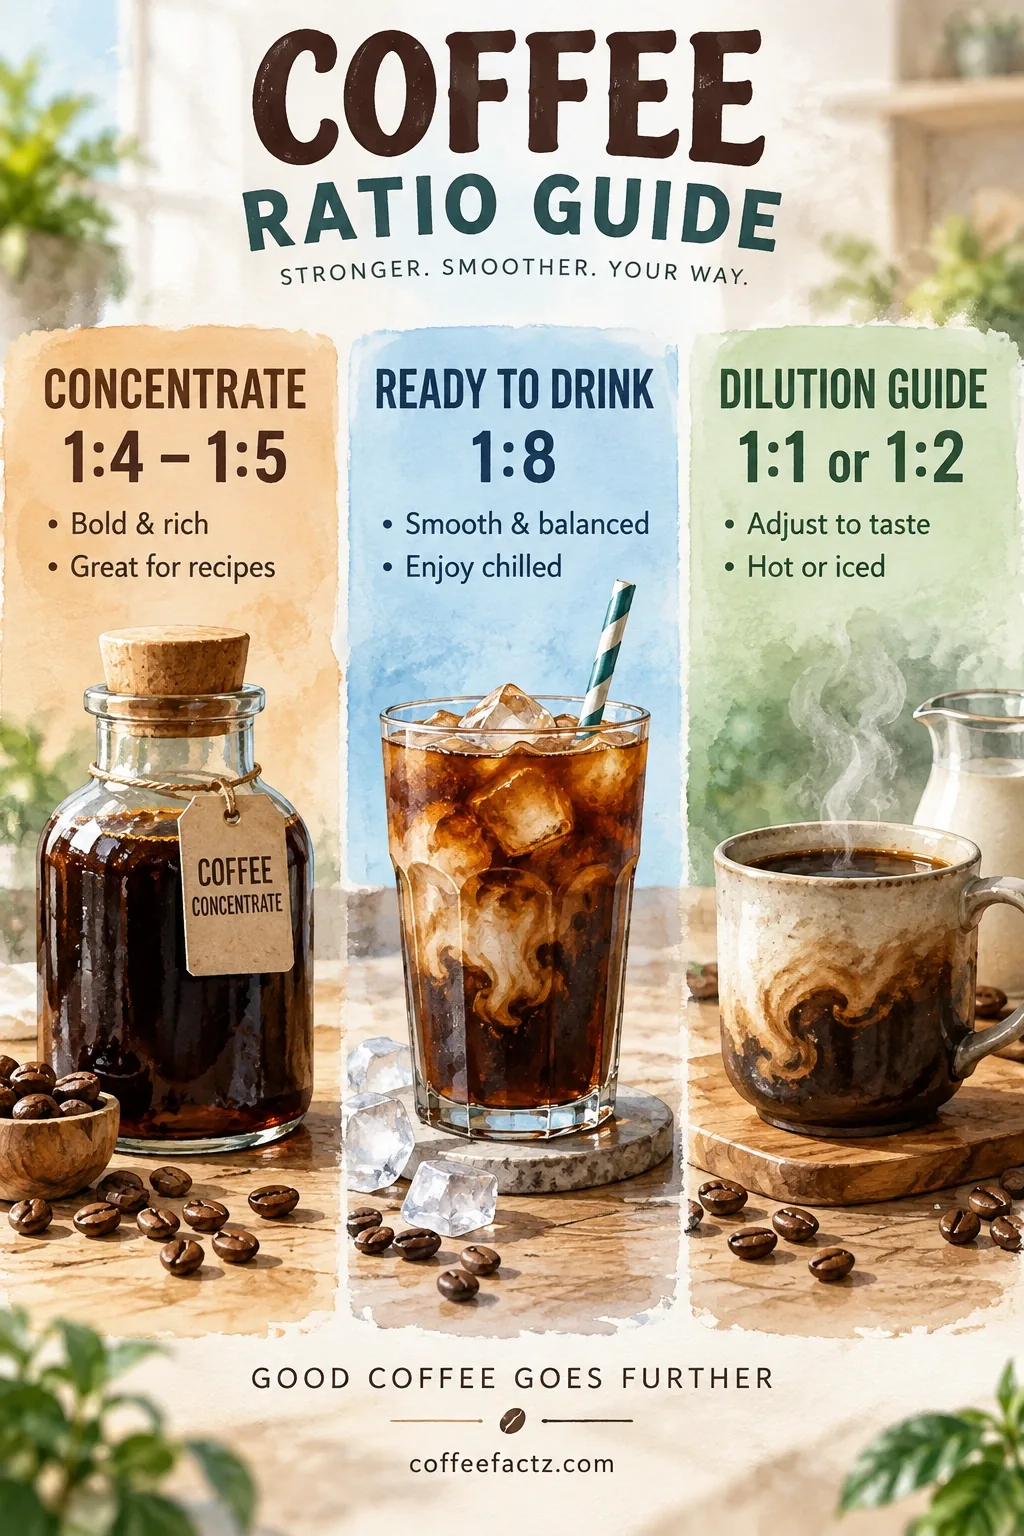
A concentrate uses roughly 1 part coffee to 4–5 parts water by weight. So for 100g of coffee, you’d use 400–500g of cold filtered water. This produces a dense, intense brew that you dilute before serving-typically 1:1 or 1:2 with water, milk, or a combination of both. It’s efficient for storage and lets you customize strength at the glass level.
A ready-to-drink cold brew uses closer to 1 part coffee to 8 parts water. It comes out of the jar at drinking strength with no dilution needed. The tradeoff is that it takes up more refrigerator space and has less flexibility for adjusting strength after the fact.
Pick one approach, write down your exact weights, and stick to it for your first batch. You can’t troubleshoot what you didn’t measure.
“Both our model and experimental results indicate that the TDS varies inversely with the brew ratio,” noted Mackenzie Batali, a researcher at the UC Davis Coffee Center, adding that brew temperature across the ranges tested had little effect on equilibrium extraction strength-brew ratio was the dominant variable.
This is worth sitting with. If your cold brew is consistently too weak or too strong, the ratio is almost certainly the culprit-not the steep time, not the coffee brand. Fix the ratio first.
Step 3: Combine and Steep – Diffusion vs. Thermal Extraction
Cold brew steeping starts simply: add your measured coffee grounds to a jar, pour cold filtered water over them, and stir until every gram of coffee is wet. No dry pockets. Stir for 30 seconds, then seal the jar.
Now the process takes over, and understanding what’s actually happening inside that jar will help you make better decisions about time and temperature.
Hot coffee extraction is driven by thermal energy. Heat agitates water molecules, breaks down cell walls in the coffee grounds, and pulls soluble compounds-acids, oils, aromatics-into solution quickly. That’s why a pour-over takes 3 minutes and a French press takes 4. The heat does the work.
Cold brew has no thermal energy to lean on. Instead, it relies entirely on diffusion: water molecules slowly penetrating the porous structure of each coffee particle, dissolving soluble compounds, and carrying them back out into the surrounding liquid. This is a much slower process, and it’s selective. The harsh, volatile acids that hot water pulls in seconds take far longer to diffuse at low temperatures-many of them never fully extract at all. That’s the mechanical reason cold brew tastes smoother and less acidic. It’s not magic. It’s diffusion kinetics.
Research from Mackenzie Batali at the UC Davis Coffee Center found that full immersion hot brews reach extraction equilibrium in roughly 20 to 30 minutes, while room-temperature cold brews take around five hours to reach equilibrium, and refrigerator-temperature brews take 10 or more hours.
Temperature matters for two reasons: speed and safety. Steeping in the refrigerator at 4°C is the standard approach. It slows extraction, which means you need more time, but it also keeps the brew in a safe temperature zone for the entire steep. Steeping at room temperature (around 20°C) accelerates extraction-you may hit a drinkable result in 8–12 hours rather than 14–18-but the brew is sitting in a warm environment the whole time, which increases microbial risk. If you steep at room temperature, check it earlier and don’t let it go past 12 hours.
The safe steep window for refrigerator brewing is 12 to 18 hours, with 14 being a reliable center point for most ratios and grind sizes. Extending to 24 hours is acceptable if your grind is very coarse. Beyond 24 hours, the brew starts pulling woody, musty compounds that cold water was never supposed to extract. The cup turns funky.
Check out this walkthrough on the steeping process in practice:
Step 4: Filter for Clarity and Diterpenes Removal
Cold brew filtration is not optional cleanup-it’s part of the extraction process, and skipping it or doing it halfway produces a cup that’s physically unpleasant to drink.
The goal is two-pass filtration. First, strain the brew through a metal mesh or cheesecloth to remove the bulk of the grounds. This gets the large particles out quickly. Then, pour the strained liquid through a paper filter. This second pass catches the fine sediment that slipped through the mesh and, more importantly, traps diterpenes-oily compounds naturally present in coffee that pass freely through metal filters but get absorbed by paper. Diterpenes at high concentrations have been linked to elevated LDL cholesterol in some research; paper filtration is the practical way to keep them out of your cup.
A French press is a common improvised cold brew vessel, but it’s a risky default for filtration. The metal mesh on a French press is designed to stop coarse grounds, not fine particles. Cold brew ground at 1200 microns will still produce enough fines to create a thick, murky brew if you stop at the French press plunge. If you use one, treat it as your first-pass filter only and always follow with paper.
If your brew sat for a long time and you notice settled sediment at the bottom of the jar, don’t pour the whole thing through the filter. Decant the top 70–80% of the volume first, discard the bottom 20–30% where the sediment has concentrated, then filter the decanted portion. This saves your filter from clogging and keeps your final brew cleaner.
Step 5: Store Airtight and Track Shelf Life
Cold brew storage is straightforward, but two small decisions determine whether your brew stays good for a week or turns stale in three days: the container and the label.
Use an airtight container. Oxygen degrades coffee compounds steadily after brewing. A loosely capped jar or a container with a poor seal exposes the brew to air every time you open the refrigerator, which accelerates oxidation and flattens the flavor. A mason jar with a tight lid, a swing-top bottle, or a dedicated pitcher with a sealed cap all work. The container doesn’t need to be expensive-it needs to close properly.
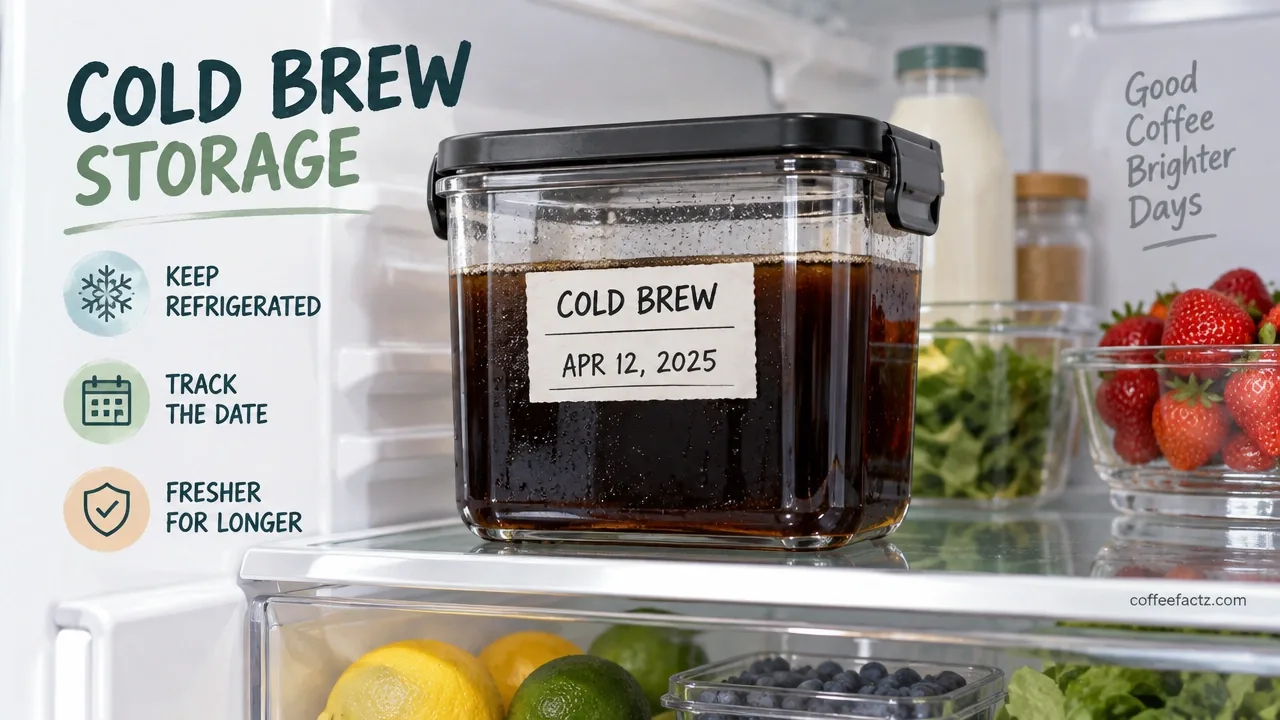
Label the container with the brew date before it goes into the refrigerator. This sounds trivial until you’re standing at the fridge on day nine trying to remember when you made the batch.
Shelf life for plain cold brew-no milk, no added sweeteners-runs about 7 days under normal refrigeration. If you filtered immediately after steeping, sealed the container tightly, and kept it consistently cold, you may get up to 10 days before quality noticeably drops. Treat that 10-day mark as an outer boundary, not a target.
The discard rule is simple: if it smells off or tastes wrong, pour it out. No date on a label overrides your senses.
Step 6: Dilute, Serve, and How It Compares to Iced Coffee
Cold brew dilution is the last variable you control, and it’s the most personal. If you made a concentrate (1:4 or 1:5 ratio), start with a 1:1 dilution-equal parts concentrate and water or milk over ice-and adjust from there. Some people prefer 1:2. Some drink concentrate straight. Taste it before you add ice and again after, because dilution and temperature both shift how you perceive sweetness and acidity.
Serve over ice. Add milk, oat milk, a sweetener, or nothing-whatever you actually want to drink. The point of making it yourself is that you control every variable. Write down what you did so you can repeat it.
On the question of strength: cold brew concentrate is more concentrated than brewed iced coffee before dilution, but once you dilute it to drinking strength, the comparison depends entirely on your ratio. What’s consistently different is the sensory profile.
A peer-reviewed sensory study published in Foods found that hot-brewed coffee reached a higher equilibrium TDS (4.27%) and extraction yield (22.28%) than refrigerator cold brew (TDS 3.76%, EY 19.55%), confirming that hot water extracts more total dissolved material. Trained panelists rated hot brew as more bitter, sour, and rubbery, while cold brew was consistently perceived as more floral. Cold brew also registered a higher pH across all samples, meaning measurably less acidity.
This lines up with what UC Davis researcher Mackenzie Batali found in separate sensory work: cold-brewed coffee consistently had a slightly higher pH than hot-brewed samples. Less acid in the cup is not a marketing claim. It’s a measurable consequence of how diffusion-based extraction works.
Iced coffee-hot-brewed then chilled-pulls those acids quickly because heat is doing the extraction. The compounds are already in solution before the coffee hits the ice. Cold brew never extracted them at the same rate to begin with.
If you need cold coffee in two minutes and can’t wait for a batch, an AeroPress brewed with a stronger ratio directly over ice is a fast workaround. It’s not cold brew-it’s a concentrated hot brew diluted by melting ice-but it’s a reasonable substitute when time is the constraint.
Taste your cold brew the same way every time: smell it first, then sip without ice, then sip over ice. Note what you’re tasting. Acidity, sweetness, bitterness, and body are all adjustable through the variables you now control. Origin and roast level often have a larger impact on flavor than brew temperature alone, so don’t overlook the coffee itself when you’re evaluating a batch.
Troubleshooting: Fix Weak, Bitter, Muddy, Funky, or Spoiled Cold Brew
Cold brew troubleshooting is mostly pattern recognition. Every off-flavor maps back to one of five variables: grind size, ratio, steep time, temperature, and filtration. Work through them in that order.
Flavor Balance Adjustments
Weak cold brew almost always points to either a ratio that’s too dilute or a grind that’s too coarse. Check your ratio first-if you used 1:8 and expected concentrate-level intensity, you got exactly what the ratio produces. If the ratio looks right, grind slightly finer on the next batch. Don’t adjust both at once or you won’t know which fix worked.
Bitter or muddy cold brew points in the opposite direction: grind too fine, steep too long, or insufficient filtration. Coarsen your grind before shortening your steep time. If the texture is the problem-thick, gritty, almost chewy-your filtration didn’t catch the fines. Run the batch through a paper filter, even after the fact. It won’t undo bitterness from over-extraction, but it will fix the texture.
Off-taste that isn’t quite spoiled often responds to dilution. A 2:1 water-to-cold-brew ratio can round out a batch that’s slightly harsh or unbalanced without wasting it entirely. Think of it as a rescue dilution before you commit to pouring it out.
Safety and Freshness Checks
Funky or woody flavor is the signature of over-steeping. Cold water, given enough time, eventually pulls compounds that should stay in the grounds-woody lignins, musty off-notes that no amount of dilution fully masks. Keep every batch within the 24-hour maximum, refrigerate from the start, and this problem disappears.
Spoiled cold brew is distinct from over-steeped cold brew. Spoilage shows up as visible mold, fizzing or carbonation in a brew that shouldn’t have any, or a smell that’s sour, fermented, or otherwise clearly wrong. If you see or smell any of those, discard the batch without tasting it. A batch left at room temperature for too long, or stored in a container that wasn’t clean, is the most common cause. Cold brew is a low-acid liquid with significant dissolved organic matter-it’s a hospitable environment for microbial growth if you give it the chance.
The fix is upstream: refrigerate immediately after steeping, use clean equipment, and stay within the safe steep window. You won’t have a spoilage problem if those three conditions are met.
Frequently Asked Questions About Cold Brew Coffee
Can you make cold brew from regular coffee?
Yes, regular ground coffee is exactly what you use. Any coffee you’d brew hot works for cold brew-just grind it coarse and give it time.
What is the correct ratio for cold brew coffee?
For concentrate, use 1 part coffee to 4–5 parts water by weight. For ready-to-drink, use 1 part coffee to 8 parts water. Weigh both; don’t rely on scoops.
Can you make cold brew from instant coffee?
No. Instant coffee dissolves in water rather than extracting through it, so there’s nothing to steep. Cold brew requires ground coffee and slow diffusion over many hours.
Is cold brew stronger than iced coffee?
Cold brew concentrate is more concentrated before dilution, but once you dilute it to drinking strength, the comparison depends on your ratio. What’s consistently different is acidity-cold brew has a measurably higher pH and tastes less bitter and sour than iced coffee.
Why does my cold brew taste bitter if cold water is supposed to be gentler?
Bitterness in cold brew almost always comes from grinding too fine. Fine particles over-extract even in cold water. Coarsen your grind first before blaming the steep time or the coffee.
Does the type of water matter for cold brew?
Yes. Filtered water makes a noticeable difference. Tap water with heavy chlorine or mineral content introduces off-flavors that cold brew’s long steep time has plenty of opportunity to amplify.
Can I steep cold brew at room temperature instead of in the fridge?
You can, but keep it under 12 hours and monitor it closely. Room temperature accelerates extraction and increases microbial risk. Refrigerator steeping is safer and gives you a wider, more forgiving window.
How do I know if my cold brew has gone bad?
Smell it before you pour. Sour, fermented, or musty odors mean discard it. Visible mold or unexpected fizzing are also clear signs. If it’s within 7 days, sealed, and smells clean, it’s fine.
References
- How Strong Is the Coffee You’re Cupping? New Model Captures the Equilibrium Extraction Nature of Full Immersion Brewing | sca.coffee
- How Cold Brew Differs from Chilled Hot Brew | sca.coffee
- Cold vs. Iced: Using Sensory Analysis to Test the Claim That Cold Brew Is Sweeter and Less Acidic | sca.coffee
- Foods – Sensory Analysis of Full Immersion Coffee: Cold Brew Is More Floral, and Less Bitter, Sour, and Rubbery Than Hot Brew | doi.org