
Fresh-ground coffee from whole beans tastes dramatically better than anything pre-ground, and the reason is chemistry, not snobbery. The volatile compounds that give coffee its aroma start escaping the moment a bean is cracked open. Pre-ground coffee sitting in a bag has already lost most of them before it reaches your cup.
The good news: you don’t need a $300 espresso machine or a precision scale to fix this. A grinder, a brewing device, and the right ratio are all it takes. Here’s exactly how to do it.
Once you begin brewing with freshly ground beans, you will also learn how to describe aromas and flavors with much greater precision and confidence.
Once you have mastered the basics of grinding and brewing, you can even take your palate to the next level by learning coffee cupping at home to evaluate different flavor profiles like a professional.
Key Takeaways on How to Make Coffee From Beans
- A blade grinder and a French press are enough to start; equipment upgrades matter less than grind size and ratio.
- Match grind size to your brewing method: coarse for French press, medium for drip and pour-over, fine for espresso.
- The 1:15 to 1:16 coffee-to-water ratio by weight is your baseline; adjust coffee dose, not water volume, to change strength.
- Grinding right before brewing preserves aroma compounds that pre-ground coffee loses within days of opening.
- The bloom step – wetting grounds and waiting 20 to 30 seconds before your full pour – prevents uneven extraction caused by trapped CO₂.
- Bitter coffee means over-extraction; sour or weak coffee means under-extraction. Grind size is the first variable to adjust for either problem.
What You Need Before You Start
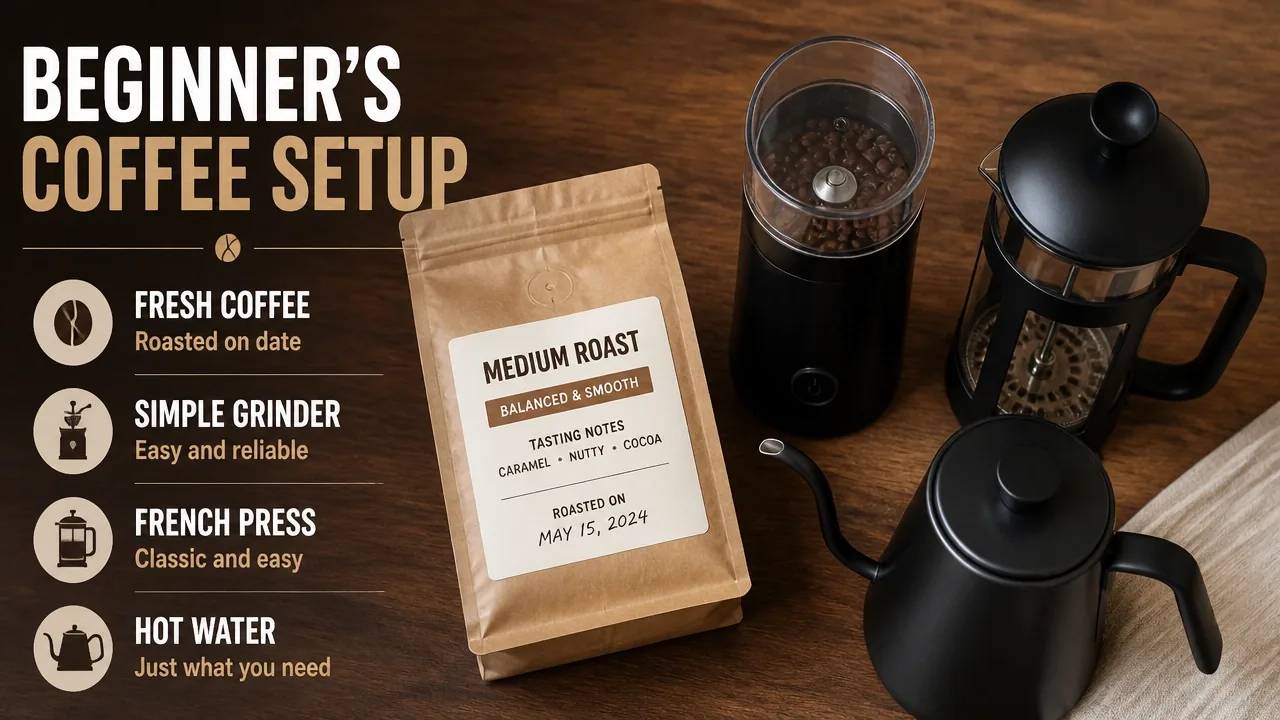
Getting started with whole bean coffee doesn’t require a specialty equipment budget. Three things cover everything: whole coffee beans, a grinder (burr or blade both work), and a brewing device. A French press, a pour-over dripper, or a standard drip machine all produce excellent coffee. Pick whichever one you already own.
For beans, start with a medium roast. Medium roasts are forgiving because they sit in the middle of the flavor spectrum. They’re not so light that small mistakes taste grassy, and not so dark that over-extraction turns them harsh. Look for a roast date on the bag and aim for coffee roasted within the last one to two months. Freshness matters more than origin or price point at this stage.
Water quality is the quiet variable most beginners overlook. Coffee is roughly 98% water, so tap water with strong chlorine or heavy mineral content will show up in the cup. Filtered water is the simplest fix. You don’t need anything fancy – a basic pitcher filter does the job.
You may have heard that serious home brewing requires a $129 burr grinder and a digital scale. That’s not where you need to start. A blade grinder is an acceptable entry point, and even high-quality pre-ground coffee gets you in the game. Start with what you have. Upgrade the grinder later once you’ve dialed in the rest of the process.
One practical note on water temperature: the ideal brewing range is 195–205°F, but you don’t need a thermometer to hit it. Bring water to a full boil, then let it sit for 30 to 45 seconds before pouring. That rest period drops the temperature right into the target range every time.
A photo of a basic beginner setup, including a French press and blade grinder, shows exactly how minimal the gear requirement actually is.
Once you have your grind size and ratio dialed in, you can fine-tune your technique by exploring our coffee brewing temperature guide to see how different levels of heat impact extraction and flavor notes.
Step 1: Grind the Beans
Grind size is the single most important variable in coffee brewing, and it’s the one most beginners set wrong. The principle is straightforward: different brewing methods move water through coffee at different speeds, and the grind size controls how much resistance the water meets. Match the grind to the method, and extraction happens evenly. Mismatch them, and you get a cup that’s either bitter or flat.
Here’s the map:
- Coarse grind (looks like sea salt) – French press, cold brew
- Medium grind (looks like sand) – drip machines, pour-over
- Fine grind (looks like table salt) – espresso
The visual comparison matters because it gives you a reference point when you’re eyeballing the grinder output. If your medium grind looks more like powdered sugar, it’s too fine for a drip machine and will likely produce a bitter, over-extracted cup.
“However, in theory, if you grind finer then you will increase pressure and extraction yield, but ultimately there is a maximum extraction yield. If you grind too fine, the water flow rate will decrease because there is too much resistance, and it can often result in channeling.” – Chahan Yeretzian, Head of the Coffee Excellence Center at Zurich University of Applied Sciences
Channeling is what happens when water finds the path of least resistance through your coffee grounds instead of flowing through them evenly. You end up extracting too much from some spots and almost nothing from others – which is why a too-fine grind in a French press produces a cup that’s simultaneously bitter and weak.
Grind right before you brew whenever possible. Whole beans lock in aromatic compounds; the moment you crack them open, those compounds start escaping into the air. Coffee aroma is largely built from volatile gases that dissipate within minutes of grinding. Pre-ground coffee loses most of that within days of opening the bag.
Real life doesn’t always allow for fresh grinding every morning. Grinding the night before loses some aromatics, but it’s still significantly better than store-bought pre-ground coffee that’s been sitting open for weeks. Give yourself permission to prep ahead on busy mornings. The difference between yesterday’s grind and a fresh one is small. The difference between fresh-ground and week-old pre-ground is substantial.
This video walks through the practical difference between blade and burr grinders, and shows what each grind size actually looks like up close.
Step 2: Measure the Coffee and Water
Coffee-to-water ratio is the most actionable number in this entire process. Get it right, and the cup is balanced. Ignore it, and you’re guessing every morning.
The standard starting point is a 1:15 to 1:16 ratio by weight. For every 1 gram of coffee, use 15 to 16 grams of water. That range produces a balanced, medium-strength cup across most brewing methods.
In practical terms:
| Batch Size | Coffee | Water |
|---|---|---|
| Single cup | 20g | 300ml |
| Two cups | 30g | 500ml |
| Full French press | 55g | 1000ml |
Once you’ve brewed a few batches, adjust the ratio based on your taste. Want it stronger? Add more coffee, not less water. Want it lighter? Pull back on the coffee rather than adding more water. Changing the water volume throws off the extraction balance. Changing the coffee dose keeps the extraction mechanics intact while shifting the coffee strength.
Step 3: Brew the Coffee
Coffee brewing is where the ratio and grind size you’ve set actually do their work. The mechanics are simple: hot water moves through ground coffee, dissolves the soluble compounds, and carries them into your cup. The method you choose controls how long that contact lasts and how the water moves through the grounds.
Brew times by method:
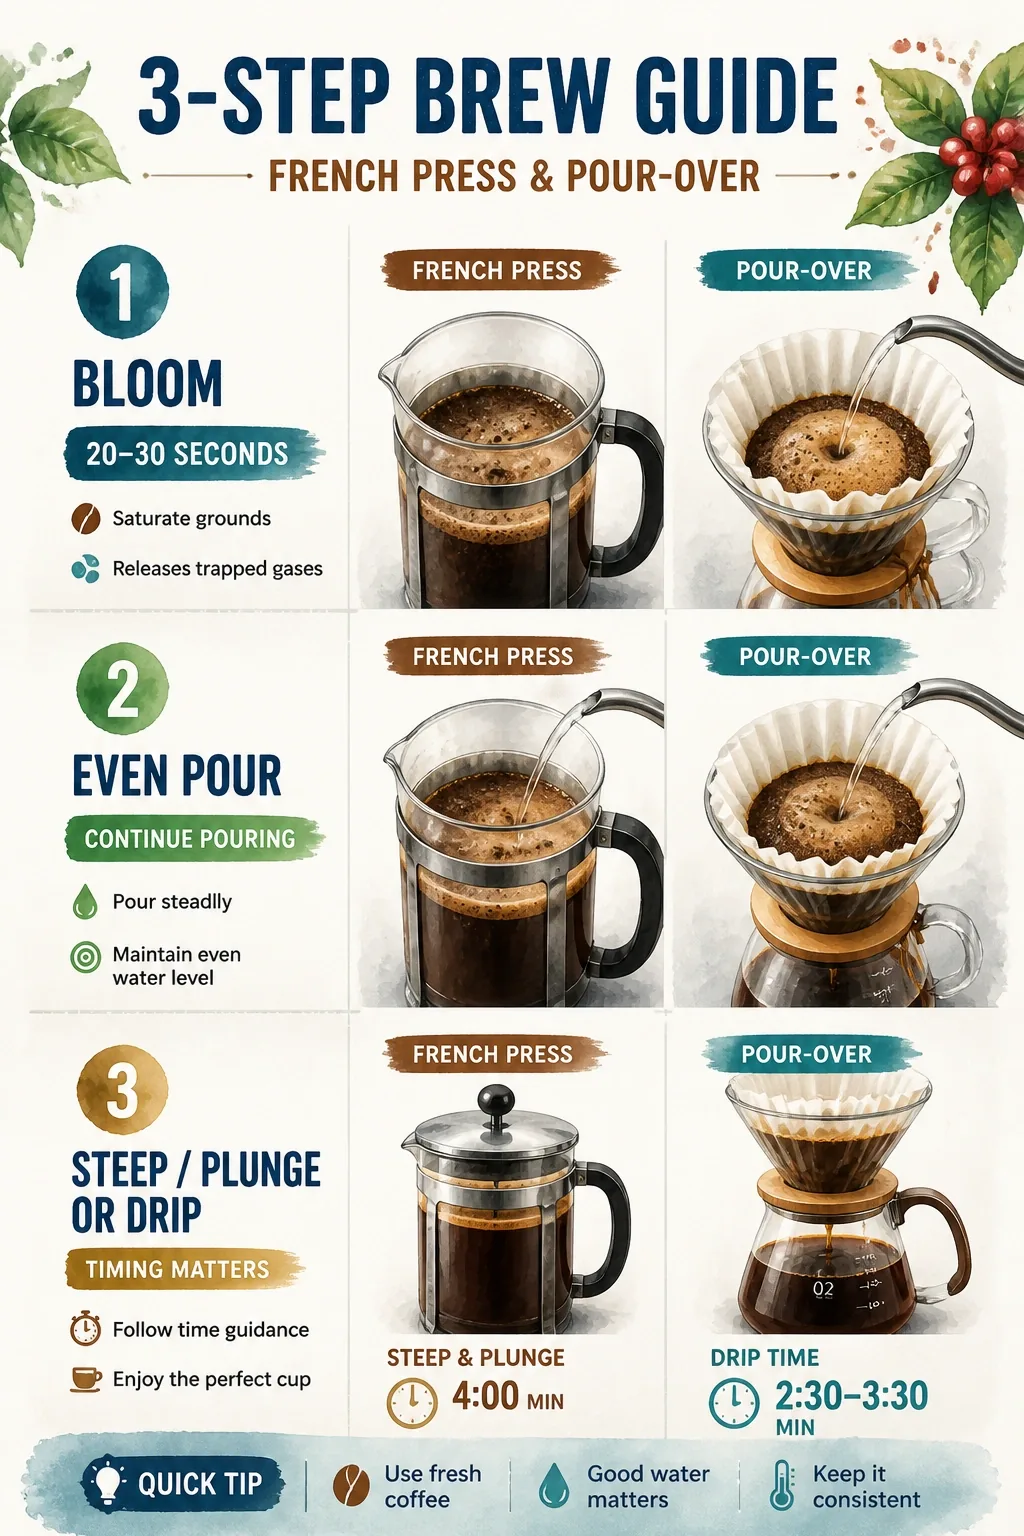
- French press: Add grounds, pour all the water at once, place the lid on (plunger up), and steep for 4 minutes before pressing.
- Pour-over: Total brew time runs 3 to 4 minutes. Pour in slow, controlled circles to keep the grounds evenly saturated.
- Drip machine: The machine handles timing automatically. Your job is the grind and the ratio.
Use water in the 195–205°F range for all three methods. The boil-and-wait technique from the first section applies here: full boil, 30 to 45 seconds of rest, then pour.
Most guides stop there. But there’s one step that separates a good cup from a great one: the bloom.
Fresh coffee contains CO₂ trapped inside the bean during roasting. When hot water first hits the grounds, that gas releases rapidly. If you pour all your water at once, the escaping CO₂ creates channels through the coffee bed – paths where water flows freely without actually extracting anything useful.
Nicole, a four-time German Coffee Champion and Coffee Expert at nunc, stresses that the foundation of an even extraction starts before the first full pour: preparing the coffee bed properly and ensuring it’s fully and evenly ready to be saturated sets up everything that follows.
The bloom does exactly that. Pour just enough water to wet all the grounds – roughly twice the weight of the coffee – then wait 20 to 30 seconds. You’ll see the grounds puff up and bubble slightly. That’s the CO₂ releasing. Once it settles, continue your pour. The water now flows through a bed that’s ready to extract evenly.
After brewing, let the finished coffee rest for about 30 seconds before drinking. The temperature drops slightly, and the flavor smooths out. It’s a small step, but the difference is noticeable.
Here’s a side-by-side look at the French press and pour-over processes, including where the bloom fits in each method.
When Your Coffee Tastes Wrong: Quick Fixes
Coffee extraction has two failure modes, and every bad cup falls into one of them. Knowing which one you’re dealing with tells you exactly what to adjust.
Bitter coffee is over-extracted. The water pulled too many compounds from the grounds – specifically the bitter, astringent ones that extract last. Sour or weak coffee is under-extracted. The water didn’t pull enough, leaving the acids and sharp flavors behind without the sugars and body that balance them.
Three variables control where you land on that spectrum: grind size, water temperature, and brew time. Change any one of them, and you shift the extraction in a predictable direction.
| Problem | Cause | Fix |
|---|---|---|
| Bitter, harsh | Over-extracted | Grind coarser, lower water temp, or shorten brew time |
| Sour, weak, sharp | Under-extracted | Grind finer, raise water temp, or lengthen brew time |
Every beginner hits these problems. The fix is a small adjustment, not starting over. Once you’ve run the troubleshooting loop two or three times, you’ll recognize the taste of over-extraction and under-extraction immediately, and you’ll know exactly which dial to turn.
Frequently Asked Questions About How to Make Coffee From Beans
Can I use a blade grinder instead of a burr grinder?
Yes, a blade grinder works, especially when you’re starting out. The grind will be less consistent than a burr grinder, but the difference becomes meaningful only once you’ve dialed in your ratio and brew time.
How long do whole coffee beans stay fresh?
Whole beans stay fresh for about one month after the roast date once the bag is opened. Store them in an airtight container at room temperature, away from light and heat. Avoid the freezer unless you’re storing a large batch sealed and unopened.
Why does my pour-over take longer than 4 minutes?
A slow pour-over almost always means the grind is too fine. Fine grounds create resistance that slows water flow significantly. Coarsen the grind one step and the pour time should drop back into the 3 to 4 minute range.
Does the type of water filter matter for coffee?
A standard pitcher filter that reduces chlorine and sediment is sufficient for most tap water. If your tap water is extremely hard or has a strong mineral taste, a more thorough filter helps, but most home setups don’t need anything beyond a basic carbon filter.
How do I know if my coffee is stale?
Stale coffee produces a flat, papery, or cardboard-like taste with very little aroma when you grind it. Fresh coffee smells sharp and complex the moment it’s ground. If your grounds barely smell like anything, the beans are past their prime.
Is there a difference between bloom time for French press vs. pour-over?
The mechanism is the same – releasing CO₂ before the full pour – but French press bloom is less critical because the immersion brewing process is more forgiving of uneven saturation. It still helps, but skipping it in a French press has less impact than skipping it in a pour-over.
What’s the fastest way to improve a bad cup without buying new equipment?
Adjust the grind size first. It’s the most powerful extraction variable and costs nothing to change. If the cup is bitter, go coarser. If it’s sour, go finer. Most bad cups at home trace back to a mismatched grind before anything else.
References
- Swirl or Stir? Coffee Bloom Best Practices | perfectdailygrind.com
- The Relationship Between Grind Size and Coffee Extraction | perfectdailygrind.com