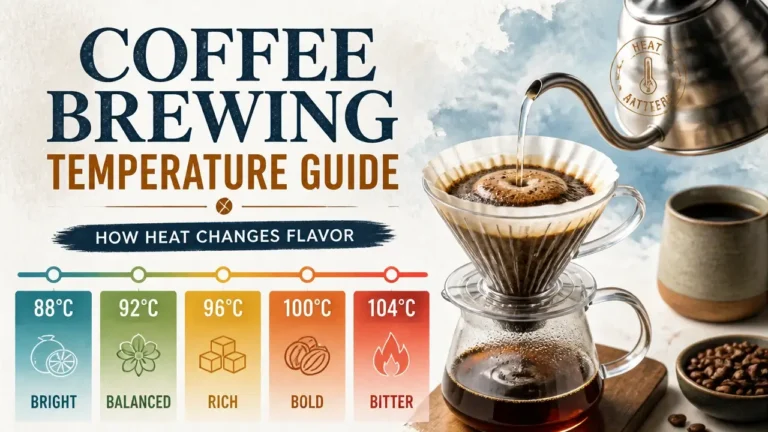

Water temperature is the invisible hand inside every brew, pulling acids, sugars, and bitter compounds from the bean in a strict sequence, at its own pace. Miss the window, and the cup tells you immediately.
The SCA’s 195–205°F range isn’t arbitrary. Below it, soluble compounds stall and sourness dominates. Above it, over-extraction drags chlorogenic acid lactones and carbonized phenols into bitter territory. Roast level shifts that window further. Understanding heat isn’t a detail: it’s the whole game.
Once you master how heat unlocks specific coffee aromas and flavors, dialing in your exact water temperature becomes an intuitive part of the brewing process.
Once you have mastered the ideal temperature for your water, you are ready to make coffee from beans with professional-level precision right in your own kitchen.
How Water Temperature Shapes Your Cup
Water temperature extraction works as a selective solvent, pulling different flavor compounds out of your grounds at different rates depending on how much thermal energy you throw at them. The hotter the water, the faster and more aggressively it dissolves soluble compounds (acids, sugars, bitter phenols), but those compounds don’t all surrender at the same temperature or the same speed. That gap is exactly what makes temperature one of the most powerful dials you have.
Think of your coffee grounds as a layered system. The bright organic acids dissolve quickly and at lower temperatures. Sucrose and other sugars need more heat and more time to fully release. The bitter compounds (chlorogenic acid lactones and carbonized phenols) come last, but they come hard when you push too far. So every brew is a race between pulling enough sweetness and stopping before the harsh stuff floods the cup.
That’s the mechanical reality behind the Specialty Coffee Association’s target brew window of 195°F–205°F. It’s not a law of physics. It’s a practical consensus zone where most coffees, brewed with reasonable technique, land in a palatable range of extraction. You can go outside it. Sometimes you should. But it’s a sane place to start because it keeps you away from both failure modes at once.
Too cold: stay well under 195°F and you’ll leave sucrose and lipids sitting in the grounds. What ends up in your cup is dominated by sharp organic acids with nothing to balance them: sour, thin, occasionally vegetal. Under-extraction in a glass.
Too hot: push past 205°F without adjusting anything else, and you risk pulling the bitter end of the spectrum: chlorogenic acid lactones and phenolic compounds that register as dry, ashy bitterness on the back of your palate.
Here’s where the most persistent myth in home brewing needs to die: boiling water does not burn your coffee. The grounds inside the slurry never reach the temperature of your kettle, the thermal mass of the coffee bed absorbs and dissipates heat the moment water hits it. Any bitterness you’ve tasted from near-boiling water was over-extraction, not scorching. Matt Perger and other working experts have confirmed this directly, and it matters practically: once you understand that 212°F water isn’t chemically burning your grounds, you stop treating the top of the range like a cliff edge and start treating it as a tool.
Professor William Ristenpart, Director of the UC Davis Coffee Center and Professor of Chemical Engineering, puts the whole temperature debate in useful perspective:
“The water temperature definitely affects how quickly the coffee is extracted! But what our research indicates is that what really matters is the final brew strength and final extraction yield at the end of the brew. If those metrics are the same in two different brews, it doesn’t matter what brew temperatures were used to achieve them because tasters cannot differentiate them: they taste the same. In other words, it’s the destination that matters, not the route you took to get there. So the brew temperature strongly affects how you get there, but the most important thing for coffee brewers to focus on is the final strength and extraction yield.”
What that tells us practically: temperature is a lever that controls how fast and how selectively you extract, not the only variable deciding your cup’s fate. Grind size, contact time, and roast level all interact with whatever temperature you choose. That’s why locking in a consistent starting temperature matters so much. You can’t diagnose what grind or contact time is doing to your cup if your water temperature is drifting 15 degrees between brews. A stable thermal baseline is the prerequisite for controlling anything else, and that’s exactly where we go next.
The Zero-Cost Temperature Baseline
Off-boil water (brought to a full rolling boil and rested uncovered for 30–60 seconds) consistently delivers coffee brewing temperature in the 200°F–205°F range without a thermometer, a PID kettle, or any gear you don’t already own. That window aligns with SCA guidelines and covers the sweet spot where extraction chemistry works in your favor. The method works because water loses heat at a predictable rate once you remove it from the source, you’re not guessing, you’re using physics as your timer.
The “boiling water burns coffee” myth has kept home brewers away from the simplest precision tool available. What 212°F actually does is extract faster, it doesn’t scorch grounds. Once you accept that, off-boil stops being something to fear and becomes your most reliable anchor.
Rest time is your only dial here. The 30–60 second window isn’t arbitrary, it’s a calibration range:
- 30 seconds: use this for lighter roasts or when you want maximum heat retention. You’re staying at the high end of the 200–205°F range.
- 45–60 seconds: use this for a more moderate starting point. Ambient temperature and kettle material (thin stainless cools faster than thick-walled cast iron or ceramic) will shift where exactly you land, but the window is forgiving enough that daily variation won’t matter.
You don’t need to be exact to the second. The range is wide enough that a 10-second overshoot changes your slurry temperature by roughly 1–2°F, well within noise.
Altitude and Your Natural Boiling Ceiling
Altitude quietly changes the math for every brewer living above sea level, and almost no guide mentions it. Water boils at a lower temperature the higher you go, approximately 2°F lower for every 1,000 feet of elevation. At 5,000 feet (Denver, Salt Lake City, Albuquerque), your boiling point is already around 202°F. Off-boil water, zero rest, is already inside the ideal coffee brewing temperature range by default.
If you’ve been brewing at altitude and compensating with grind adjustments because your cups felt flat or underextracted, this may be the missing piece. You weren’t doing anything wrong, you were just working with a lower thermal ceiling your whole coffee life. At high altitude, reduce or eliminate the rest period entirely. Your “off-boil” is already where you need it.
Why Preheating Your Brewer Matters
Getting your water to 203°F means nothing if it hits a cold ceramic V60 and drops 8–10°F before it touches the grounds. A cold dripper, carafe, or French press acts as a heat sink: it pulls thermal energy out of your brew water the instant contact happens, and that temperature loss is instant and significant.
The fix takes 20 seconds: rinse your brewer and carafe with hot tap water immediately before brewing. Not warm, hot. You’re not sterilizing anything; you’re bringing the vessel’s thermal mass up so it stops stealing heat from your carefully calibrated pour.
This one step locks in the off-boil temperature you’ve set. Skip it, and the rest of the precision work is undermined before the first drop extracts.
Here’s a quick visual walkthrough of the full technique, the boil, the rest, and the preheat in real time:
Video: [Switch your kettle off early]
Off-Boil as Your Fixed Starting Point
Treat off-boil as the single variable you commit to locking in first, before you touch grind size or brew ratio. The reason is mechanical: if your starting temperature is floating around unpredictably each morning, you can’t tell whether a sour cup is a grind problem or a heat problem. You’ll be chasing two variables at once and solving neither.
Fix the baseline. Then everything you adjust from here (roast level, brewer type, contact time) has a known reference point to push against.
The off-boil method isn’t a beginner’s workaround. It’s the foundation that frees you from worrying about your kettle so you can start paying attention to what the coffee is actually telling you. Once this is locked in, roast level is the next place to look, and light roasts and dark roasts don’t want the same heat at all.
Roast-Level Tuning: Match Temperature to Bean Density
Roast-adjusted temperature is the single most direct lever you have over sweetness extraction, and it’s set before water ever touches coffee. Light roasts, medium roasts, and dark roasts aren’t just different in flavor profile; they’re structurally different materials that respond to heat in opposite ways.
Here’s the mechanism that makes this matter.
Roast-adjusted temperature is the single most direct lever you have over sweetness extraction, and it’s set before water ever touches coffee, a foundational principle you can also explore when learning coffee cupping at home.
How Bean Cell Structure Drives Extraction
When green coffee gets roasted, heat drives out moisture and CO₂, expanding the cell walls and making them progressively more porous. A light roast stops early: the cell walls are still dense and relatively intact. A dark roast goes further: those same walls are brittle, open, and riddled with micro-fractures.
That structural difference changes everything about how thermal energy moves through the bean.
A dense light-roast cell resists water penetration. The soluble sugars that create sweetness are locked behind tighter walls, and you need near-boiling water to generate enough thermal energy to pull them out cleanly. Drop the temperature on a light roast and you’ll under-extract, the cup turns thin and sharp, with a sour edge that no amount of contact time fully fixes.
A porous dark-roast cell is the opposite problem. The bitter, ashy compounds that develop in longer roasts are sitting right at the surface, ready to dissolve fast. Hit them with near-boiling water and they flood the cup before the sweeter, more balanced notes even have a chance. You need a deliberate temperature drop, not to slow extraction entirely, but to give the good stuff a head start over the harsh stuff.
The Practical Temperature Bands by Roast
These are kettle-temperature targets (what the water reads before it leaves the spout). Once water hits your brewer, the actual slurry temperature will be lower, especially if you’re pouring into an unheated ceramic or glass vessel. That matters, and we’ll get to it in the next section. For now, think of these numbers as your starting input.
| Roast Level | Kettle Temp Target | Off-Boil Rest (No Thermometer) | What You’re Protecting |
|---|---|---|---|
| Light Roast | 203°F–208°F (95°C–97.8°C) | 0–30 seconds after boil | Dense cell walls need maximum thermal energy to release soluble sugars |
| Medium Roast | 198°F–202°F (92.2°C–94.4°C) | 30–45 seconds after boil | Balanced porosity (moderate heat extracts sweetness without amplifying roast bitterness) |
| Dark Roast | 185°F–195°F (85°C–90.5°C) | 60+ seconds after boil, or set explicitly on a controlled kettle | Fragile, porous cells release bitter compounds fast: lower heat slows that rush |
The off-boil rest times are not rough estimates, they’re calibrated to a standard home kettle holding roughly 500–700ml of water. A full liter cools more slowly; a smaller volume cools faster. If your kettle is unusually large, add 10–15 seconds to each interval.
Your First Brew as a Calibration
Every new bag is an unknown. Even within the “light roast” category, a washed Ethiopian processed at 72-hour fermentation and a natural Brazilian with 21 days of drying time will behave differently under heat. The roast band gives you a principled starting point, not a guaranteed finish line.
The practical move: on your first brew from any new bag, hit the center of the recommended band for that roast level. Light roast? Start at 205°F. Medium? Start at 200°F. Dark? Start at 190°F. Taste it straight, while it’s still warm. That first cup is data. The adjustment comes in the next brew, and the taste-correction framework for reading exactly what the cup is telling you is coming in the final section.
What these bands don’t account for yet is your brewing device. The same 205°F water poured through a cold glass V60 behaves differently than 205°F water sitting in a preheated French press. The roast-adjusted temperature gets you to the right starting input, but the brewer itself changes what actually happens at the coffee bed.
Method Matters: How Your Brewer Changes the Temperature Equation
Brewer temperature dynamics are the missing conversion layer between your roast-adjusted number and what actually happens inside the cup. The same 202°F water poured into a French press and a ceramic V60 will produce two different slurry temperatures within 60 seconds, and that gap is large enough to shift flavor in a direction you didn’t intend.
The reason comes down to one mechanical split: how your brewer handles heat over time.
Immersion vs. Percolation Heat Behavior
Immersion brewers (French press, Clever Dripper) mix all the water with the grounds at once and then leave it alone. No fresh hot water enters the system. The slurry temperature starts dropping immediately and keeps dropping until you pour. That’s a one-way thermal slide, and it means your starting temperature is the only lever you have. Start at the hot end of your roast-adjusted range, or even a degree or two above it, to compensate for that inevitable decay.
Percolation brewers (V60, Kalita Wave, any pour-over) continuously introduce fresh hot water throughout the brew. That constant replenishment keeps the average slurry temperature higher for longer. Starting too hot here doesn’t just over-extract the early grounds; it compounds across each pour, pushing late-stage extraction into harsh, papery territory. Use the middle or lower end of your roast-adjusted range instead.
That single structural difference (static bath versus moving stream) explains why the same kettle temperature produces different results in different brewers.
Starting Points by Common Brewer
- French press / Clever Dripper: Target 203°F–205°F for light and medium roasts. Drop toward 198°F–200°F for dark roasts. The thermal decay will do the rest of the work for you.
- V60 / Kalita Wave: Target 200°F–203°F for most roasts. If your drawdown runs long (past 3:30 or so), the grounds are spending more time in contact with water that’s still cooling, so nudging slightly lower protects against late-stage bitterness.
- AeroPress: Treat this one as its own category. It works across a huge usable window (comfortably down to 175°F–185°F) because the pressure-assist and short contact time change the extraction math entirely. Lower temperatures on an AeroPress don’t mean under-extraction; they highlight bright fruit notes without the bitterness that same temperature would produce in an open pour-over. Use it as a playground, not a fixed target.
How Brewer Material Shifts the Equation
The brewer’s physical material is a silent variable most people ignore entirely. A ceramic V60 and a plastic V60 are the same shape, but they behave differently the moment hot water hits them.
Ceramic and glass are thermal sinks. They absorb heat aggressively from the slurry, especially if they’re sitting cold on your counter. A cold ceramic dripper can pull 8–10°F out of your carefully calibrated water in the first few seconds of contact. That’s not a minor rounding error; that’s potentially dropping a light-roast brew from the extraction sweet spot into under-extracted sourness before a single drop has fallen.
Plastic brewers insulate better. An AeroPress or plastic V60 holds heat more stably because the material doesn’t conduct heat away from the slurry as quickly. In practical terms, a plastic dripper may actually need a slightly lower kettle temperature than a ceramic one to land at the same slurry result, the material is doing less damage on the way in.
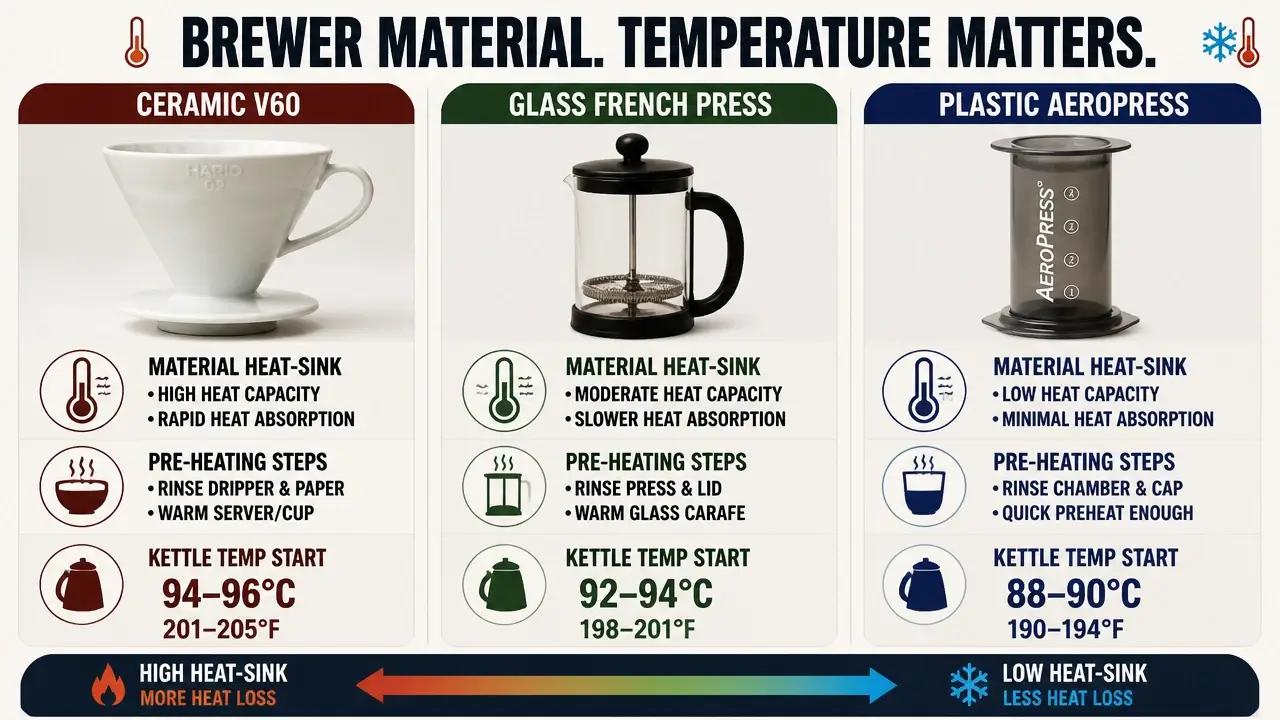
The fix for ceramic and glass is non-negotiable: preheat aggressively. Pour a full kettle of hot water through the empty dripper, let it sit for 30 seconds, then dump it. That step saturates the thermal mass of the brewer before your brew water ever touches a ground. Skip it, and your roast-adjusted temperature number means almost nothing.
When Kettle Temperature Becomes Misleading
Here’s where coffee brewing temperature measurement gets genuinely tricky: your kettle thermometer tells you the temperature of the water leaving the spout. It says nothing about the temperature of the slurry 45 seconds into your brew.
For most people, the roast-adjusted starting point plus aggressive preheating gets you close enough. But if you’re chasing a persistent flavor flaw that doesn’t respond to the usual fixes, and you’ve already ruled out grind, a probe thermometer placed directly in the slurry is the honest diagnostic tool. Measuring at the kettle and assuming the slurry matches is like checking the weather outside and assuming your basement is the same temperature.
Jiexin Liang, lead researcher at the UC Davis Coffee Center, puts the boundary conditions in useful perspective:
“Although the brew temperature will affect the dynamics of the brew, where the hotter brews reach equilibrium more quickly than the lower temperature ones, the variation of brew temperatures from 80°C to 99°C (176°F to 210°F) does not affect the final equilibrium TDS or E.”
That finding is specific to full-immersion brewing, and it’s a useful pressure release valve. It means that for a French press or Clever, the exact degree you start at matters less than you think for final extraction yield, as long as you’re somewhere in a reasonable range. What temperature does control is the speed of extraction and which compounds get pulled first. Fast early extraction at high heat favors certain bitter compounds; a slower, cooler curve pulls differently. The slurry dynamics, not just the final number, shape the flavor.
You now have a translation key: roast gives you a range, brewer type tells you which end of that range to use, and material tells you how much preheating you owe the system before the first pour. The remaining question, what to do when the cup still tastes off after all of this, is where the real diagnostic work begins.
The Taste Correction Protocol
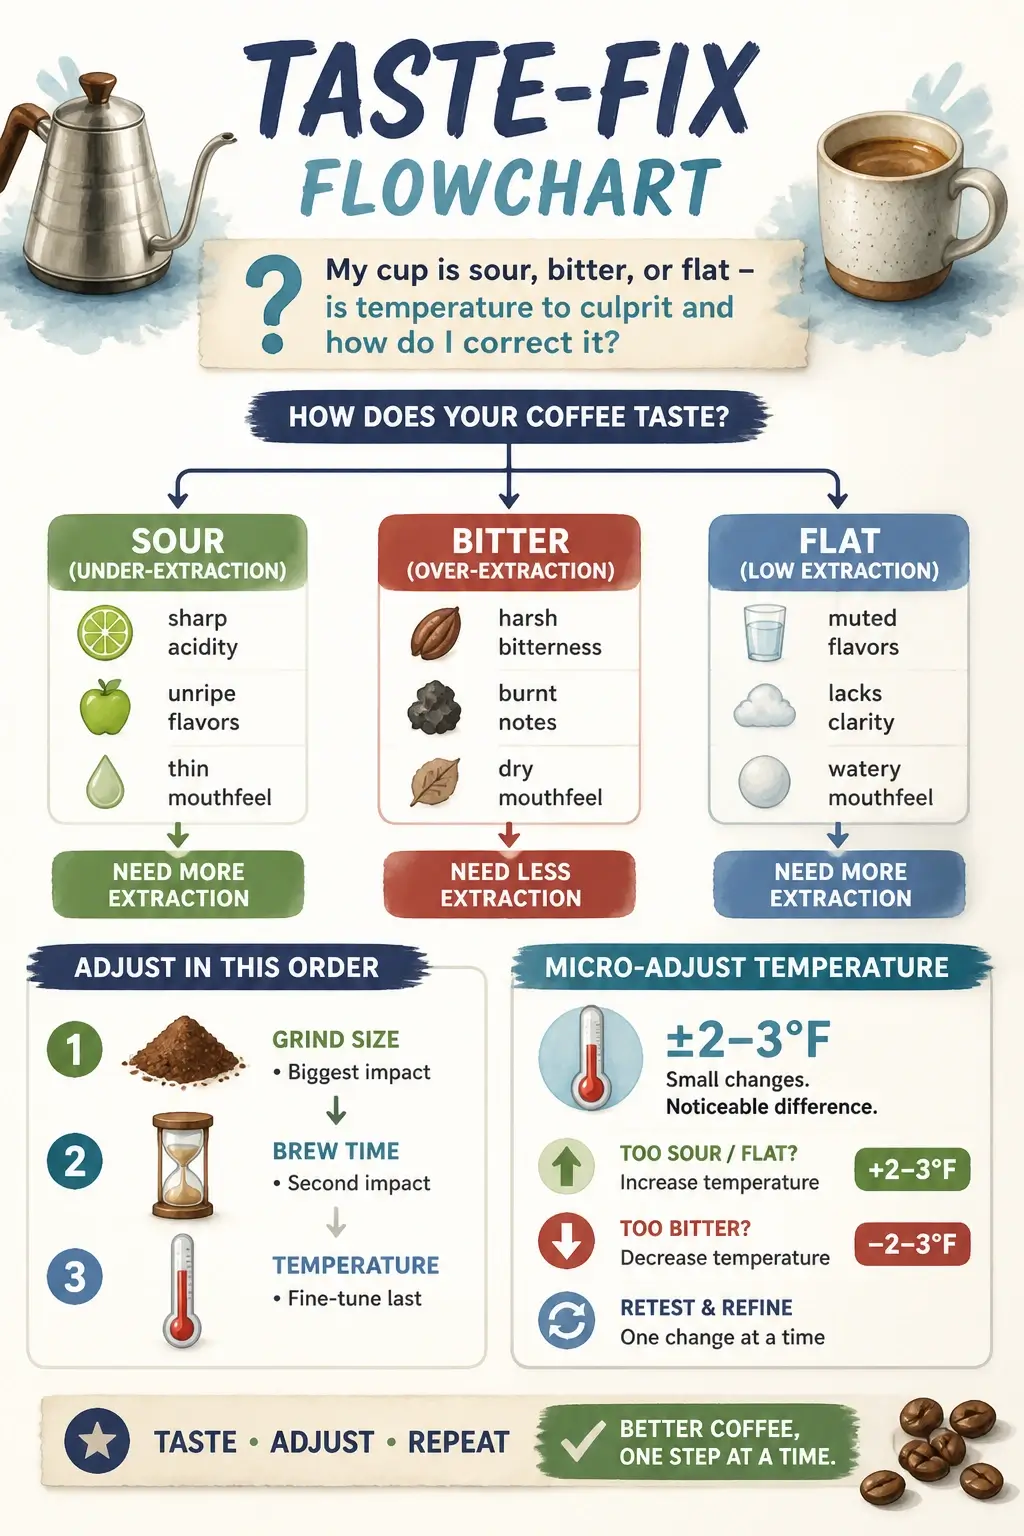
Most sour or bitter cups aren’t temperature problems, they’re grind problems wearing a temperature costume. The systematic taste correction protocol that actually works starts with diagnosis, runs through grind and brew time first, and only reaches for the temperature dial as a finishing move once everything else is locked in.
Here’s the decision tree you run at the table, right after the first sip:
- Sour, salty, or vegetal -> under-extraction. The water didn’t pull enough soluble compounds. Temperature may be too low, but grind is probably too coarse, or brew time too short.
- Bitter, dry, or ashy -> over-extraction. The water pulled too much, including the harsh compounds that come out last. Temperature may be too high, but grind is probably too fine, or contact time too long.
- Flat, hollow, or thin -> low extraction overall. Both temperature and brew time deserve a look here.
That tree tells you what happened. It doesn’t yet tell you which knob to turn.
Why Grind Must Move First
The grind-first rule isn’t a stylistic preference: it’s a mechanical reality. Grind size controls surface area, and surface area is the single biggest lever on extraction rate. A grind that’s too coarse creates channels where water rushes through without doing real work. No amount of heat fixes that. You’re just running hot water through the same gaps faster.
So if your cup is sour and you’re already brewing in the correct temperature range for your roast and method, grind finer before you touch the kettle. If it’s bitter, coarsen the grind before you back off the heat. In most cases, that one move resolves the problem entirely.
The Specialty Coffee Association research team, summarizing findings from a UC Davis Coffee Center study published in Scientific Reports, put it plainly:
“When we think about brewing temperature, we first need to consider how raising or lowering the brewing temperature is going to impact the extraction. If you can adjust your process to achieve the desired TDS and PE at different temperatures (at least within the range of 87°C–93°C), we will expect to see little to no change in the flavor profile delivered by the brewed coffee or to the consumer’s response to them.”
That’s the research confirming what experienced brewers already know from the table: if grind and ratio are wrong, temperature adjustments won’t save the cup. They’ll just move the problem around.
Micro-Adjusting Temperature in 2–3°F Steps
Once grind and brew time are genuinely dialed (meaning you’ve tested them, not just assumed they’re fine), coffee brewing temperature becomes your precision finishing tool. And the operative word is precision.
If sourness still lingers after grind correction, raise your kettle temperature by 2–3°F. Brew a full cup. Taste it. If it’s closer, stay there. If it needs more, move another 2–3°F in the same direction. Single increments only.
If bitterness persists after coarsening the grind, drop temperature by 2–3°F and repeat the same process.
The reason 2–3°F is the right unit of movement is that it’s large enough to shift extraction yield in a measurable, perceptible way, but small enough that you can’t overshoot into the opposite defect in one move. A 10°F swing doesn’t fine-tune anything. It replaces one problem with a different one, and now you’ve lost your reference point entirely.
Building Your Personal Brew Log
Here’s the move that separates someone who dials in a good cup once from someone who can repeat it every morning: write the winning temperature on the bag, or in a note on your phone. Roast, origin, grind setting, brew time, water temperature, and how the cup tasted.
That entry becomes your personal starting point the next time you buy the same coffee. Over a few months, you build a library of calibrated profiles, and the next bag of that Ethiopian natural or Colombian washed doesn’t start from zero. It starts from a known, proven recipe.
The off-boil baseline gets you into the right neighborhood. Roast and method adjustments get you to the right street. The grind-first rule and 2–3°F micro-adjustments get you to the exact address. And the brew log means you never have to find that address twice.
That’s the closed loop, and it requires no extra gear, no PID kettle, no thermometer. Just a system you actually run in sequence.
Key Takeaways on Coffee Brewing Temperature
- Off-boil water with timed rest gives a consistent 200–205°F baseline without any gear, and boiling water does not burn coffee grounds.
- Light roasts demand near-boiling heat to release locked-in sweetness; dark roasts need a deliberate temperature drop to avoid harsh bitterness.
- Preheating your brewer is non-negotiable for ceramic and glass—skipping it steals up to 10°F from your slurry before extraction starts.
- Grind size is the true master of extraction; fix it first, then micro-adjust temperature in 2–3°F steps only as a finishing move.
- At high altitude, your boiling point is lower, so off-boil water may already be at the perfect temperature with zero rest needed.
- Logging roast, origin, grind, and winning temperature for each coffee turns every new bag into a repeatable recipe.
Frequently Asked Questions About Coffee Brewing Temperature
Q: What’s actually causing the bitter taste if 200°F isn’t burning my coffee?
A: Bitterness at 200°F isn’t scorching—it’s over-extraction. When grind is too fine or brew time too long, water pulls harsh chlorogenic acid lactones and phenols. Fix your grind coarser or shorten contact time before ever blaming temperature.
Q: Why might a 2–3°F temperature tweak fail to fix a bitter cup?
A: A small temperature change can’t overcome a grind that’s fundamentally too fine or a pour creating channels. Surface area errors dominate heat effects; dial in grind size and brew time first, then use micro-adjustments as finishing touches.
Q: Why does my French press taste sour even with 205°F water?
A: Even with perfect kettle temp, a cold French press steals heat instantly, dropping slurry temperature into under-extraction territory. Always preheat the press with hot water for 30 seconds before brewing—that locks in enough thermal energy to extract sweetness.
Q: When is a thermometer absolutely necessary even if you use the off-boil method?
A: For dark roasts where precision matters most, a thermometer prevents overshoot. At high altitude or for percolation brews with long drawdowns, measuring actual slurry temp reveals if your preheat is adequate. Off-boil works, but a probe confirms.
Q: How does kettle material secretly influence your brew temperature?
A: Thin stainless cooling rapidly drops water 4–6°F faster than heavy cast iron in the same rest period. If you’re using a lightweight kettle, shorten your off-boil rest by 10–15 seconds to hit the same target range, or switch to a thick-walled model.
Q: Does preheating matter for a plastic V60, or is it just for ceramic?
A: Plastic insulates well, so heat loss is minimal, but a quick hot rinse still prevents a few degrees of drop and removes papery residue. It’s not as critical as with ceramic, but skipping it entirely can still underextract light roasts.
Q: How does the 80/20 extraction rule shift when you drop temperature for dark roasts?
A: At lower temps, extraction slows across the board, so the first 20% of brew time may yield only 60–70% of total solubles. That means you need longer total contact or finer grind to reach proper extraction yield without extracting harsh bitterness.
References
- Brewing Temperature and the Sensory Profile of Brewed Coffee — sca.coffee
- How Strong is the Coffee You’re Cupping? New Model Captures the Equilibrium Extraction Nature of Full Immersion Brewing — sca.coffee
- How Hot is Hot Enough? Brew Temperature, Sensory Profile, and Consumer Acceptance of Brewed Coffee — sca.coffee