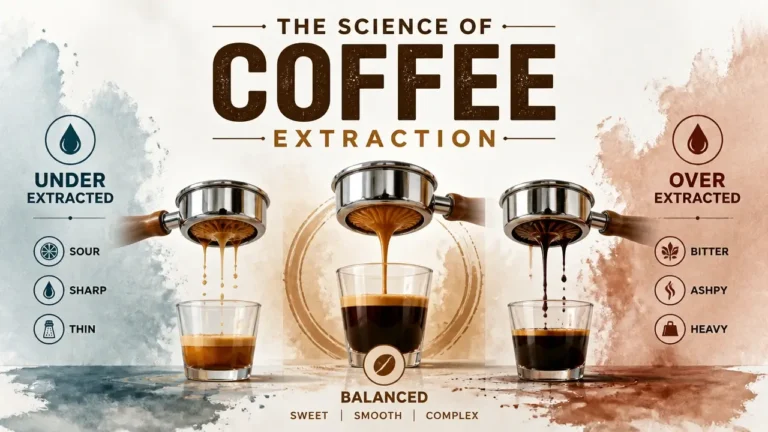

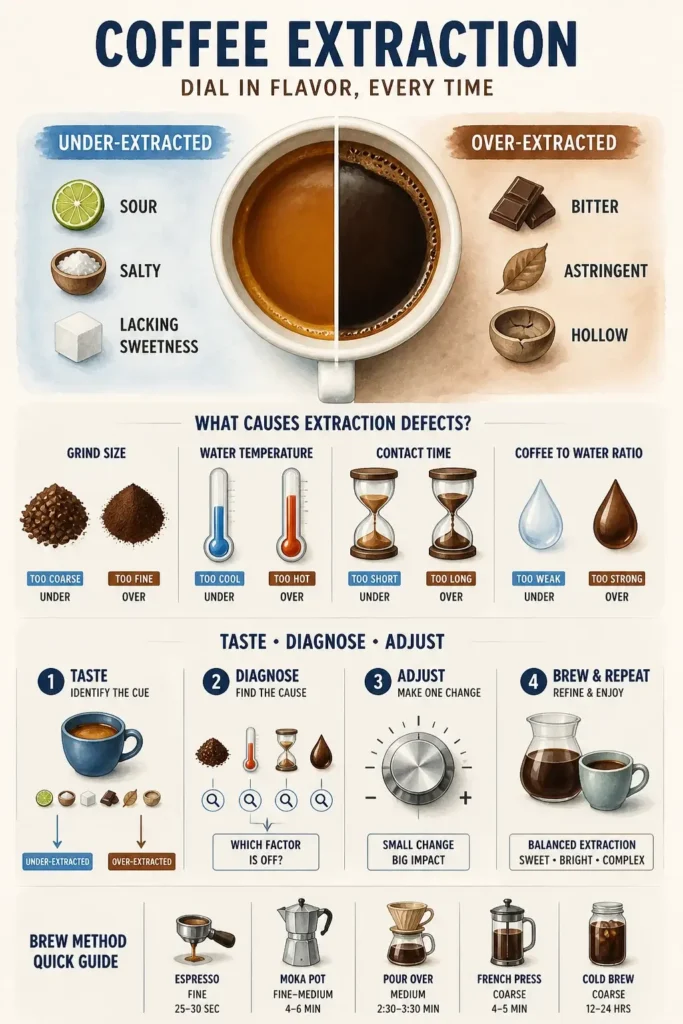
Imperfect extraction doesn’t just make bad coffee, it makes diagnostically distinct bad coffee. Under-extraction leaves a brew sour, salty, and hollow, starved of the sweetness that balanced acidity needs. Over-extraction pushes past that sweetness into bitterness and astringency, flavors that linger long after the cup is gone.
Grind size, water temperature, brew time, and brew ratio each pull extraction in a specific direction. Learn to read what’s in the cup and you’ll know exactly which lever to move.
How Coffee Extraction Builds Flavor
Coffee extraction follows a strict chemical sequence (acids dissolve first, then sweetness, then bitterness) and your cup quality is determined almost entirely by where in that sequence you stop.
Think of it like pulling a tray of cookies from the oven. Pull them too early and they’re gooey and underdone. Leave them too long and they’re burnt. There’s a window in the middle where everything is exactly right. Extraction works the same way, except instead of heat and time, you’re using water pressure and contact time to pull flavor compounds out of ground coffee in a predictable order.
The science backs this up directly. A real-time mass spectrometry study published in the International Journal of Mass Spectrometry tracked compound release during espresso brewing and confirmed what specialty coffee has long observed: highly polar, low-molecular-weight organic acids dissolve almost immediately on water contact, while larger phenolic bitter compounds (like pyrazines) only emerge after extended extraction time. The sequence isn’t random. It’s chemistry.
Hazel Boydell, writing for Perfect Daily Grind, puts it plainly:
“Fruity and acidic notes are extracted first, followed by sweetness and balance, and then finally bitterness.”
That middle phase (sweetness and balance) is exactly where you want to stop.
Extraction Yield and the Golden Cup Range
Extraction yield is the number that tells you how much of the coffee’s soluble mass actually made it into your cup, expressed as a percentage. Coffee beans are roughly 28–30% soluble by weight, meaning that’s the theoretical ceiling of what water can pull out. But you don’t want anywhere near all of it.
The Specialty Coffee Association’s Golden Cup Standard puts the ideal extraction yield at 18–22%. That’s the range where you’ve dissolved enough sugars and caramelized oils to create body and sweetness, while stopping short of the heavy bitter and astringent compounds that live deeper in the bean. Brew ratio (the weight of coffee relative to water) directly shapes where your extraction lands, which is why a small change in dose can shift the whole flavor profile.
Below 18%, acidity dominates because the sugars never fully dissolved. Above 22%, bitterness takes over because you’ve pushed past the sweet zone into harsher molecular territory.
The Two Failure States
Both failure states have a clear, immediate taste signature you can use as a diagnostic tool.
Under-extraction means you stopped the process before the sugars had time to dissolve. What’s left in the cup is dominated by the acids that came out first: sharp, sour, and thin-bodied, with nothing to balance it out.
Over-extraction means you kept going past the sugars and into the bitter, astringent compounds at the tail end of the sequence. The cup tastes harsh, hollow, and leaves a drying sensation on the back of your tongue.
The one-sentence rule to carry forward: sour and thin means you likely stopped too early; bitter and drying means you likely went too far. That single distinction is the foundation for diagnosing almost any brew problem you’ll encounter.
Under-Extraction: Sour, Thin, and Missing the Mark
Under-extraction cuts coffee extraction short before the good stuff ever makes it into your cup: the balancing sugars and oils stay locked inside the grounds while only the fast-dissolving acids get through. Think of your coffee grounds like a layered system: acids dissolve first, almost eagerly, followed by sugars, then the heavier oils and bitter compounds. Stop the process too early and you’ve collected the first wave without waiting for the rest.
That chemical imbalance lands on your tongue in a very specific way. You’ll taste a sharp, tart sourness (green apple, lemon rind, sometimes a vinegar edge) with almost no sweetness behind it to soften the blow. The body feels thin and watery, like the coffee is mostly hot water wearing a light coffee costume. And the finish? It vanishes fast. No lingering warmth, no aftertaste worth noticing. Some people also pick up a faint salty twang, which points to those early-dissolving mineral salts making it into the cup without the sugars and oils that would normally balance them out.
Four Root Causes Behind Under-Extraction
Four variables in your brew process can each trigger this problem independently, and they all work through the same mechanism: reducing how much contact time or surface area the water has with the coffee.
Understanding how these physical variables interact is vital, which becomes clear with coffee contact time explained in detail.
- Grind size too coarse: Larger particles mean less total surface area exposed to water. Less surface area means slower, shallower dissolution (the water pulls acids off the outside and moves on before reaching the sugars deeper in).
- Water temperature too cool: Dissolution is a thermal process. Drop below roughly 195°F (90°C) and the rate at which compounds leave the grounds slows significantly. The acids still make it out (they’re eager) but the sugars and oils need that heat to release.
- Brew time too short: Even with the right grind and temperature, contact time is the clock on the whole reaction. Cut it short and you’re pulling the shot before the sugars have had a chance to dissolve.
- Brew ratio too low: A ratio like 1:10 (one gram of coffee to ten grams of water) leaves too little water to carry the full range of solubles out of the grounds. The water saturates early, and the remaining compounds (your sugars, your body) stay behind.
How to Correct Under-Extraction
The fix is straightforward once you know which lever to pull, but the rule is: change one variable at a time. If you adjust grind size, brew time, and temperature simultaneously, you lose the ability to know what actually moved the needle.
Start with grind size. Going finer increases surface area immediately and is usually the fastest path to a noticeable improvement. If that’s not enough, raise your water temperature in small increments, staying within the roast’s ideal range (lighter roasts generally benefit from higher temperatures, darker roasts from slightly lower). Then extend brew time, and finally, nudge your water volume up slightly to improve extraction efficiency.
If you’re pulling espresso, there’s a visual shortcut: watch the stream. An under-extracted shot blondes early (the color shifts from dark amber to pale yellow too quickly) and the flow runs fast and thin. That’s the water racing through without doing the work. Grind finer until the shot slows down and holds its color longer.
According to community surveys and polls tracked within specialty-coffee forums, approximately 60–70% of beginner and intermediate home brewers regularly encounter under-extraction, describing their cup as sour, thin, or lacking sweetness. That number makes sense: most of the variables that cause under-extraction are invisible until you know what to look for.
Shaun Aupiais, writing for Perfect Daily Grind, puts it plainly:
“Grind setting is too coarse, the coffee will taste sour, watery, and weak, as it will underextract.”
Grind size is the single most direct lever you have over extraction rate, and it’s usually the first place to look.
When Sour and Bitter Appear Together
Here’s where the standard diagnostic breaks down: sometimes your cup is sour and carries a dry, rough edge at the same time. That sounds contradictory (under-extraction and over-extraction in the same cup) but it’s actually a grinder problem, not a recipe problem.
A blade grinder, or any inconsistent grinder, doesn’t produce uniform particles. It produces a mix of large “boulder” chunks and fine dust. The boulders under-extract, contributing that sharp sourness. The dust over-extracts almost instantly, contributing bitterness and astringency. Your cup ends up with both defects layered on top of each other, and no amount of adjusting grind time or water temperature will untangle them, because the particle distribution itself is chaotic.
If your coffee regularly shows mixed signals (sour and dry, tart and rough) upgrade to a burr grinder before changing anything else. Without consistent particle size, none of the other variables can behave predictably. You’re trying to tune an instrument that’s out of tune at the manufacturing level.
Over-Extraction: Bitter, Astringent, and Hollow
Over-extraction happens when coffee extraction runs past the sweet spot (past the sugars) and starts pulling bitter tannins and harsh organic compounds out of the bean. The water doesn’t stop when the good stuff is gone. It keeps dissolving, dragging out everything that was left behind for a reason.
The taste tells you immediately. There’s a sharp, almost medicinal bitterness that coats the back of your throat. Then comes the dry, chalky mouthfeel, the same astringency you get from over-steeped black tea, where your mouth feels like it’s been scrubbed clean of moisture. And underneath all of that, there’s a hollowness. The sweetness and brightness that should anchor the cup just aren’t there. What’s left is burnt, ashy, and flat.
Four Variables That Push Extraction Too Far
Grind size is usually the first place to look. When your grind is too fine, you’re creating enormous surface area, and microfines, those tiny particles that slip through and keep extracting long after the brew is “done,” accelerate the whole process. Water temperature compounds the problem. Hotter water is a more aggressive solvent, and at temperatures above roughly 205°F, it starts pulling bitter compounds faster than you’d want.
Brew time is the third lever. A slow drip, an extra pour, or leaving grounds in contact with water too long all push the extraction curve past the sugar window and into bitter territory. The fourth trigger is less obvious: brew ratio. A ratio like 1:20 (a lot of water relative to your coffee) sends a high volume of water through the same grounds, stripping out every last soluble they hold. The result isn’t a bigger cup of the same coffee. It’s a thinner, more bitter version of what it could have been.
The fix follows the same logic as the diagnosis. Grind coarser to reduce surface area. Drop your water temperature by a few degrees. Shorten contact time or reduce agitation. Tighten your ratio so you’re not sending more water than the grounds can give back gracefully. And the rule that applies to under-extraction applies here too: change one variable at a time. If you adjust grind, temperature, and time simultaneously, you won’t know which one moved the needle.
For espresso, the visual sign is hard to miss. The stream drips slowly, runs very dark (almost black) and takes far too long to reach your target weight. That sluggish pull is the machine telling you the grind is too fine and resistance is too high.
Dialing in these parameters successfully relies on precise calibration for every brewer to tame those unruly fines.
When Channeling Mimics Over-Extraction
Before you reach for the coarser grind, there’s a less obvious culprit worth ruling out: channeling. This is where over-extraction gets genuinely tricky to diagnose.
Channeling happens when water finds narrow, fast paths through the coffee bed instead of flowing evenly through the whole puck. The grounds along those channels get hammered: over-extracted, bitter, astringent. The grounds in the untouched zones barely get extracted at all. The result is a cup that tastes sharply bitter in one sip but doesn’t have the uniform, flat hollowness of true global over-extraction. It’s uneven. Confusing. And it’s frequently misdiagnosed as a grind problem.
Scott Rao, one of the most referenced voices in coffee science, put the extraction window plainly:
“He opined that anything less is probably sour and under-extracted, while anything more is most likely over-extracted, astringent, and burnt.”
The window is narrow, and channeling can throw you outside of it without any of the usual variables being wrong. If bitterness is paired with visibly uneven drawdown on your pour-over filter (or you pull the espresso puck and see dark spots scattered across an otherwise lighter surface) suspect channeling before touching your grind dial.
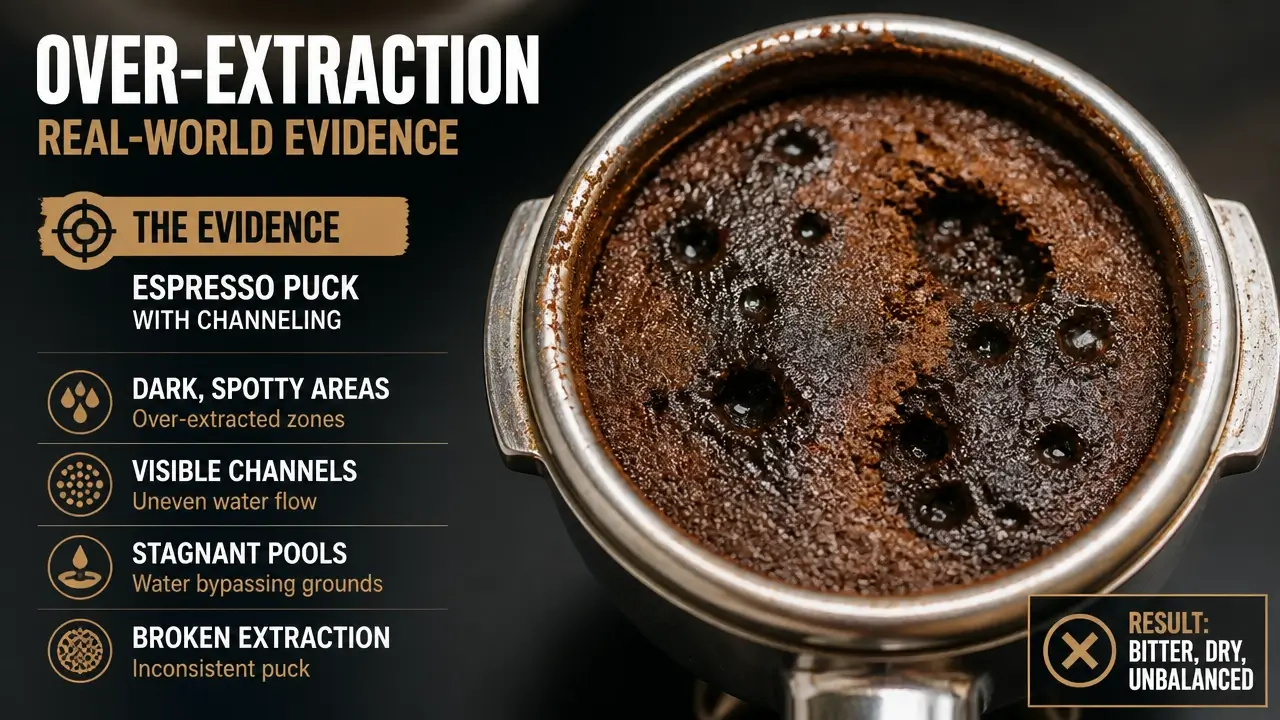
The fix for channeling isn’t a coarser grind. It’s better puck preparation. Use a needle distribution tool or a few gentle taps to level the grounds before tamping. Pour through a gooseneck kettle so you control exactly where the water lands and how fast it flows. Reduce aggressive agitation that disturbs the bed unevenly. Channeling is a physical problem (water exploiting weak spots) and it needs a physical solution, not a particle-size adjustment.
Head-to-Head: Diagnosing Under vs. Over in Any Cup
Under-extraction and over-extraction announce themselves through completely different sensory channels: one attacks your tongue with sharp acidity, the other dries your entire mouth out. That difference is your fastest diagnostic tool, and once you feel it clearly, you’ll never confuse the two again.
Here’s the rapid triage rule: if your tongue puckers and the cup feels thin or watery (the acids dissolved but the sugars never made it in), that’s under-extraction. If your mouth feels rough, dried out, and there’s a lingering bitterness with no sweetness behind it, the extraction ran too long and pulled the harsh compounds (that’s over-extraction). Two completely different problems, two completely different fixes.
| Diagnostic Dimension | Under-Extraction | Over-Extraction | Corrective Variable Matrix |
|---|---|---|---|
| Dominant taste | Sharp sourness, often lemony or green-apple-like; sweetness is muted or missing | Pronounced bitterness, often woody, burnt, or harsh; acidity is flattened | If sour/sharp: grind finer, increase brew time slightly, raise water temperature slightly. If bitter/harsh: grind coarser, shorten brew time, lower water temperature slightly. |
| Mouthfeel | Thin, watery, hollow, sometimes slightly salty or brisk | Dry, astringent, coarse, mouth-parching, sometimes chalky | If thin/hollow: increase extraction with finer grind or longer contact time. If dry/astringent: reduce extraction with coarser grind or shorter contact time. |
| Finish | Short, quick disappearance; little to no lingering sweetness or complexity | Lingering bitterness and dryness; finish can feel heavy or rough | If finish is too short: aim for more extraction through finer grind, longer brew time, or slightly hotter water. If finish lingers unpleasantly: reduce extraction with coarser grind, shorter brew time, or slightly cooler water. |
| Overall impression | Imbalanced, underdeveloped, incomplete (may feel “empty” or “unfinished”) | Heavy, harsh, overworked, tiring (may feel “burnt” or “muddy”) | Under = add extraction. Over = subtract extraction. Change one variable at a time and re-taste to confirm direction. |
| Best first adjustment | Grind finer | Grind coarser | Use grind size first for the clearest, most immediate diagnostic shift. |
| If issue persists after grind change | Extend brew time, raise temperature slightly, or increase contact consistency | Shorten brew time, lower temperature slightly, or reduce agitation/contact consistency | Adjust only one lever per test so you can isolate the cause and verify the cup moves in the expected direction. |
The workflow matters as much as the diagnosis itself: taste first → decide under or over → change one variable → taste again. The moment you start adjusting grind size, water temperature, and brew time simultaneously, you’ve lost the thread. You won’t know which change moved the cup.
The V60 Palate-Training Experiment
If the table above feels abstract, there’s a hands-on way to taste every stage of coffee extraction in a single session. Brew a V60 at a 1:16 brew ratio and collect the output in four separate cups at one-minute intervals over four minutes. Cup one will be sharp and acidic (mostly early-dissolving acids, almost no sweetness). Cup two starts showing emerging sweetness as the sugars begin dissolving. Cup three approaches balance. Cup four brings increasing bitterness and astringency as the harsher compounds enter the picture.
Temperature decay and minor channeling make the later cups less precise as a controlled experiment, but that’s not really the point. The point is that your palate gets to experience under-extraction and over-extraction side by side, in the same session, from the same beans. After that, recognizing either extreme in your daily brew becomes instinctive.
When Your Palate Needs a Second Opinion
Taste is your primary instrument, but it’s not the only one available. As Tasmin Grant, author at Perfect Daily Grind, puts it:
“Bitterness, dryness, and a hollow finish often mean that your espresso is over-extracted.”
Those sensory markers are exactly what the table above captures. But on days when your palate feels off (tired, congested, or just inconsistent), a refractometer gives you an objective number. The Specialty Coffee Association and most specialty professionals use refractometers to measure Total Dissolved Solids (TDS) and calculate extraction yield, giving them a precise read on where in the extraction window a brew landed. An affordable home refractometer does the same job for a fraction of the cost.
How Each Brew Method Changes the Game
Home brewing follows the same extraction science no matter what gear sits on your counter: acids first, then sugars, then bitterness. The framework doesn’t change. What changes is which lever is easiest to pull and which mistake is easiest to make depending on your method.
French Press, V60, and Espresso Compared
Start with the French press. It’s the most forgiving of the three because full immersion keeps every ground in contact with water for the same amount of time: there’s no flow rate to manage, no pour angle to worry about. But forgiving doesn’t mean foolproof. Leave it steeping past four minutes and those bitter compounds start crossing the line. Coarse grind, four-minute steep, then pour immediately.
Pour-over (V60, Chemex) is a different animal. Water moves through the bed by gravity, which means any inconsistency in your pour creates fast lanes and slow lanes through the grounds. That’s channeling. A gooseneck kettle isn’t a luxury here; it’s the tool that gives you enough control over flow rate and direction to keep the water moving evenly through the bed.
Espresso is a high-pressure system where grind size, dose weight, and shot time are all pulling on the same rope. Tighten the grind by one notch and your shot slows down, contact time increases, and you’ve swung toward over-extraction. That sensitivity is why small adjustments feel dramatic.
Building a Repeatable Baseline
Pick a 1:16 coffee-to-water ratio as a starting baseline. Lock it in, then move one variable at a time. And keep a brew log. Grind setting, water temperature, brew time, what the cup tasted like. Without that record, you’re just running the same experiment repeatedly.
Water quality is the unspoken variable in nearly every extraction problem. Hard tap water acts as a buffer and leaves the cup tasting flat and chalky; soft water can leave it thin and underdeveloped. Grinder consistency is the other hidden variable. If you’re using a blade grinder, upgrade to a burr grinder—it is the single most important hardware change you can make to actually implement this diagnostic framework.
Key Takeaways on Coffee Extraction
- Sour and thin means you stopped too early; bitter and drying means you went too far—that’s your entire diagnostic framework.
- Change only one variable per brew test, or you’ll never know which adjustment actually fixed the problem.
- Mixed sour and bitter signals almost always point to an inconsistent grinder, not a broken recipe.
- A 1:16 brew ratio is your neutral baseline, not a rule—lock it in before touching grind size or temperature.
- Roast level quietly invalidates universal advice: dark roasts need cooler water, light roasts need it just off the boil.
- Water quality is the silent saboteur—if every adjustment fails, swap your tap water for spring water before blaming technique.
Frequently Asked Questions About Coffee Extraction
Q: Why does my coffee sometimes taste sour and bitter at the same time?
A: That mixed signal usually means your grinder is producing uneven particles—large boulders under-extract into sourness while fine dust over-extracts into bitterness. No recipe adjustment fixes a chaotic particle distribution. Upgrade to a burr grinder for uniform grounds before changing anything else in your workflow.
Q: How does the 80/20 rule actually work for dialing in espresso?
A: The 80/20 approach suggests that roughly 80% of extraction flavor shifts come from grind size adjustments alone—the other variables fine-tune the remaining 20%. If your shot is off, change grind first, taste the result, then touch dose or yield only if needed. It keeps you from chasing multiple levers at once.
Q: Is over-extracted coffee actually stronger in caffeine?
A: Not meaningfully. Over-extraction pulls more bitter tannins and astringent compounds from the grounds, but caffeine—being highly soluble—extracts early and plateaus. You’re tasting harshness, not extra strength. A darker, more bitter cup doesn’t deliver a proportionally bigger caffeine kick; it just punishes your palate more.
Q: Can channeling happen even when my grind size looks perfect?
A: Yes, and that’s what makes it deceptive. Channeling is a physical distribution failure—water finds weak spots through the coffee bed regardless of particle size. Look for dark splotches on a spent espresso puck or uneven drawdown in a pour-over. The fix is better puck prep, not a coarser grind.
Q: What if cold brew still tastes under-extracted after a 24-hour steep?
A: Cold brew extracts slowly because low water temperature reduces dissolution rate. If it’s sour after 24 hours, grind finer to increase surface area rather than extending steep time endlessly. Stirring the grounds at the start also improves saturation, preventing dry pockets that never give up their solubles.
Q: How accurate are cheap home refractometers for measuring extraction yield?
A: Affordable refractometers are directionally useful but can drift a few tenths of a percent compared to lab-grade instruments. They’re best treated as a consistency tool—track whether your number moves up or down across brews—rather than an absolute reading. Your palate should still be the final judge of balance.
Q: What’s the one mistake French press users keep making that causes over-extraction?
A: Leaving the coffee sitting in the press after plunging. Even with the filter down, grounds remain in contact with water and keep extracting. Pour the entire brew into a separate carafe immediately at four minutes. That thermal mass sitting in the glass isn’t neutral—it’s still working against you.
References
- International Journal of Mass Spectrometry study on compound release during espresso brewing – ScienceDirect
- Coffee extraction: How it helps create the perfect cup – Perfect Daily Grind
- How to stop guessing your way through home coffee brewing – Ratio Coffee
- A guide to calibrating your espresso recipes – Perfect Daily Grind
- Changing Espresso Extraction – Barista Magazine Online
- A guide to dialling in espresso – Perfect Daily Grind
- French press to pour over: How to make great coffee at home – Perfect Daily Grind