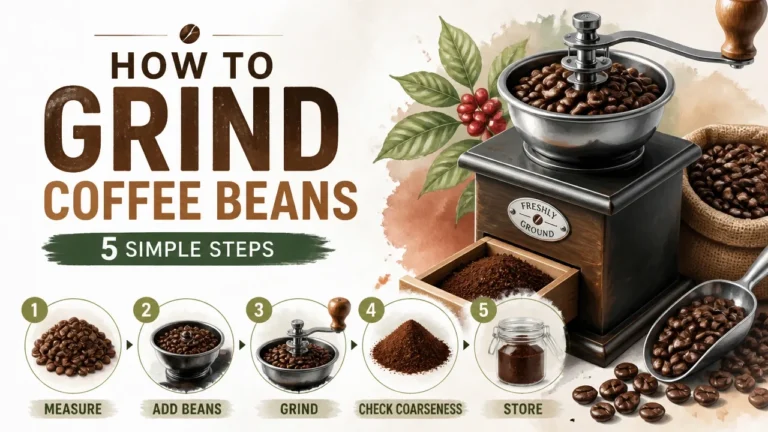

Freshly ground coffee beans produce a noticeably better cup than anything pre-ground – not because of coffee snobbery, but because of chemistry. The moment a bean is cracked open, its aromatic compounds start escaping into the air instead of into your mug.
The problem is that most guides jump straight to gear recommendations and skip the actual sequence. What follows is the full process: from choosing a grinder to inspecting the grounds before a single drop of water falls. Work through it once, and the variables stop feeling like guesswork.
Once you have mastered grinding for individual manual cups, you might also want to explore batch brew coffee basics to understand how specialty cafés efficiently scale up filter coffee.
Once you have mastered the fundamentals of bean preparation, you can apply these exact grind principles when you learn How to Make Pour Over coffee for a cleaner, more nuanced cup.
Key Takeaways on How to Grind Coffee Beans
- A burr grinder produces more consistent particle sizes than a blade grinder, but blade grinder technique – short pulses, small batches, shaking between bursts – can still yield a drinkable cup.
- Weigh whole beans before every session; ground coffee loses significant aroma within minutes of grinding, not hours.
- Grind size is not a preference – it’s matched to your brew method, and one step in the wrong direction produces a noticeably bitter or sour cup.
- Run a 5g diagnostic dose at your grinder’s extremes before committing a full batch to a new setting.
- A pre-brew visual inspection of the dry grounds and brew basket catches most grind mistakes before water is involved.
- Bitter means grind coarser; sour or weak means grind finer – and change only one variable per session so you know what actually worked.
Before You Start: Pick the Grinder You Already Own or Buy Smart
The grinder question stops more beginners than any other part of the process. Here’s the short answer: use what you have. If you’re buying, lean toward a burr grinder – but don’t delay learning the full sequence just because you don’t own one yet.
The two grinder types work on fundamentally different principles. A burr grinder feeds beans between two abrasive surfaces – either conical or flat – and the gap between those surfaces controls the particle size. A blade grinder spins a metal blade that chops beans randomly, producing a mix of fine dust and coarse chunks in the same batch.
Maciej Kasperowicz, Director of Coffee at Trade Coffee, explains that in a burr grinder, two sharp cones or disks with blades crush the beans, and the distance between the burrs is what determines particle size – producing a far more consistent grind that results in a smoother cup regardless of what kind of coffee you enjoy.
That consistency matters because even particle size means water extracts flavor from every piece at roughly the same rate. Uneven particles – the blade grinder’s signature output – mean some grounds over-extract (bitter) while others under-extract (sour) in the same brew.
Realistic entry points right now:
| Grinder Type | Starting Price | Best For |
|---|---|---|
| Blade grinder | ~$20 | Beginners testing the process |
| Hand burr grinder | ~$30 and up | Budget-conscious, low volume |
| Electric burr grinder (e.g., Baratza Encore) | ~$140–150 | Daily home use, consistent results |
Step 1: Weigh Whole Beans and Grind Only What You Need Right Now
Dose controls everything downstream. Before you touch the grinder, put a small bowl on your kitchen scale and weigh out whole beans for exactly one brew session – nothing more.
A useful starting ratio is roughly 31.9g of coffee per 18oz of water, but treat that as a diagnostic baseline, not a rule carved in stone. Every bean, roast level, and brewer is slightly different. The point is to start with a number you can repeat and adjust, rather than a scoop that varies every time.
Once you’ve weighed the dose, grind it immediately and brew it immediately.
Peter Giuliano, Senior Advisor for Scientific Communication at the Specialty Coffee Association, puts the chemistry bluntly: the CO₂ that slowly escapes from whole beans over weeks vanishes within minutes after grinding – and with it goes a significant portion of the aroma and flavor complexity in your cup.
This is why pre-grinding a week’s worth of coffee and storing it in a bag works against you. Ground coffee exposed to air oxidizes rapidly – most of the noticeable degradation happens within 15 to 30 minutes of grinding under normal conditions. Some sources suggest that grounds stored in a properly sealed, airtight container can hold reasonably well for up to 7 to 10 days for espresso use, but that’s an exception built on tight sealing, not the norm.
The simplest test: grind one small extra dose, seal it overnight in an airtight jar, then brew it alongside same-day fresh grounds the next morning. Your own palate will tell you more than any freshness timer.
One more rule: don’t fill the hopper with more beans than your current dose requires. Beans sitting in an open hopper stale faster than beans in a sealed bag, and you lose the ability to weigh precisely when you pre-load.
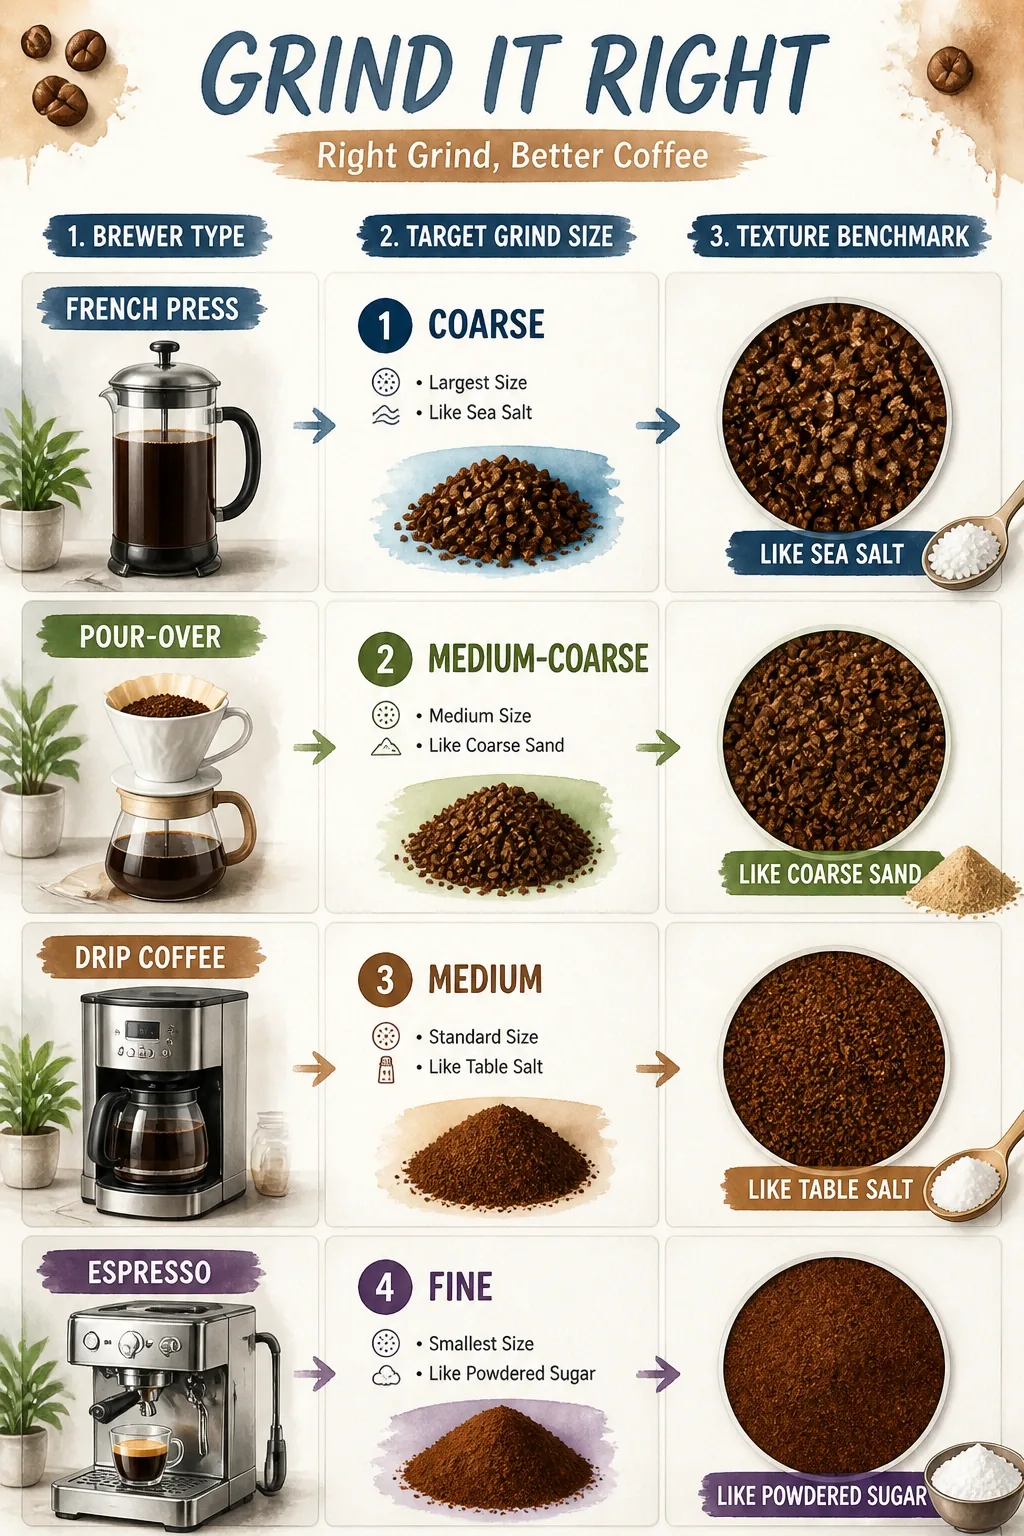
Step 2: Match Grind Size to Your Brewer, Not the Label
Grind size is not a preference—it’s the mechanical factor that shapes your coffee flavor. Each brewing method moves water through coffee at a different speed, and grind size controls how much resistance the water meets on the way through.
Chahan Yeretzian, Professor and Head of the Coffee Excellence Center at Zurich University of Applied Sciences, makes this especially clear for espresso: a finer grind creates more pressure inside the portafilter, generating the resistance needed for proper extraction. The same logic applies in reverse for slower, immersion-style methods like French press, where coarse grounds prevent over-extraction during a long steep.
Here’s the practical map:
| Brew Method | Grind Size | Texture Analogy |
|---|---|---|
| French press | Coarse | Kosher salt or breadcrumbs |
| Pour-over | Medium | Sand or table salt |
| Drip coffee maker | Medium-fine | Fine sand |
| Espresso | Fine to extra-fine | Flour or powdered sugar |
One thing most grind charts don’t tell you: your grinder’s “medium” is not calibrated to any universal standard. Before you commit a full dose, run a quick 5g diagnostic test at your grinder’s finest and coarsest settings to understand its actual range. Then dial in from the middle. This prevents a beginner from wasting good beans on a wildly wrong setting on the first try.
One natural transition: the infographic below maps each common brew method to its target grind size and texture, so you can cross-reference before you dial in.
Step 3: Grind with the Right Technique for Your Grinder
Technique changes based on the grinder you’re using – and getting this wrong is how people end up with overheated, dusty, or wildly uneven grounds even after setting the right size.
For a burr grinder
Set your target grind size before adding beans. Add your pre-weighed dose from Step 1, then run the grinder until all the beans have passed through. That’s it – no pulsing, no shaking. The burr mechanism does the work. Your only job is not to overfill the chamber, which can cause beans to jam or grind unevenly.
For a blade grinder
This requires more active involvement. Use short pulses – two to three seconds each – rather than holding the button down continuously. Between pulses, shake or tap the grinder to redistribute the grounds so the blade hits fresh material instead of re-chopping already-ground particles into dust. Stop when the grounds look like your target texture.
Avoid long continuous runs. The blade generates heat through friction, and heat degrades flavor compounds before the water even touches the coffee. It also produces a wider range of particle sizes the longer it runs.
The honest reality about blade grinders: they won’t produce espresso-quality uniformity, and no technique fully closes that gap. But for French press, drip, and pour-over, the pulse-shake method can produce a drinkable and even enjoyable cup while you learn the full process. Many people never need to go further.
The video below walks through both grinder types side by side, so you can see exactly what proper technique looks like in real time.
Step 4: Check the Grounds Before You Brew
Most beginners skip this step entirely – they grind, they pour, they taste something wrong, and they have no idea where the problem started. A 10-second visual inspection before adding water removes most of that guesswork.
Pull a small pinch of the dry grounds and compare them to the texture target you set in Step 2. Coarse grounds should feel gritty and distinct between your fingers, like kosher salt. Fine grounds should feel almost silky, like flour. If what you’re holding doesn’t match the target, adjust one step finer or coarser and grind a fresh small test dose before committing the full batch.
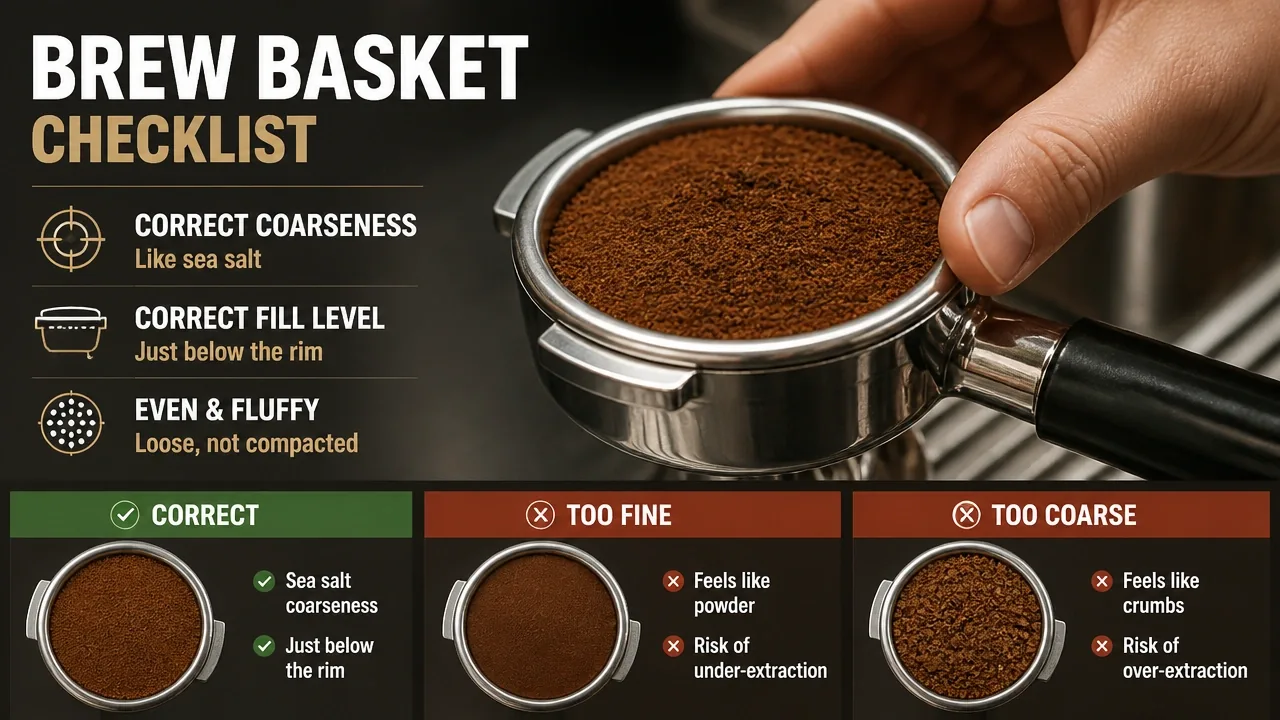
Also check the brew basket. Grounds should sit evenly without overflowing the edges. If the basket looks overpacked, either the dose is too large or the grind is too fine for that basket size – both are easy fixes before water enters the picture.
Here’s what success actually looks like at this stage, since most guides never define it:
- Basket is filled evenly without overflow
- Grounds match the texture you targeted for your brew method
- No visible clumping or dusty powder mixed with coarse chunks (a blade grinder warning sign)
- Water flows through evenly during brewing – not pooling on top, not racing through instantly
If all four indicators appear, you’re in the workable window. If not, change one grind step and repeat the inspection before brewing a full pot.
After the inspection, the grounds are ready. Here’s what a correct pre-brew basket looks like before water is added.
Step 5: Store Leftover Beans and Clean Your Grinder
The two things most beginners skip after brewing are the two things that quietly ruin the next cup.
Leftover beans should go back into an airtight container immediately – away from heat, light, and moisture. Keep them whole. The sealed bag they came in works fine if it has a one-way valve; if not, transfer them to a jar with a tight lid. The refrigerator is a common choice but not ideal – temperature fluctuations and moisture from other foods can affect flavor. A cool, dark cabinet is usually better.
If you accidentally ground more than you needed, store the excess in an airtight container and use it within a day or two. It won’t be as good as fresh-ground, but it won’t be wasted either. Just don’t make a habit of pre-grinding in bulk – the flavor loss compounds quickly.
Grinder cleaning is the other half. Coffee oils left inside the grinder go rancid over time and contaminate future batches with a stale, bitter undertone that has nothing to do with your beans or technique. After each session, use a small cleaning brush (most grinders include one) to sweep out the chamber, chute, and any accessible burr surface. For blade grinders, a quick wipe with a dry cloth after brushing is usually enough. For burr grinders, a deeper clean every few weeks – using grinder cleaning tablets or rice – keeps the burrs clear of oil buildup.
One brush pass after every use costs thirty seconds and protects every cup that comes after it.
Troubleshooting: Fix the Main Grind Mistakes by Taste
If you followed the five steps and the cup still tastes wrong, the fix is almost always a single grind adjustment – not a new grinder, not different beans, not a different brewer.
Bitter or harsh? The grind is too fine. Water is spending too long in contact with too much surface area, pulling out the harsh, late-stage compounds. Adjust one step coarser and brew again with everything else held constant – same dose, same water, same brewer.
Weak, sour, or flat? The grind is too coarse. Water is passing through too quickly, picking up the early bright notes but not enough of the body and sweetness underneath. Adjust one step finer.
The rule that matters most here: change one variable at a time. If you adjust the grind and the dose and the water temperature in the same session, you’ll have no idea which change fixed the problem – or which one introduced a new one.
For blade grinder users who are getting inconsistent results even after adjusting grind size: the issue is almost never the setting. It’s batch size and pulse length. Use less coffee per grind session, pulse shorter, shake between bursts, and stop before the grounds look powdery. That combination narrows the particle spread more than any dial adjustment can.
Frequently Asked Questions About How to Grind Coffee Beans
How can I grind coffee beans at home without a grinder?
A blender on pulse mode is the most practical workaround – use short bursts and stop frequently to check texture. A mortar and pestle works too, but it’s slow and produces very uneven results. Neither method replaces even a basic burr grinder, but both can produce a drinkable coarse grind for French press in a pinch.
Is it okay to grind coffee beans in a blender?
Yes, but treat it like a blade grinder: short pulses, small batches, and shake between bursts to redistribute the grounds. A blender’s blade generates heat quickly, so don’t run it continuously or you’ll scorch the grounds before they ever hit water.
How do I grind coffee beans without ruining the flavor?
The two most common flavor killers are grinding too far in advance and using the wrong grind size for your brewer. Grind immediately before brewing, match the texture to your brew method, and avoid long continuous blade runs that generate heat.
What are the most common mistakes when grinding coffee?
Pre-grinding too much at once, using a single grind size for every brew method, and changing multiple variables at the same time when troubleshooting. The last one is the sneakiest – it makes it impossible to know what actually fixed the problem.
Does grind size really make that big a difference in taste?
It’s one of the highest-leverage variables in the entire brew process. A grind that’s one step too fine can turn a great bean bitter; one step too coarse leaves the cup flat and sour. The bean quality matters, but grind size is what unlocks or wastes it.
How often should I clean my coffee grinder?
Brush out the chamber after every use to remove loose grounds. Do a deeper clean – with grinder cleaning tablets or a manufacturer-recommended method – every two to four weeks if you brew daily. Rancid coffee oils build up faster than most people expect and add a stale bitterness that no grind adjustment can fix.
Can I store pre-ground coffee, or should I always grind fresh?
Grinding fresh every time produces the best results. If you must store pre-ground coffee, use an airtight container and use it within one to two days. Beyond that, the flavor loss is noticeable enough that you’re essentially brewing stale coffee regardless of how good the beans were to start.
Why does my coffee taste different every morning even when I do the same thing?
The most common culprits are inconsistent dose weight (scoops vary; a scale doesn’t), beans aging in an open hopper, and residual grounds from a previous session mixing with fresh grounds. Weigh every dose, keep beans sealed until the moment you grind, and brush the grinder chamber between sessions.
References
- Baratza Encore Burr Grinder Review | foodandwine.com
- Coffee Decoded: Fresh Coffee | sca.coffee
- The Relationship Between Grind Size and Coffee Extraction | perfectdailygrind.com