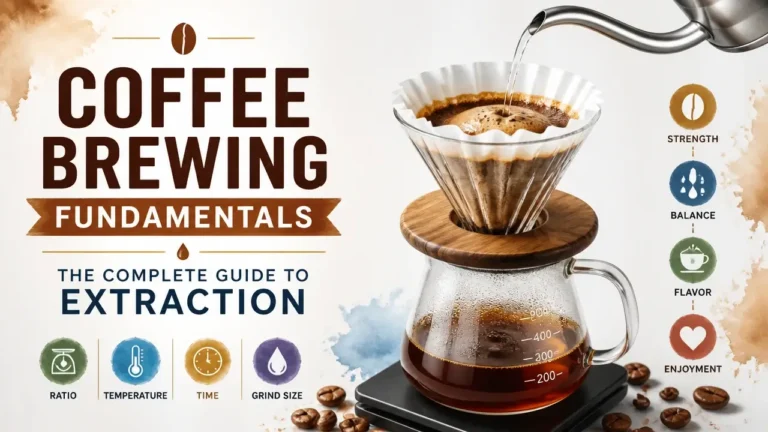

Coffee extraction is a precise chemical negotiation between water and ground coffee, one where every variable you control either unlocks flavor or destroys it. Grind size, water temperature, brew time, and ratio aren’t preferences. They’re levers.
Pull them wrong and you get sour underextraction or bitter, astringent overextraction. Pull them right and you land in that 18–22% extraction yield sweet spot the Specialty Coffee Association mapped for a reason. This guide gives you the framework to stop guessing and start dialing in.
What Is Coffee Extraction, Really?
Coffee extraction is the process of water dissolving soluble compounds: acids, sugars, oils, and aromatic chemicals, out of your coffee grounds and into your cup. Every flavor you’ve ever tasted in a brewed coffee, good or bad, came from that one process. Understanding it is the difference between guessing at your next adjustment and knowing exactly what to change.
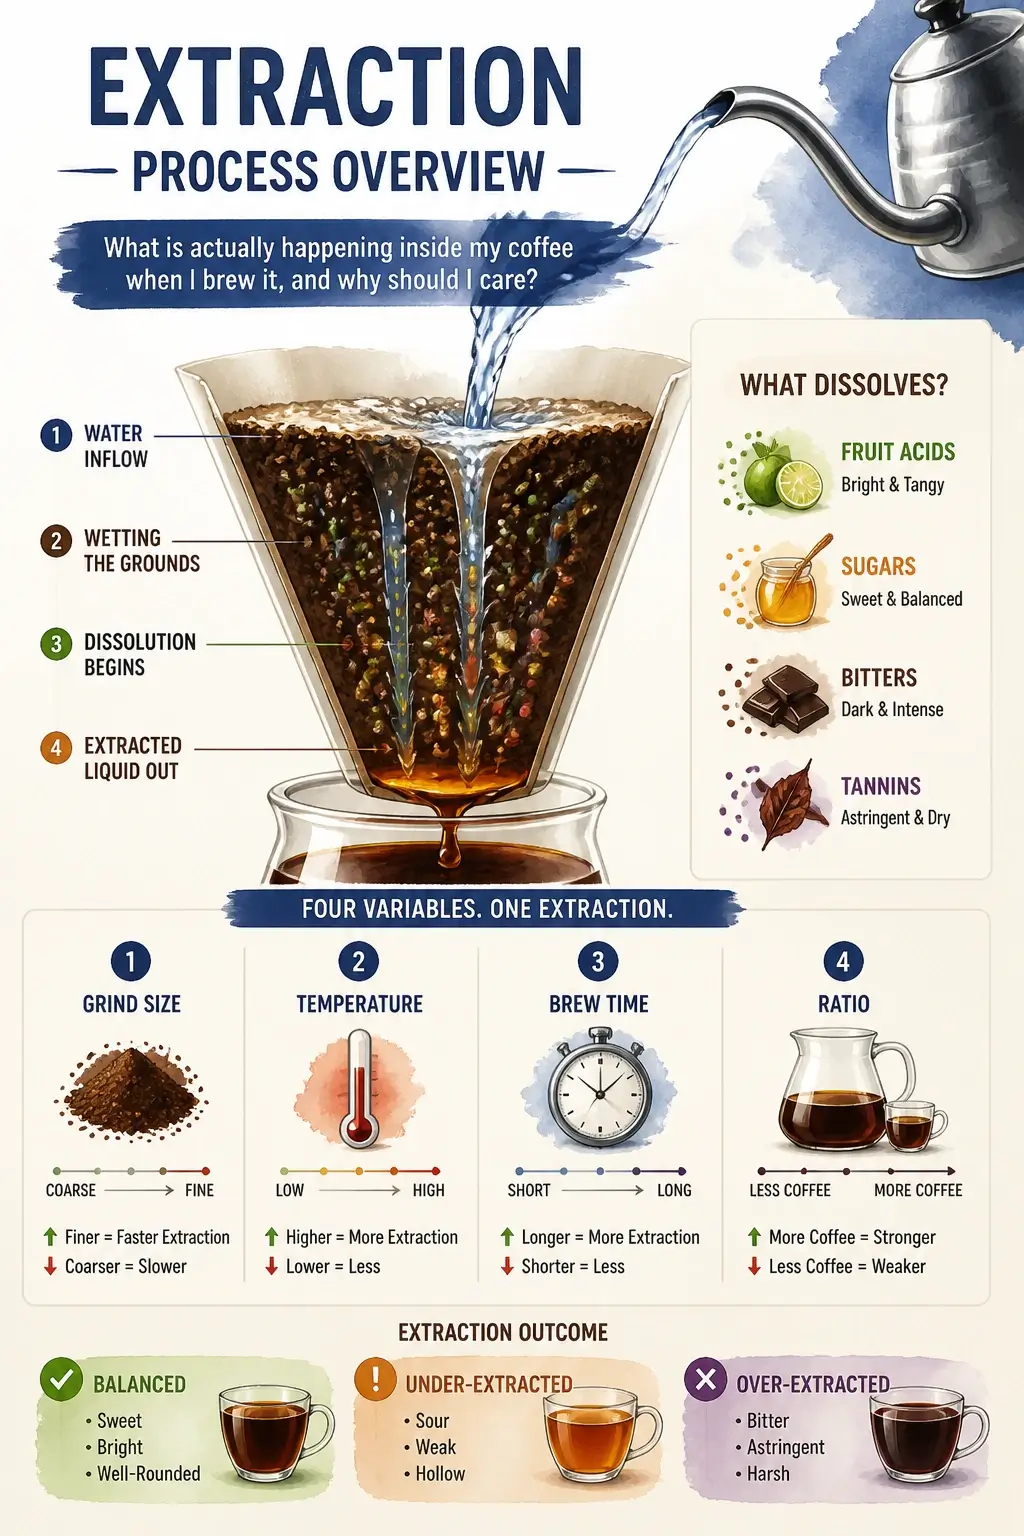
Here’s what’s actually happening inside the grounds. Coffee beans contain hundreds of chemical compounds, and they don’t all dissolve at the same rate. The fruity acids and sugars go first: they’re highly soluble and come out fast. The deeper, heavier compounds like bitter tannins and certain chlorogenic acids take longer. So every brew is a race against time: you want to pull enough of the bright, sweet stuff without pushing so far into the slow-dissolving bitter end.
Think of it like steeping a tea bag. Pull it out at 30 seconds and you get weak, grassy water (you barely touched the good stuff). Leave it in for ten minutes and it turns harsh and astringent (you went too far and started pulling the compounds that make your mouth pucker). Coffee works the same way, just with a lot more variables in play.
That’s the part most people miss. Extraction isn’t a single dial you turn up or down. It’s the combined result of four things working together: how fine you ground the coffee, how hot your water is, how long the water stays in contact with the grounds, and how much coffee you used relative to the water. Change any one of those, and you shift which compounds end up in your cup, and how much of each.
Your Cup Tells You Exactly What Went Wrong
Under-extraction and over-extraction leave unmistakable fingerprints on your palate, sour and thin on one end, bitter and dry on the other, and once you know what each signal means, coffee extraction becomes a diagnostic conversation you’re having with every sip.
The key is understanding why those flavors show up in that order.
Coffee writer Hazel Boydell, coffee writer at Perfect Daily Grind, explains the mechanism directly:
“Coffee compounds are not all extracted at the same rate. Fruity and acidic notes are extracted first, followed by sweetness and balance, and then finally bitterness.”
That sequence is everything. Your cup is essentially a timestamp (a record of how far through that compound ladder the water actually traveled).
Calibrating your palate to spot these sensory defects is essential for mastering under vs over extracted brews.
What Under-Extraction Tastes Like
Under-extracted coffee tastes sour, sometimes salty, and noticeably thin. The finish disappears fast, like it was never really there.
What you’re tasting is an incomplete extraction: water that dissolved the fast-moving acids before it could reach the sugars and balancing compounds sitting deeper in the grounds. Those early acids have nothing to balance them, so they dominate. The sourness isn’t a sign of bad beans. It’s a sign the process stopped too soon.
What Over-Extraction Tastes Like
Over-extracted coffee goes in the opposite direction: bitter, dry, and hollow. There’s often an astringent mouthfeel (that drying, almost chalky sensation that coats the inside of your mouth and lingers long after the sip is gone).
Here, water kept pulling after the good stuff was already out. The tannins and harsh compounds that should have stayed locked in the grounds got dissolved too. Bitterness in small amounts is normal and even pleasant (it’s part of coffee’s complexity). But when it’s the loudest note in the cup, and it comes with that drying sensation, extraction went too far.
What Balanced Extraction Tastes Like
Balanced coffee extraction lands in the middle of that compound sequence: past the sharp acids, through the sugars, and stopping before the harsh tannins take over. The result is sweetness upfront, a full body that fills your mouth, and acidity that reads as fruit rather than vinegar. The finish lingers without bitterness.
That pleasant acidity is worth pausing on. Acidity itself isn’t the enemy: it’s the type of acidity that tells you where you are. Sharp and face-puckering means under-extracted. Bright and fruit-forward means you’re in the window.
The Three-Cup Calibration Exercise
The fastest way to train your palate is to make the contrast deliberate. Brew three cups back to back, changing only one variable to shift extraction:
- Under-extracted cup: Use a coarser grind than normal, or cut your brew time short. Taste it. Lock in that sour, thin, quick-finish sensation.
- Over-extracted cup: Use a finer grind, or let it run longer. Taste it. Notice the bitterness, the dryness, the astringent coating on your tongue.
- Balanced cup: Brew at your normal target. Compare it against both extremes.
You’re not trying to make good coffee in the first two cups. You’re building reference points, sensory anchors your brain can use automatically the next time something tastes off. After this exercise, “this is a little sour” stops being a vague complaint and becomes an actionable signal.
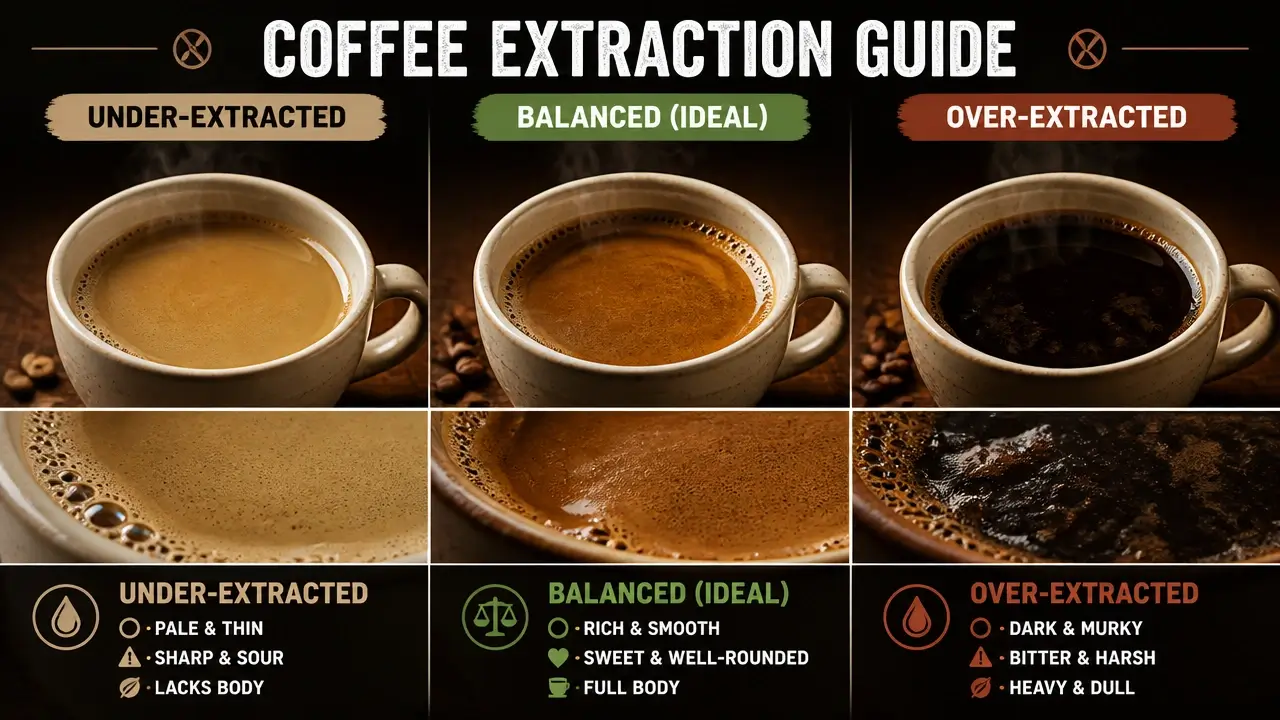
Once you can reliably read those signals, the next question becomes: what’s the measurable target that defines “balanced,” and how do you know when you’ve actually hit it?
The 18-22% Extraction Window
Extraction yield is the percentage of your dry coffee grounds that actually dissolves into your cup. Brew 20 grams of coffee, and if 4 grams end up in the liquid, you’ve hit 20% extraction yield. That single number is what separates “I think this tastes okay” from a repeatable target you can work toward every single time.
Here’s why that matters. Most beginner guides skip this concept entirely. They hand you sensory cues (“adjust until it tastes good”) without ever giving you a shared reference point. The result is two people using the same beans, same equipment, same recipe, and producing wildly different cups with no idea why. Without a quantitative anchor, you’re not dialing in. You’re just wandering.
The Specialty Coffee Association puts the sweet spot at 18–22% of dry coffee mass dissolved into the cup. That range isn’t arbitrary. Below 18%, you’ve under-extracted (the water moved too fast or didn’t have enough contact to pull the sugars and body out of the grounds). What’s left behind is the sweetness. What ends up in your cup is sharp, thin acidity. Above 22%, you’ve gone too far. The desirable compounds came out early; now you’ve started pulling the bitter, astringent ones that were buried deeper in the cell structure.
That 18-22% window is also what connects the taste signals from the last section to an actual mechanism. When your coffee tastes sour, your tongue isn’t just giving you an opinion: it’s telling you extraction yield is sitting somewhere south of 18%. The mental model shifts from “something’s off” to “I need to push extraction higher toward that 20% midpoint.”
Coffee consultant Scott Rao, coffee consultant and author of The Professional Barista’s Handbook and Espresso Extraction: Measurement and Mastery, captures exactly why this scale is more useful than taste alone:
“Something may taste good at an extraction yield of 17%, taste flat or dull at 19%, but peak in flavor at 21%: essentially, using the extraction scale in tandem with tasting has the potential to create a flavor quality and extraction map of sorts.”
That’s the key insight. Taste tells you direction. Extraction yield tells you position. You need both.
Now, you don’t need a refractometer to use this. A refractometer measures Total Dissolved Solids in your brew and can calculate your yield precisely, but it’s a professional tool, not a kitchen requirement. What you do need is the mental model: every adjustment you make to your grind, your temperature, your brew time, all of it is moving that extraction percentage up or down along the same scale. Once that clicks, you stop guessing and start steering.
The Four Levers of Extraction Control
Every extraction outcome traces back to four variables: grind size, water temperature, brew time, and coffee-to-water ratio, and adjusting any one of them shifts the balance of what ends up in your cup. These aren’t settings you tweak randomly. They’re a system, and they talk to each other.
Grind size controls how much surface area you’re exposing to water. Grind finer, and you create more contact points: water reaches more of the coffee’s interior and pulls compounds out faster. Grind coarser, and you reduce that surface area, so extraction slows down. This is why grind size is so often called the master variable: it sets the pace for everything else.
Water temperature determines how aggressively water dissolves those compounds. Hotter water increases solubility, meaning it pulls more material out of the grounds in less time. Cooler water is slower and more selective: it tends to favor certain compounds over others. For most hot-brew methods, the standard starting zone is 195–205°F (90–96°C). That range isn’t arbitrary; it’s where water is hot enough to extract the full range of desirable flavor compounds without scorching the grounds.
Brew time is simply the duration over which the other variables operate. Longer contact means more total extraction. Shorter contact means less. Think of it as the clock running on whatever grind size and temperature you’ve already set. A finer grind at high temperature running for too long will over-extract: you’ll taste it as bitterness. The same grind pulled short will under-extract. Time is where those upstream decisions cash out.
Coffee-to-water ratio controls strength: the concentration of dissolved material in your final cup. The standard starting point for drip and pour-over is 1:16: one gram of coffee to sixteen grams of water. That ratio produces a balanced, medium-bodied cup that most people find approachable. Espresso works on a completely different scale, typically around 1:2, because the brew method forces highly pressurized water through a dense puck in under thirty seconds.
The interdependence here is real and worth taking seriously. If you grind finer to coax more flavor from a light roast, you’ve just speeded up extraction, so you may need to shorten your brew time to compensate, or you’ll overshoot. Pull one lever, and at least one other lever responds. That’s not a complication; it’s the logic of the system.
Here’s what most beginner guides leave out entirely: water itself is a fifth variable, and it’s one almost nobody accounts for. Water isn’t a passive solvent: it’s an active participant in extraction. Its mineral content, specifically calcium and magnesium (hardness), and its carbonate buffering capacity (alkalinity), directly affect how efficiently your coffee extracts and how the final flavors express themselves.
The Specialty Coffee Association publishes target ranges for brew water: total hardness between 50–175 ppm CaCO₃ and alkalinity between 40–75 ppm. Water that falls outside those ranges causes real, predictable problems. Soft water with low mineral content and no buffering capacity tends to under-extract: it lacks the ionic charge to pull compounds effectively, and the cup tastes thin or sharp. Hard water with high alkalinity over-extracts and mutes acidity, flattening the cup no matter how well you’ve dialed in your grind and temperature.
Why Burr Grinders Outperform Blade Grinders
Grind size only works as a reliable variable if your particles are consistent. This is where the equipment gap becomes real.
A burr grinder crushes beans between two abrasive surfaces set at a precise distance apart. Every particle comes out roughly the same size. Water moves through that bed evenly, and extraction proceeds at a predictable rate.
A blade grinder spins a metal blade that chops randomly. What you get is a mix of boulders and fine dust in the same batch. The dust over-extracts almost immediately, turning bitter. The boulders under-extract: staying sour and weak. Both happen simultaneously in the same cup, which is why blade-ground coffee often tastes muddy and flat even when everything else seems right. You can’t fix that with temperature or brew time because the problem isn’t speed: it’s that different particles are extracting at completely different rates.
A burr grinder is the single most impactful equipment upgrade a beginner can make. Before you buy a precision kettle or a specialty scale, get the grinder right. Everything downstream depends on it.
The Espresso Ratio Trap
Here’s something most beginner guides quietly skip over: grind size is the master variable, but it can’t carry the whole load when other fundamentals are misaligned, especially in espresso.
The standard 1:2 espresso ratio (say, 22 grams of coffee yielding 44 grams of liquid in 28-32 seconds) gets presented as a fixed law. When a shot runs too fast or too slow, the instruction is always the same: adjust the grind. Grind finer to slow it down, coarser to speed it up. And that works, until it doesn’t.
A darker roast at a 1:2 ratio can taste harsh and over-extracted even with a perfect grind. A lighter roast at 1:2 can taste sour and thin no matter how many grind adjustments you make. If you’ve been chasing grind changes in circles without landing on a balanced shot, the ratio itself may be the problem, not the grind.
Viable espresso ratios actually run from 1:1.5 (tighter, more concentrated) all the way to 1:3 (longer, higher extraction). The ratio isn’t a law, it’s a variable. Knowing that is what gets you out of the frustration loop that rigid beginner frameworks create.
Temperature’s Real Role in Coffee Extraction
Water temperature isn’t a dial you set once and forget, it’s the throttle controlling which flavor compounds actually make it into your cup. The 195–205°F (90–96°C) range is the right starting zone for most hot-brew methods: pour-over, drip, French press, AeroPress. But calling it a universal answer is like saying “drive between 30 and 50 mph” without mentioning whether you’re in a school zone or on a highway.
The reason that range exists at all comes down to how coffee compounds dissolve. Different flavor molecules have different solubility curves, meaning they release into water at different rates depending on temperature. Fruit acids and light aromatic compounds are eager. They dissolve readily even at lower heat. The heavier caramelized sugars and bitter compounds like chlorogenic acid lactones are stubborn. They need more thermal energy to pull into solution, and when they finally do release, they come fast.
A 2016 study on mass spectrometry tracked volatile organic compounds during espresso extraction at 82°C, 92°C, and 96°C. The finding that matters: a 5°C increase, say, from 91°C to 96°C, produced a disproportionate surge in low-polarity bitter compounds, shifting the dominant flavor profile toward roastiness and bitterness. The acids barely moved. The bitter compounds spiked. That’s not a uniform 20-degree window behaving consistently across its range. That’s a spectrum with real consequences at each point on it.
How Roast Level Shifts Your Target Temperature
Roast level changes the physical structure of the coffee bean, and that changes where within the range you should actually brew.
Light roasts are denser. The cellular structure hasn’t broken down as much, so flavor compounds are harder to access. Brewing a light-roast Ethiopian at 195°F often produces a vegetal, underdeveloped cup, not because the beans are bad, but because you didn’t give the water enough thermal energy to do the job. Push toward 205°F, and those bright fruit acids and floral aromatics have a real chance to release cleanly.
Dark roasts work the opposite way. Longer roasting makes the bean more porous and the compounds more soluble. At 205°F, a dark-roast Sumatran doesn’t need that extra push, it’s already primed to release. What you get instead is an ashy, harsh cup where the bitter compounds have been over-extracted. Pulling back to 195–200°F gives you control over what comes out and what stays behind.
This is the part most beginner guides skip entirely. They hand you a 20-degree range as if it’s flat, when in practice the low end and the high end produce meaningfully different cups, especially as roast level shifts the solubility of every compound in the bean.
Even the Specialty Coffee Association, the body that sets brewing standards for the industry, is careful not to overclaim here. Their own research notes:
“Brew temperature is widely considered to be one of these key variables affecting the final quality of coffee, with a temperature near 93°C believed by most to be best. And, while it is no surprise then that drip brewers that can’t reach 92°C fast enough fail their certification, it turns out there is little empirical (and even less scientific) evidence, however, to support any particular range of brew temperatures for optimal sensory quality and consumer acceptance.” — Specialty Coffee Association
That’s the standards body saying: the rule is a starting gate, not the finish line. Your roast, your beans, and your palate determine where you actually land.
Cold Brew’s Deliberate Temperature Exception
Cold brew isn’t a broken version of hot coffee, it’s a deliberate manipulation of the same temperature-extraction relationship, just run in slow motion.
At room temperature or refrigerated (roughly 20–25°C), extraction slows dramatically. The same compounds that dissolve in minutes at 93°C take 12–24 hours at cold temperatures. But time compensates for heat, and the result is a chemically different cup. Because the bitter, low-polarity compounds require significant thermal energy to extract efficiently, cold brew naturally suppresses them. What you get is smooth, low-acid, and sweet, not because cold brew uses different beans, but because the temperature floor keeps the harsh compounds from fully releasing, no matter how long you steep.
When Water Chemistry Undermines Temperature Control
Here’s the variable that temperature can’t fix on its own: your water’s mineral balance. As we covered earlier in the extraction variables, water chemistry acts as the medium through which all extraction happens. Magnesium ions, in particular, bind preferentially to the aromatic compounds that make specialty coffee taste complex and bright.
If your water is too soft, it lacks the mineral carriers to pull those compounds efficiently, and no amount of temperature adjustment will compensate. If it’s too hard, scale buildup and competing minerals interfere with clean extraction. You can dial your temperature perfectly for a light-roast pour-over and still get a flat, muddled cup if the water working against you.
Temperature is one throttle. Water chemistry is the road the car is driving on. Both have to be right before the other one fully matters.
The Systematic Dial-In Process
Disciplined dial-in process converts coffee extraction from a guessing game into a repeatable sequence, and it works the same way whether you’re brewing pour-over, French press, or AeroPress. You start at a known position, taste, diagnose, and move one lever at a time. That’s the whole system.
Here’s why that last part matters more than anything else: if you adjust grind size, ratio, and temperature in the same brew, and the cup improves, you have no idea which change did the work. You’re back to guessing next time. One variable at a time isn’t a suggestion: it’s the mechanism that makes the process repeatable.
Step 1: Lock In Your Starting Ratio
Before you touch the grinder, set your ratio and don’t move it until you’ve worked through grind size first. Your starting position depends on your method:
- Pour-over / drip: 1:16 (1g coffee to 16g water)
- French press: 1:15 (slightly tighter because immersion extracts more efficiently)
- AeroPress: 1:15 to 1:16, depending on whether you’re brewing concentrated or full cup
- Espresso: 1:2 (18g in, 36g out (a different world entirely))
These aren’t magic numbers. They’re calibrated starting points that put you close enough to the extraction window that your first taste gives you useful information, not a cup so far off that you can’t even read the signal.
Barista Jonathan Prestidge, barista and coffee professional, describes his own starting position this way:
“The first stage of dialing in a coffee grinder is to adjust the grind. It starts with the setting used for the previous beans, unless there’s a vast difference in their respective roast profiles. I use a starting dose of 16g and a 50% brew ratio initially.”
That instinct (anchor to something known, then adjust) is exactly the logic behind the sequence. You need a baseline before the data means anything.
Step 2: Taste and Use the Flavor Compass
Brew your first cup at your locked ratio. Then taste it with a purpose, using the flavor compass from earlier in this guide as your diagnostic tool:
- Sour, sharp, thin? Under-extracted. The water didn’t pull enough from the grounds.
- Bitter, dry, hollow? Over-extracted. The water pulled too far and dragged the harsh compounds out.
- Sweet, balanced, complex? You’re in the window. Now you’re just refining.
This taste is your data point. Without it, every adjustment is a coin flip.
Step 3: Adjust Grind Size First
Grind size is the right first lever because it directly controls contact time and surface area, the two things that determine how fast coffee extraction happens. Ratio and temperature modulate the process. Grind size sets the pace of it.
- Sour cup → go finer. Smaller particles, more surface area, longer effective contact time. The water extracts more.
- Bitter cup → go coarser. Larger particles, less surface area, faster flow. The water extracts less.
Make one grind adjustment. Brew again. Taste again. Most of the time, you’ll close most of the gap in this single step.
Step 4: Fine-Tune with Temperature or Time — But Know the Difference
Once grind size gets you close, small temperature adjustments finish the job. Lighter roasts can handle (and often benefit from) water closer to 205°F. Darker roasts tend to go bitter fast at high heat, so pulling back toward 195°F protects the cup.
Time is where most beginners hit a hidden wall, and it’s worth pausing here.
In immersion methods (French press, AeroPress) brew time is a direct variable. You set the clock, you pull the plunger, you control it completely. If your French press tastes over-extracted, steeping for 3 minutes instead of 4 is a real, clean adjustment.
In percolation methods (pour-over, drip) time is an emergent outcome. It results from your grind size, your filter type, and your pour technique. You don’t control it directly. If your pour-over is running long and tasting over-extracted, the instinct to pour faster to shorten contact time is understandable, but it often makes things worse. Pouring faster increases agitation at the bed surface, which can actually accelerate extraction locally even as the total brew time drops.
The correct path on a pour-over is to coarsen the grind. That genuinely increases flow rate, shortens contact time, and reduces extraction, all from one clean adjustment. This is one of those distinctions that separates people who dial in efficiently from people who chase their tail for weeks.
The Same Framework, Every Brew Method
| Method | Starting Ratio | Time Control |
|---|---|---|
| Pour-over | 1:16 | Dependent (grind-driven) |
| Drip machine | 1:16 | Dependent (grind-driven) |
| French press | 1:15 | Direct |
| AeroPress | 1:15–1:16 | Direct |
| Cold brew | 1:8 (concentrate) | Direct (12–24 hrs) |
Same variables. Same sequence. Same flavor compass. Just different starting coordinates.
Dialing In Is the Process, Not a Sign of Failure
Every professional barista goes through this sequence with every new bag of coffee. Different farms, different roast dates, different processing methods, each one shifts the extraction behavior enough that the previous grind setting stops being right. Dialing in isn’t a remedial exercise for people who don’t know what they’re doing. It’s the standard operating procedure for people who do.
The goal on your first brew with new beans isn’t a perfect cup. The goal is useful data. A sour first cup isn’t a failure: it’s the system telling you exactly where to go next.
Here’s the full dial-in process shown in real time, so you can see how the sequence feels in practice: the ratio setup, the taste, the grind adjustment, and the retaste:
When Your Coffee Still Tastes Wrong
You’ve changed one variable at a time, and you’ve been methodical. The coffee still isn’t right. Before you blame your palate or your process, go back to the flavor compass: because the taste defect in your cup is still the most reliable diagnostic signal you have.
Sour means under-extracted. Bitter means over-extracted. But two other defects tell you something different: hollow and thin means your ratio is off (too much water for the dose). Dull and flat almost always points to stale beans or a water chemistry problem, not your technique at all.
The Hidden Variables Most Guides Skip
Once you’ve identified the dominant defect and you’ve already adjusted the obvious variables, the problem is almost certainly hiding in one of four places.
Water quality is the most overlooked variable in home brewing. Water that’s too hard, too soft, or chlorinated doesn’t just taste off: it physically changes how coffee extraction behaves. Hard water’s excess minerals compete with flavor compounds during extraction. Chlorine suppresses the aromatics you’re trying to pull out. If you’ve dialed everything else and the cup still tastes flat or harsh, swap in filtered water for one brew and taste the difference. It’s often dramatic.
Grinder quality sets a hard ceiling on what’s possible. A blade grinder doesn’t grind: it smashes. The result is a mix of fine powder and large chunks in the same dose. Water finds the fine particles first, over-extracts them, then rushes past the large chunks under-extracted. You end up with bitter and sour in the same sip, and no grind setting can fix it because the problem isn’t the setting: it’s the inconsistency of the particle distribution itself.
Bean freshness is a chemistry problem. Coffee loses volatile aromatic compounds steadily after roast. Beans more than three to four weeks past their roast date extract differently: the compounds that create brightness and complexity have already off-gassed. What’s left extracts flat and dull regardless of how precise your technique is. Check the roast date, not just the “best by” date.
Equipment temperature stability is the one most beginners never suspect. Many consumer drip machines never actually reach 195°F. Some espresso machines start a shot at 200°F and finish it at 185°F (which means the first half of the extraction is running hot and the second half is running cold, creating simultaneous over- and under-extraction in a single shot). No grind adjustment fixes that, because the variable causing the problem isn’t grind: it’s an equipment limitation that’s invisible until you know to look for it.
Reading the Troubleshooting Table
| Taste Defect | Likely Underlying Causes | Corrective Actions |
|---|---|---|
| Sour | Bean freshness, ratio, equipment temperature stability, water quality | Use fresher beans; adjust ratio; stabilize temperature; change water |
| Bitter | Grinder quality, equipment temperature stability, ratio, water quality | Adjust grind consistency; stabilize temperature; adjust ratio; change water |
| Hollow | Bean freshness, ratio, grinder quality | Use fresher beans; adjust ratio; improve grind consistency |
| Astringent | Grinder quality, equipment temperature stability, ratio | Improve grind consistency; stabilize temperature; adjust ratio |
| Dull | Bean freshness, water quality, ratio | Use fresher beans; change water; adjust ratio |
| Flat | Bean freshness, equipment temperature stability, ratio, water quality | Use fresher beans; stabilize temperature; adjust ratio; change water |
If you’ve worked through the table systematically (across multiple brew sessions, adjusting one variable at a time) and the same defect keeps showing up, the honest diagnosis is equipment. That’s not a failure of your process. It’s a diagnostic truth. Some machines physically cannot execute what extraction science requires. Knowing that protects your confidence in your palate and your method.
Expert Scott Rao, coffee consultant and author of The Professional Barista’s Handbook and Espresso Extraction: Measurement and Mastery, puts the relationship between measurement and taste exactly right:
“First, Scott Rao emphasised that measuring extraction cannot replace taste (but that when a barista or home brewer combines the two, it can lead to a better understanding of coffee, better tasting coffee, and better consistency in their coffee.”
That combination (your palate reading the signal, your understanding of the framework identifying the cause) is the whole system. Coffee extraction isn’t a set of rules you follow until something goes wrong. It’s a cause-and-effect chain. Every taste defect has a physical origin. Every physical origin has a lever you can reach. Once you understand that chain, you don’t need to memorize fixes: you can reason your way to the right one, on any equipment, with any bag of beans you pick up.
That’s the framework. You own it now.
Key Takeaways on Coffee Extraction
- Grind size is the master variable; changing it shifts the entire extraction curve, so dial it in before adjusting anything else.
- Sour means under-extracted and bitter means over-extracted—your palate is a precise diagnostic instrument, not an opinion.
- Water chemistry silently controls extraction efficiency; if your adjustments don’t work, it’s often the mineral content that’s off.
- Dialing in one variable at a time converts brewing from a guessing game into a repeatable science.
- A burr grinder isn’t an upgrade—it’s the baseline for even extraction; blade grinders guarantee muddled flavor.
Frequently Asked Questions About Coffee Extraction
Q: What is the 80/20 rule of coffee extraction?
A: The 80/20 rule of extraction says grind size drives 80% of your result. Because it controls surface area, it sets the pace for how fast flavor compounds dissolve. Temperature and time fine-tune, but if your grind is inconsistent or wrong, no other variable can fully compensate.
Q: Why does my coffee taste both bitter and sour at the same time?
A: Bitter and sour in one sip signals uneven extraction. When grinds are different sizes—common with blade grinders—fines over-extract into bitterness while boulders under-extract into sourness. The fix is a burr grinder for uniform particles so water extracts evenly.
Q: Do I need a refractometer to brew great coffee at home?
A: No. A refractometer measures extraction yield precisely, but it’s a professional tool. You can dial in perfectly using your palate: sour means push extraction higher, bitter means pull it back. The 18-22% range is a mental model, not a mandatory measurement.
Q: How does bean freshness change extraction chemistry?
A: As coffee ages past three weeks, volatile aromatics off-gas and oils oxidize. These lost compounds are the most soluble and bright-tasting. Extraction becomes flatter because the water has less vibrant material to dissolve, no matter how precisely you brew.
Q: Why doesn’t my expensive espresso machine guarantee great shots?
A: Even high-end machines can have temperature instability—dropping 15°F mid-shot—which creates simultaneous under- and over-extraction. Pair that with a subpar grinder or stale beans, and no machine can rescue your consistency issue.
Q: Can I use the same extraction recipe for light and dark roasts?
A: No. Light roasts are denser and need higher heat (near 205°F) to extract fully. Dark roasts are porous and extract faster; lower temperatures (195°F) prevent bitter over-extraction. Ignoring roast solubility leads to sour or ashy cups.
References
- Understanding Coffee Extraction for Your Perfect Cup – Perfect Daily Grind
- Scott Rao Is One of the World’s Most Influential Coffee Thinkers, and Here’s Why – Sprudge
- Brewing Control Chart – Specialty Coffee Association
- How Hot is Hot Enough? Brew Temperature, Sensory Profile, and Consumer Acceptance of Brewed Coffee – Specialty Coffee Association
- Influence of Brew Temperature on Volatile Compounds in Espresso – ScienceDirect
- Barista Certified Rules for Dialing In Your Coffee Grinder – Perfect Daily Grind
- Scott Rao on Understanding Extraction, TDS & Refractometers – Perfect Daily Grind